Figure 1
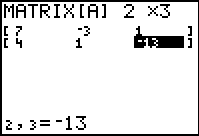
| By now we are aquainted with the steps of getting through the MATRIX menu to EDIT
[A], change the dimensions if need be, and then enter the
values of the coefficients and constants from our equations. This has
been done in Figure 1.
|
Figure 2
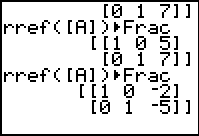
| In Figure 2 we have quit the matrix editor, recalled the command that we want to use,
and performed the command. The resulting matrix yields the solution
x=–2 and y=–5.
|
Figure 3
| Having used the first and second equation and having found a solution, we do have
the option of just seeing if the solution works in the third equation. We could go through the
following restatement,substitution, and simplification:
14x - 6y = 2
14*–2 - 6*–5 ?= 2
–28 + 30 ?= 2
2 = 2
where the "?=" is there because as we do the steps we do not know if it will work.
This shows that the point (–2,–5) does indeed satisfy the third equation and, therefore,
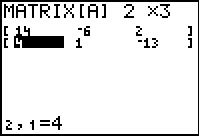
that point is a solution to all three equations. At the same time, we could, as is shown in Figure 3,
modify the matrix to hold the third equation and one of the other two, in this case the second,
and then move to Figure 4 to recall and perform the rref function
to transform those two equations into a solution.
|
Figure 4
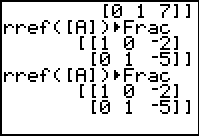
| Indeed, as we expected the solution point for the second and third
equations is the same (–2,–5).
|
Figure 5
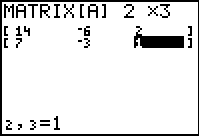
| In Figure 5 we return and, just for completeness, modify the matrix
to hold the first and third equations.
|
Figure 6
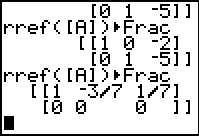
| Performing the rref function gives what is perhaps an unexpected
result. The first and third equations do not intersect at a unique point.
The interpretation of the matrix in Figure 6 is that there are an infinite number of
solutions to the system of the first and third equations, namely,
7x - 3y = 1
14x - 6y = 2
Closer examination of the two equations shows that they are really the same equation.
Therefore, the graph of the first and the third equation is the same line, and it is a
line that itersects the line of the second equation at the point
(–2,–5).
|
Figure 7
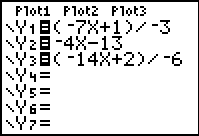
| In order to take a look at the three equations we move to the Y= screen.
All three equations have been put into the appropriate form and entered into that screen.
|
Figure 8
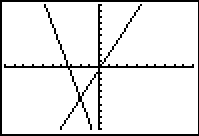
| Move to  these functions. The result is shown in
Figure 8 which is using the ZOOM Standard WINDOW settings.
Of course, in this graph we can see the that there are two lines, one on top of the
other, representing the first and third equations. these functions. The result is shown in
Figure 8 which is using the ZOOM Standard WINDOW settings.
Of course, in this graph we can see the that there are two lines, one on top of the
other, representing the first and third equations.
|
Figure 9
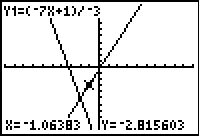
| Moving to the Trace feature via   and then using
  to change the cursor position we can see,
in Figure 9, that we are tracing the first equation (it is shown in the upper
left corner of the screen). to change the cursor position we can see,
in Figure 9, that we are tracing the first equation (it is shown in the upper
left corner of the screen).
|
Figure 10
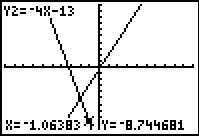
| Using the  key moves the trace to the second
equation, again shown in the upper left corner. key moves the trace to the second
equation, again shown in the upper left corner.
|
Figure 11
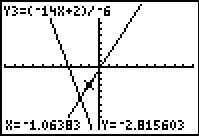
| Finally, using the  key one more time
moves the trace to the third
equation, again shown in the upper left corner. key one more time
moves the trace to the third
equation, again shown in the upper left corner.
|


 these functions. The result is shown in
Figure 8 which is using the ZOOM Standard WINDOW settings.
Of course, in this graph we can see the that there are two lines, one on top of the
other, representing the first and third equations.


 and then using
  to change the cursor position we can see,
in Figure 9, that we are tracing the first equation (it is shown in the upper
left corner of the screen).

 key moves the trace to the second
equation, again shown in the upper left corner.

 key one more time
moves the trace to the third
equation, again shown in the upper left corner.
 key, whereas on the TI-83 Plus
requires 2 keys to achieve the same result, namely, the
 key.
The text below will be done from the perspective of the TI-83. That is, all
reference to the MATRIX key will be demonstrated via the
 .
In addition, the
  key may be shown as
  and the
  , again to save space.