| Figure 1 |
|
|
This page is based on the installation of R on a Mac computer using the Firefox web browser.
The process took place on August 6, 2015. The standard version of R
at that time was 3.2.1.
Please understand that web pages change, software changes,
and installation systems change. Thus, what is recorded here, although true at the moment of
recording, may have changed by the time you read this.
Also, as I hope is obvious, the images below have been annotated, in GREEN, to show you where you need to point and click. |
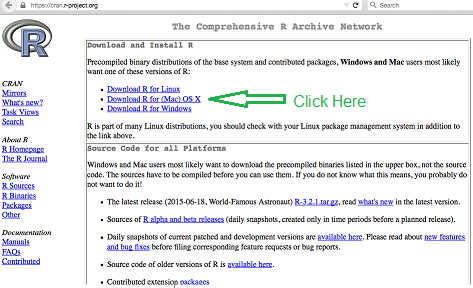
To install R, we will go to the Comprehensive R Archive Network at the cran.r-project.org web site. This should open a page, the top of which should appear as shown in Figure 1.
| Figure 1 |
|
|
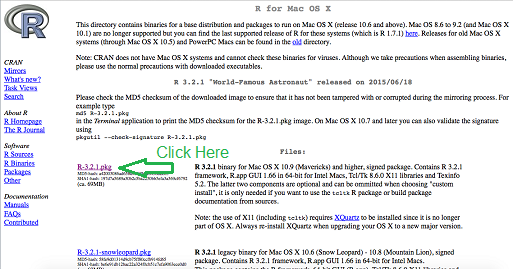
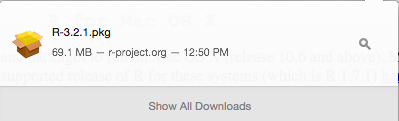
Since we are trying to install R on a Mac machine, we will click on the "Download R for (Mac) OS X" link on that page. Doing so should take us to a new page, the top of which is shown in Figure 1.5.
There are many choices for us, depending upon the operating system that we are using. The machine used here was running Yosemite which was a follow-on to Mavericks. Therefore, we click on the R–3.2.1.pkg link on that page.
| Figure 1.5 |
|
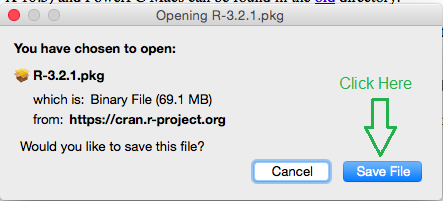
This opens a small window, shown in Figure 2, that would allow us an early exit if we had made a mistake, or allows us to continue by clicking on the "Save File" button, which we do.
| Figure 2 |
|
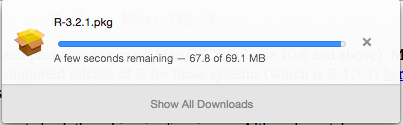
Figure 3 shows the window that pops up to show our progress. We just sit back and enjoy this. It will disappear when the download is completed.
| Figure 3 |
|
Once the download process completes, you may see any number of different things depending upon the browser that you are using and the settings for that browser. As noted above, this particular set of screen captures was done using the Firefox browser. To get to Figure 4 we have clicked on the download icon on the Firefox toolbar. If we then click on the R-3.2.1.pkg in that window the computer will start the process of actually installing the software.
| Figure 4 |
|
Note that if you are using a different browser, Internet Explorer, Opera, Safari, Chrome, etc., then there will be some way for you to do the same thing. Even if you cannot find that similar way, you could use the Download icon on the bottom applications bar to find and run the file.
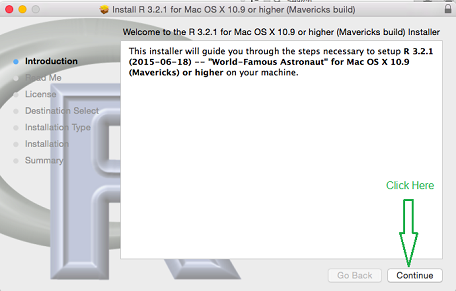
Once you have started to run the program it will open the screen shown in Figure 5. The actual "steps" to the installation are listed on the left side of the window. This is but the first step, giving an introduction. We will just click on the "Continue" button to move to the next step.
| Figure 5 |
|
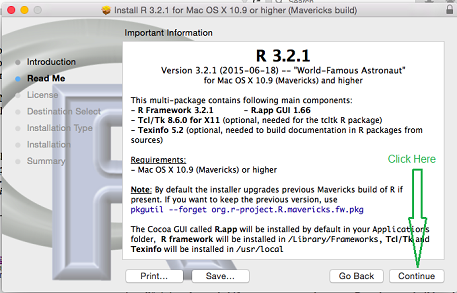
In Figure 6 we see the "Read Me" information. This is actually informative, but for us, at this point, we really just want to install R on this machine without any other concerns so we just click on then "Continue" button.
| Figure 6 |
|
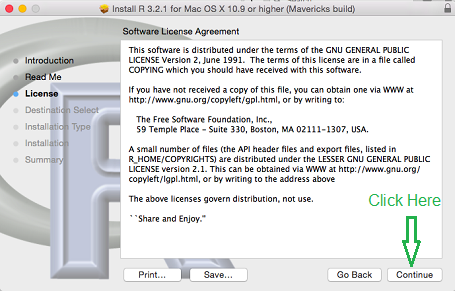
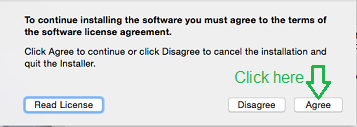
This brings up the Software License Agreement shown in Figure 7. Of course this is worth reading. Then, click on the "Continue" button.
| Figure 7 |
|
Having pointed us to the Software License Agreement in Figure 7, the installation program now asks us for a formal agreement with that license. To move on we click on the "Agree" button.
| Figure 8 |
|
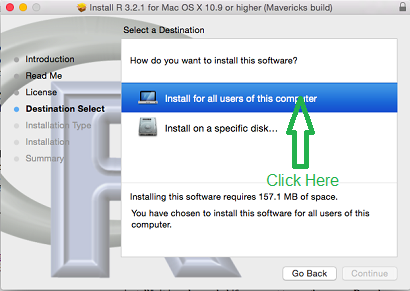
The title for the screen shown in Figure 9 is "Select a Destination." The second option seems to be an open ended question of which disk to use for the installation. Most of our computers have but one disk to this is not much of an option. When the screen appears it already has the first option, "Install for all users of this computer", highlighted. Furthermore, as shown in Figure 9, the "Continue" button is not available. We will actually have to click on one of options, I suggest clicking on the "Install for all users of this computer" option, in order to get the computer to make that "Continue" button available.
| Figure 9 |
|
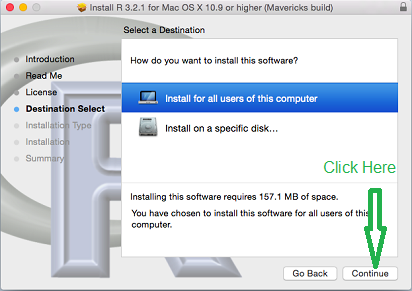
Once the "Continue" button is "active", as shown in Figure 9.5, then we can just click on it to move to Figure 10.
| Figure 9.5 |
|
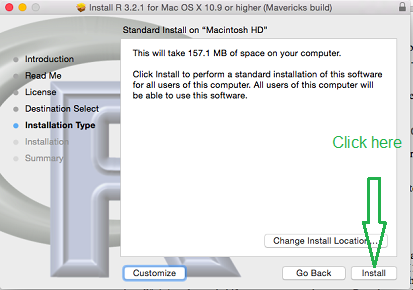
The screen shown in Figure 10 actually dies give us some options, if we wish to "Customize" the installation, or "Change Install Location", but we can just move on to the next screen by clicking on the "Install" button.
| Figure 10 |
|
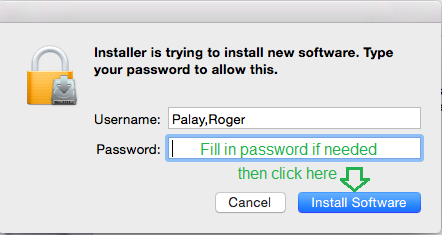
The screen shown in Figure 11, came up during my installation. It is simply a verification that I am the authorized user of this computer. If you get a similar screen, just supply your password for this computer and click on the "Install Software" button.
| Figure 11 |
|
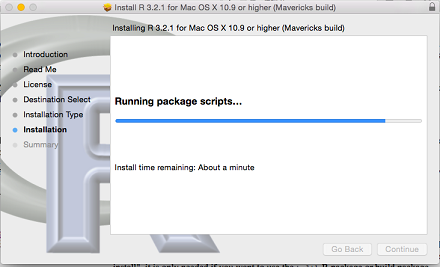
The screen shown in Figure 12 just shows the progress of the installation. As software installations go, this should not take too long.
| Figure 12 |
|
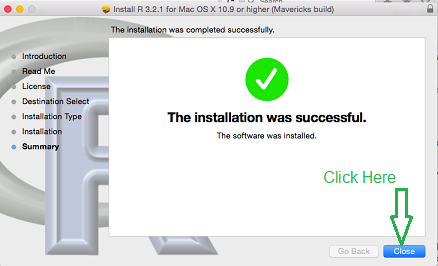
That concludes the installation of R on the computer.
| Figure 13 |
|
To leave the screen shown in Figure 13, just click on the "Close" button.
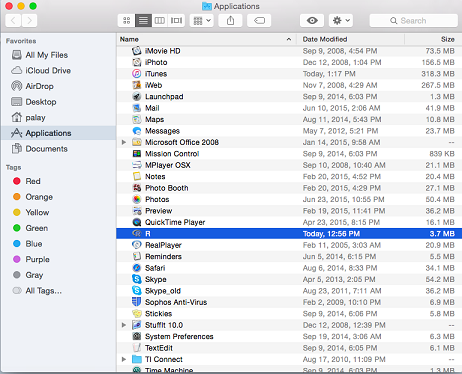
Although the software is now installed, we might want to make it easier for us to start it. To that end, in Figure 14, we have opened the "Finder", and clicked on the "Applications" item in the left panel. Then, in the right panel, if need be, we have scrolled to so be able to see and highlight the R application entry.
| Figure 14 |
|
From there we can
| Figure 15 |

|
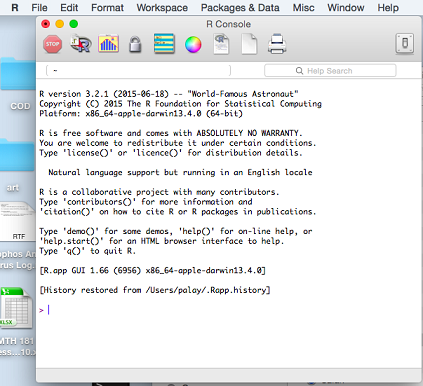
At this point we will try to at least run R. Using any of the methods noted above, we start the R program and it opens a screen shown in Figure 16.
This "splash" screen will appear each time we start R. Toward the bottom of the screen you will see that there are hints on how to get a demo, how to get help, and even how to quit. We will just quit the system.
| Figure 16 |
|
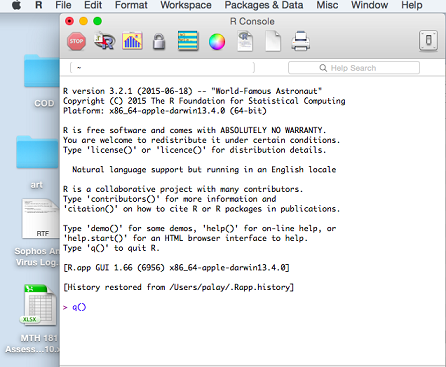
Using the method given in Figure 16, we will just type q() at the prompt on the window. This is shown in Figure 17 below.
| Figure 17 |
|
Having typed the q() command we press the "Enter" key to tell R to perform the command.
Quitting R is not a step to be taken lightly. Therefore, R takes this opportunity to ask if you are really serious (you could "Cancel" the action) and if you are serious, then do you want R to save the "workspace". Saving the workspace should allow you to restart R later and at least restore any values (i.e., work) that you have done to this point. We will talk about this in more detail in a later web page.
| Figure 18 |
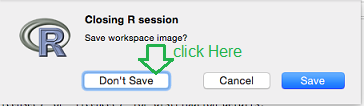
|
We have not done anything so we might as well just tell R not to save the workspace by clicking on the "Don't Save" button.
That closes R and ends the task of installing R on a Mac computer.
©Roger M. Palay
Saline, MI 48176 August, 2015