Figure 3

|
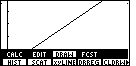
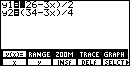
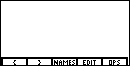
The only important point of this screen is that it shows the menu on the bottom line.
If there are graph lines on the screen we will want to remove them.
Removing such graphs will be demonstrated below, around Figure 4b.
We would like
to check on the range of values, so we select the RANGE option by typing  .
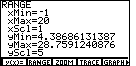
This produces a screen similar to the following picture. .
This produces a screen similar to the following picture.
|
Figure 4
|
You may have different values. That is just fine because we will now set the values
to the ranges that we want. Do this by using the cursor control keys to move up or down the list,
typing in new values where needed. The following screen reflects a change of values that
will have X running from -1 to 20, and y going from -10 to 30.
|
Figure 4a
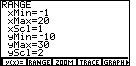
| Note that I chose the yMin to be -10, even though our values do not go down that far.
The choice was made so that the y-axis would be elevated off the bottom of the
display. This helps later when the graph is displayed and there are menus along the bottom of the screen
that cover up the graph. By using -10 for yMin, the menus will be covering up areas that
are not important to the values being graphed.
|
Figure 4b
 |
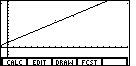
Get out of the RANGE display by using  .
This will take you back to a blank screen, as in Figure 2. If the screen is blank,
as was Figure 2, then you may want to skip ahead to Figure 5. .
This will take you back to a blank screen, as in Figure 2. If the screen is blank,
as was Figure 2, then you may want to skip ahead to Figure 5.
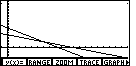
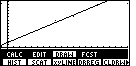
Figure 4b demonstrates a
graph that has the appropriate range, but also has some left over lines on it.
We will want to remove those lines since they will interfere with our work here.
|
Figure 4c
 |
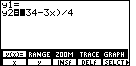
Our first step in the process of removing the left over lines is
press the  key to select "y(x)=" from the menu.
This will bring up a screen similar to the one shown in Figure 4c. On your screen
you may have one or more equations. Figure 4c shows two. We can eliminate the
first equation by pressing the key to select "y(x)=" from the menu.
This will bring up a screen similar to the one shown in Figure 4c. On your screen
you may have one or more equations. Figure 4c shows two. We can eliminate the
first equation by pressing the  key. key.
|
Figure 4d
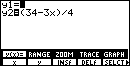 |
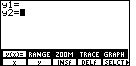
Figure 4d shows the effect of pressing the key.
Having cleared the first equation, we can use the down arrow key  to
move to the next equation if there is one. If there are no more equations, then we are done
and we can close this screen and then move directly to Figure 5.
We can close this window by using the
key. to
move to the next equation if there is one. If there are no more equations, then we are done
and we can close this screen and then move directly to Figure 5.
We can close this window by using the
key.
|
Figure 4e
 |
Now that we have the cursor on the second equation, we repeat the process
by pressing the key to eliminate that equation.
|
Figure 4f
 |
Once all of the equations have been removed, we can use the
key to leave this window.
|
Figure 5
| Now use the
  buttons to open the LIST menu.
This should produce a screen as seen to the left in Figure 5. Note that the menu has the { and }
characters assigned to the and keys,
repectively. Lists on the TI 85 are enclosed in curly braces. There is no key assigned to the
curly brace. Thus, when we want to type a curly brace we need to open the LIST menu so that we can use
the F1 and F2 keys. buttons to open the LIST menu.
This should produce a screen as seen to the left in Figure 5. Note that the menu has the { and }
characters assigned to the and keys,
repectively. Lists on the TI 85 are enclosed in curly braces. There is no key assigned to the
curly brace. Thus, when we want to type a curly brace we need to open the LIST menu so that we can use
the F1 and F2 keys.
|
Figure 6
|
Now, use the button to generate the left curly brace.
The screen shoud appear
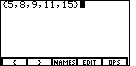
as in Figure 6. We will now complete the list which will hold our x values. To do this
we type the elements of the list, separated by a comma. In our example we want the values
5, 8, 9, 11, and 15. So we enter  


|
Figure 7
|
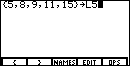
Then, to finish off the list, we will add the closing curly brace by typing
. The result should be the screen to the left, in Figure 7.
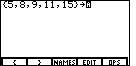
Having created a list, we want to save it, or rather we want to STORE it in a variable.
The  key generates the store arrow on the screen. key generates the store arrow on the screen.
|
Figure 8
| Now we need to give the list a name. We will use L5 for this list.
The TI-85 has already moved into alphabetic mode as signaled by the
change in the cursor.
|
Figure 9
| To arrive at the name L5, press  to produce the "L".
Then, to get out of alphabetic mode, press to produce the "L".
Then, to get out of alphabetic mode, press  and follow that by
pressing . This should leave the screen looking like Figure 9.
Finally, press and follow that by
pressing . This should leave the screen looking like Figure 9.
Finally, press  . .
|
Figure 10
|
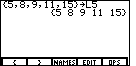
The TI-85 responds by displaying our L5 list as the answer, this time without the commas.
Now we need to enter the second list, the y values, and store it in a variable we will call L6.
|
Figure 11
|
Use to get the {,
  and to get the }.
Then,
and to get the }.
Then,

|
Figure 12
|
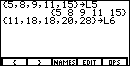
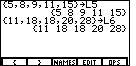
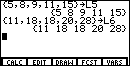
Use the key to submit the new list. Again, the TI-85
responds by displaying the newly entered list, as in Figure 12.
|
Figure 13
|
Now that the data has been entered, we need to use the statistical functions to do
the linear regression. Press  .
This will close the LIST menu of Figure 12 and generate the STAT menu at the bottom of Figure 13. .
This will close the LIST menu of Figure 12 and generate the STAT menu at the bottom of Figure 13.
|
Figure 14
|
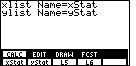
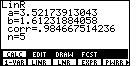
We want to do some calculations in the statistical area. We use
to select CALC from the menu. This will open a new menu and it will display two prompts at the
top of the screen. The new menu gives the names of LISTs that have been defined on the calculator.
This menu will change over time as new LISTs are created or old ones are deleted.
|
The TI-85 wants to do statistical calculations using a list for the x values and one for the y values.
The screen that is presented in Figure 14 is telling us that the default is set to use the predefined list called
xStat for the list of x values, and the predefined list called yStat for the y values. However, we put our lists
into L5 and L6. We need to tell the calculator to use those lists instead of the default.
For completeness, I have constructed the following table to show all of the
values that would have to be computed to use the formula given in the book.
 to display a screen similar to this.

 .
This will bring up the graphing screen such as
.
This will bring up the graphing screen such as
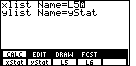
 to select
L5 from the menu to replace xStat for the xlist Name. The display should be similar to
Figure 15.
to select
L5 from the menu to replace xStat for the xlist Name. The display should be similar to
Figure 15.
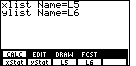
 L6
from the menu to replace yStat for the ylist Name.
Press
L6
from the menu to replace yStat for the ylist Name.
Press 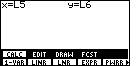

 to select VARS. This opens a new menu, as shown at the bottom of Figure 23. The variables
that we want to see are not in this part of the new menu. Therefore, press
to select VARS. This opens a new menu, as shown at the bottom of Figure 23. The variables
that we want to see are not in this part of the new menu. Therefore, press