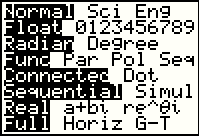
 key to select the
desired option.
To get out of the review of modes, press the
key to select the
desired option.
To get out of the review of modes, press the | x | 5 | 8 | 9 | 11 | 15 |
|---|---|---|---|---|---|
| y | 11 | 18 | 18 | 20 | 28 |
 to display a screen similar to this.
|
| All of the options on the left,
and only the options on the left, should be highlighted. If your screen does
not appear like this, then you should fix it. Use the cursor control keys to move up and down,
left and right on the screen. Then use the key to select the
desired option.
To get out of the review of modes, press the |
|
If the screen is not blank, press the Next, we want to prepare for an eventual graph of the solution. Therefore, before we even start working on the data, we look it over and determine that we want to graph x values from -1 to 20, and y values from -10 to 30. We need to check the WINDOW settings to be sure that those settings are set the way we want them to be set. |
 .
This will bring up the graphing screen such as
.
This will bring up the graphing screen such as
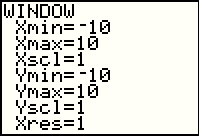
| You may have different values. That is just fine because we will now set the values to the ranges that we want. Do this by using the cursor control keys to move up or down the list, typing in new values where needed. The following screen, Figure 1, reflects a change of values that will have X running from -1 to 20, and y going from -10 to 30. | ||||||||||||

| Note that I chose the yMin to be -10, even though our values do not go down that far.
The choice was made so that the y-axis would be elevated off the bottom of the
display. This helps later when the graph is displayed because puts the origin, (0,0),
onto the graph. The Yscl value was set to 2 so that the "tick" marks on the Y-axis are not on top of one another.
We chanck out the sup[posedly empty graph by pressing the
 key. The result is on the calculator used here is given in Figure 2. key. The result is on the calculator used here is given in Figure 2.
| ||||||||||||
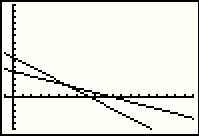 |
If your screen looks like Figure 7 instead of having extraneous lines on it,
as does Figure 2, then feel free to skip to Figure 7.
The lines here, on Figure 2, are left over from
some earlier work on this calculator.
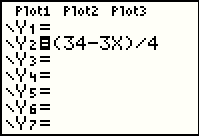
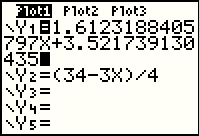
We want to clear off those lines. In order to do that we need to see the
equations that generate the lines. To do this we move to the Y=
screen by pressing the | ||||||||||||
 |
There are two methods to removing the lines from the screen.
The first is to just press the | ||||||||||||
 |
Figure 4 shows the effect of pressing the  to
move to the next equation if there is one. Here we can demonstrate an alternative method to
hiding the graph for this second equation.
Note, back in Figure 3 and in Figure 4, that the equal sign is given in reverse
shading, i.e., the character has a black background and the equal sign is in white.
This indicates, in Figure 3, that the first two equations are "active" while in Figure 4 the only "active" equation
is the second one. We can use the key to move the cursor highlight
doen to the second equation and then the to
move to the next equation if there is one. Here we can demonstrate an alternative method to
hiding the graph for this second equation.
Note, back in Figure 3 and in Figure 4, that the equal sign is given in reverse
shading, i.e., the character has a black background and the equal sign is in white.
This indicates, in Figure 3, that the first two equations are "active" while in Figure 4 the only "active" equation
is the second one. We can use the key to move the cursor highlight
doen to the second equation and then the  key to move the cursor over the
equal sign. The result should be Figure 5. key to move the cursor over the
equal sign. The result should be Figure 5.
| ||||||||||||
 |
Now that we have the cursor on the second equation, we implement the alternative method by
pressing the key. When the cursor is over the equal sign, pressing the
Enter key will reverse the "active"/"inactive" status of the equation.
The result is in Figure 6.
| ||||||||||||
 |
Here we see that the first equation is removed and the
second one is in an "inactive" status.
We could reactivate this second one if we desired by again changing its status.
The old first equation is lost and we would have to re-enter it to get it back on the screen.
At this point we press
the
key to leave this window and see the benefits of our work.
| ||||||||||||
 |
Now we have a blank graph with appropriate axes. Press the
| ||||||||||||
 |
To do this regression we need to enter the data as two lists, the x
values go into one list and the y values go into another.
A "list" on the TI-83 is a sequence of numbers, separated by commas, and enclosed in
curly braces. We use the sequence   button to generate the left curly brace.
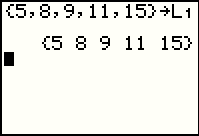
We will now complete the list which will hold our x values. To do this
we type the elements of the list, separated by a comma. In our example we want the values
5, 8, 9, 11, and 15. So we enter
button to generate the left curly brace.
We will now complete the list which will hold our x values. To do this
we type the elements of the list, separated by a comma. In our example we want the values
5, 8, 9, 11, and 15. So we enter  


 . We close the list with the sequence
 . Now we want to store
the list that we entered. press the . Now we want to store
the list that we entered. press the  key for the "store" character, the right pointing
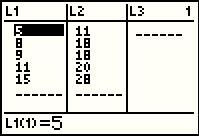
arrow. We will store the list in one of the built-in lists, namely L1.
To do this press This produces the
screen shown in Figure 8. key for the "store" character, the right pointing
arrow. We will store the list in one of the built-in lists, namely L1.
To do this press This produces the
screen shown in Figure 8.
| ||||||||||||
 |
Then, to finish the process, press
. The result should be the screen to the left, in Figure 9.
The TI-83 displays the list again.
| ||||||||||||
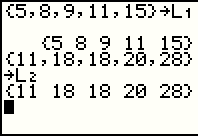 |
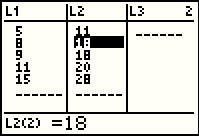
Now we need to give enter the y values into a list that we will store in L2.
The key sequence to do this is
to get the {,
  and
to get the }.
Then,
, followed by
and
to get the }.
Then,
, followed by
| ||||||||||||
|
|
Let us take a look at out points. We press the
but the result may look like figure 10a. [If it looks like Figure 14 you can skip to that Figure.)
The problem with Figure 10a is that we might not have told the TI-83
to turn on the plotting of points stored in the lists L1
and L2. We need to look at the calculator settings for STAT PLOT
| ||||||||||||
 |
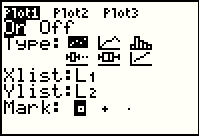
In order to be sure that the calculator is set to display or plot our points.
press  to open the screen
in Figure 11. In that screen we see that all three of the plots are OFF.
We want to turn on the first one. That is the highlighted option so we press
to move to Figure 12. to open the screen
in Figure 11. In that screen we see that all three of the plots are OFF.
We want to turn on the first one. That is the highlighted option so we press
to move to Figure 12.
| ||||||||||||
 |
It is hard to show the blinking light in Figure 12, but it is on the On
option. Use the key to select that option.
This moves is to Figure 13.
| ||||||||||||
 |
We are ready to see the plot of the points. To do this
press the key.
| ||||||||||||
 |
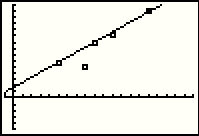
Finally, we see the plot of the points from the problem we were given. We still have to find and eventually graph the linear regression equation. | ||||||||||||
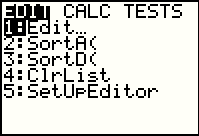 |
To open the Figure 15 screen, press the  key. key.
| ||||||||||||
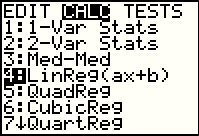 |
Press  to move the
highlight to the CALC option. In this screen we want option 4.
We could do this simply by pressing the 4 key or by using the down arrow to
move the highlight to the 4th option, as shown in Figure 16, and then press the
key to move forward. to move the
highlight to the CALC option. In this screen we want option 4.
We could do this simply by pressing the 4 key or by using the down arrow to
move the highlight to the 4th option, as shown in Figure 16, and then press the
key to move forward.
| ||||||||||||
 |
The TI-83 merely pastes the selected command from Figure 16 onto the main screen. To
perform that command, press the .
| ||||||||||||
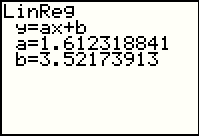 |
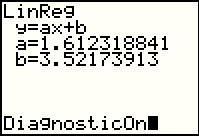
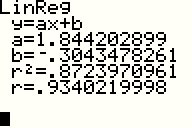
The LinReg(ax+b) command has the TI-83 do a linear regression on the
set of points stored in the L1 and
L2 lists.
The results are displayed in Figure 18. From that we see that the
regression equation is key, we get the graph in Figure 18a.
| ||||||||||||
|
|
This is not what we want. There should be a line, the graph of the regression equation, here.
The problem is that although the TI-83 calculated the regression
equation, it did not put that equation into the
Y= screen. To see that screen press the | ||||||||||||
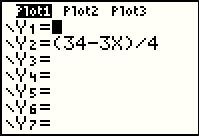 |
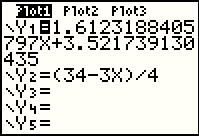
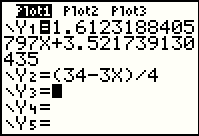
Figure 19 shows the Y= screen. We need to place the regression equation here.
We could just type in the equation, but that is asking for a lot of key-strokes. Beside
the inconvenience, we would have to have written down the equation since we can
no longer see it on the calculator screen. The TI-83 provides an alternative to typing the equation.
We press the  key to get Figure 20. key to get Figure 20.
| ||||||||||||
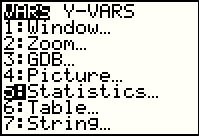
 |
Figure 20 provides a selection of variables. We want the Statistics sub-menu, option 5. We could press the 5 key to do this or we could use the down arrow to move the highlight to option 5, This is the approach shown here to move to Figure 21. | ||||||||||||
 |
Press to select the move to the Statistics sub-menu.
| ||||||||||||
 |
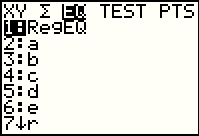
Here we have many options, but the one we want is not on this screen. Instead,
we will need to press the right arrow twice,
,
to highlight the EQ selection. This will move us to Figure 23.
| ||||||||||||
 |
Fortunately, the thing we want is the first item, RegEQ. We could select it by pressing the 1
key or, since it is currently highlighted, press the key.
| ||||||||||||
 |
The result of our Figure 23 action is that the calculator has pasted the entire regression equation into our
Y= screen. We are ready to look at the graph. Press | ||||||||||||
 |
Finally we have a graph of the plot of points and of the regression equation. |
Of course, the next problem is to find the correlation coefficient for this regression. The
good news is that the TI-83 would have been happy to find this if we had set it up properly.
We need to turn on the Diagnostics. To do this the TI-83 has a special command.
To find that command we need to look in
the CAATALOG which we do by pressing .
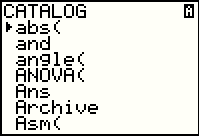 |
Figure 25 shows the start of the CATALOG. We are looking for the
DiagnosticOn command. We could use the cursor key to move down through the
list of commands, but a small shortcut is to press the  key
to skip to the D's in the list. [We choose the x-1 key because it is assigned to the
alphabetic letter D.] key
to skip to the D's in the list. [We choose the x-1 key because it is assigned to the
alphabetic letter D.]
|
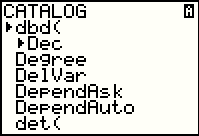 |
Now that we are closer to our goal,
repeat pressing the key to move the highlight down to the DiagnosticOn
command, as shown in Figure 27.
|
 |
Press to select the DiagnosticOn option.
|
 |
The command has been pasted onto the main screen. Press
to execute the command.
|
 |
The caculator responses with DONE. |
 |
We now return to the STAT window by pressing the
key. We move to highlight the CALC sub-menu by pressing the
key. We highlight the fourth option by moving the cursor down
using the key. Then we press the
key to paste the command onto the main screen, as in Figure 31.
|
 |
Press key
to execute the command.
|
 |
Figure 32 gives the same regression equation, but it also givess the value of the correlation coefficient, r, along with the value of r2. |
For completeness, I have constructed the following table to show all of the values that would have to be computed to use the formula given in the book.
| x | y | x^2 | xy | y^2 | |
| 5 | 11 | 25 | 55 | 121 | |
| 8 | 18 | 64 | 144 | 324 | |
| 9 | 18 | 81 | 162 | 324 | |
| 11 | 20 | 121 | 220 | 400 | |
| 15 | 28 | 225 | 420 | 784 | |
| TOTAL | 48 | 95 | 516 | 1001 | 1953 |
| x | 5 | 8 | 9 | 11 | 15 |
|---|---|---|---|---|---|
| y | 11 | 10 | 18 | 20 | 28 |
 |
Press to get to the STAT window and then, since the first option, Edit is
highlighted, press to get to FIgure 34.
|
 |
The calculator displays the lists that are defined. Use the key
to move to the second list and then to highlight the incorrect value, 18.
|
 |
Press
to enter the correct value for this item. This will be displayed at the bottom of the
screen, as it appears in Figure 36.
|
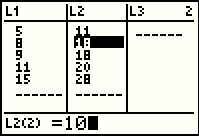 |
Now press to accept that new value.
|
 |
The list has been changed and all of the correct values are here. |
 |
Pressing
redisplays the data.
We can see that the second data point has moved.
However, the regression line has not changed. This is because we have not redone the
calculation of the regression line
based on the new data.
|
 |
Press the key and the calculator pastes the command
onto the main screen. We can see this in Figure 39, along with the results from our
previous run of the command.
|
 |
Press to run the command.
|
 |
New results appear on the screen represented in Figure 41. Note that all of the values have changed. |
 |
We might think that we can look at the new regression line, so we press
only to see that the graph has not changed.
|
 |
Returning to the Y= screen via the
key we see that the old equation is still there.
We could replace it or make it inactive, but for our purposes we
will just let it stay there.
|
 |
Instead we will move the highlight down to the Y3= line. |
 |
Then use the key to open the window shown in
Figure 45. Then use the cursor down charactrer to move the highlight to item 5,
Statistics.
|
 |
Use the cursor right key to highlight the EQ sub-menu. |
 |
Press the
key to paste the equation into
the Y3= field.
|
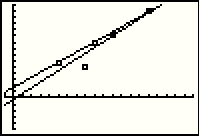 |
Now press to display the graph, where we see both the new
regression line and the old one, and the new points.
|
©Roger M. Palay
Saline, MI 48176
August, 2010