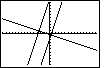
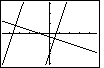
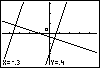
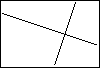
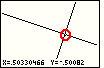
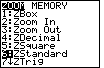
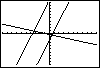
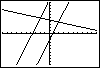
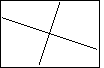
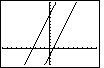
As we look at Figure 27, we might be concerned by the fact that the
graph of the last function does not appear to be perpendicular to the
graphs of the first two functions. Each of the first two functions has slope=3.
The last function has slope=-1/3. We may know that lines with slopes that multiply to be -1 are
supposed to be perpendicular, that is, they should meet in a 90° angle.
However, looking at Figure 27, those lines do not appear to be perpendicular.
The problem is in the WINDOW settings. The screen on the calculator has
many more points going across the screen than it does going up and down the screen.
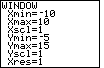
Therefore, with a ZStandard setting, where
the x-values go from -10 to 10 and the y-values
go from -10 to 10, the screen is essentially stretched left and right to use the extra
horizontal points on the screen.
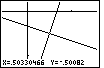
The screen is made up of lots of dots, called pixels (for picture elements),
arranged in rows and columns. There are only so many
vertical pixels and there are more horizontal pixels.
The Y-values are spread from -10 to 10 across the vertical pixels.
The X-values are spread from -10 to 10 across the horizontal pixels.
Because there are more horizontal pixels, the horizontal dot-to-dot
change in value is different from the vertical dot-to-dot change in value.
The result of this is that lines that should be perpendicular
do not appear to be perpendicular. Also, lines with a slope just slightly more than 1 will
appear as lines sloping at less than 45° from the horizontal. It would be nice if we had some
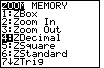
way to correct for this "stretching", and we do. The calculator has a ZOOM option that adjusts
the WINDOW settings so that it compensates for the extra width in the screen.
Figure 29

| For Figure 29 we have moved back to the ZOOM screen by
pressing the  key. The option that we want is
5:ZSquare and we have used to key. The option that we want is
5:ZSquare and we have used to  key to move the
highlight down to that option. Now, to move to Figure 30, pess the key to move the
highlight down to that option. Now, to move to Figure 30, pess the
 key key |
Figure 30
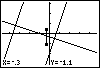
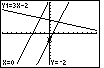
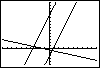
| Once we have selected the ZSquare option, the
calculator re-displays the graph, as shown in Figure 30. Here we note that the
third graph does seem to be perpendicular to the other two graphs. Furthermore,
the slope of the first two graphs corresponds a bit better to our expectation for
a slope of 3. Let us see what the ZSquare option did to the settings
in the WINDOW screen.
|
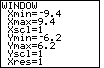
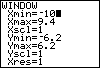
Figure 31
| We move back to the window screen by pressing the
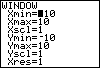
 key. The result is given in Figure 31. Note that the
Ymin and Ymax values remain as before in Figure 28.
However, the Xmin and Xmax values
have been changed so that we have a wider Domain. The new values mean that the
dot-to-dot change in values on the x-axis corresponds
to the dot-to-dot change in values on the y-axis.
Therefore, with these settings, graphs will look more the way that we expect them to appear. key. The result is given in Figure 31. Note that the
Ymin and Ymax values remain as before in Figure 28.
However, the Xmin and Xmax values
have been changed so that we have a wider Domain. The new values mean that the
dot-to-dot change in values on the x-axis corresponds
to the dot-to-dot change in values on the y-axis.
Therefore, with these settings, graphs will look more the way that we expect them to appear.
|
Figure 32
| The previous Figures demonstrated the ZStandard and
the ZSquare options. Now we will look at another option, the ZDecimal option.
We return to the ZOOM screen via the key.
Then we move the highlight down to the 4:ZDecimal option with the
key. |
Figure 33
| We select the ZDecimal option in Figure 32 by pressing the
key. The result is the graph reproduced in Figure 33.
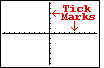
The lines still look perpendicular, but the extent of the graph seems to have been cut down.
Judging by the tick-marks, the x-values run from somewhere less than -4 to somewhere
over 4, and the y-values go from just less than -3 to slightly more than 3.
|
Figure 33a

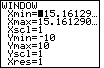
| If we press the key we return to the WINDOW
screen and we can see what ZDecimal has really done.
Figure 33a shows us the new values with
the blinking cursor covering the negative sign.
The 4.7 and 3.1 values are just about what we guessed from looking at
Figure 33.
It just so happens that there are 63 vertical pixels and 95 horizontal pixels on the
TI-83 screen. By choosing the values shown in Figure 33a, the calculator is
making sure that moving one pixel left, right, up, or down, corresponds to a change
of exactly 0.1. Therefore, we will have pixels at points such as (2.0,3.0) and (-3.4,-1.2).
That is why this setting is called ZDecimal.
|
Figure 34
| The ZOOM options that we have demonstrated so far,
ZStandard, ZSquare, and ZDecimal, have taken immediate effect on
the graph. Now we will look at ZBox, an option that requires us to
press a few more buttons. We return to the ZOOM screen
by pressing the key.
The idea of a ZBox zoom is that we will draw a box around a portion of
the graph. Then we will have the calculator change the WINDOW settings so that
a new GRAPH screen will be that entire box. Let us see how this works. Since 1:ZBox is
already highlighted, merely press the key to select
this option.
|
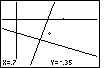
Figure 35
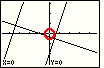
| Figure 35 is the result of starting the ZBox process. It looks
remarkably the same as Figure 33. However, one point, one dot, one pixel, has
changed. The pixel at the origin, circled in red in Figure 35, is now white.
It is marking a possible location for a corner of the box that we will draw. The
coordinates of that pixel are given at the bottom of the screen, namely x=0 and y=0. |
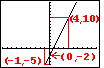
Figure 36
| I want to draw a box around the intersection of the first and third graphs.
To do this I will move the pointer to (-0.3,0.4) by using the
 and and  keys. I have done that
in Figure 36 until I have the pointer at (-0.3,0.4) as noted by the coordinates at the
bottom of the screen. This point will be the upper left corner of the box that I will draw. keys. I have done that
in Figure 36 until I have the pointer at (-0.3,0.4) as noted by the coordinates at the
bottom of the screen. This point will be the upper left corner of the box that I will draw. |
Figure 37
| To signal that this is the location for one corner
we press the key. The calcualtor responds by
placing a small square at the corner point selected. |
Figure 38
| Now we use the key to move the pointer
down to the point (-0.3,-1.1). As we do this, the calculator extends the side of the
box from the corner spot that we selected. |
Figure 39

| We use the  key to move the cursor to the right
until we are at the point (1.7,-1.1), causing the calculator to draw the box from the
specified corner to the pointer. In Figure 39 we can see that box. key to move the cursor to the right
until we are at the point (1.7,-1.1), causing the calculator to draw the box from the
specified corner to the pointer. In Figure 39 we can see that box.
This is the box that we want to expand to the full screen size. To accept this box we press the
key. That will reset the WINDOW settings and it will
re-display the graphs in the new GRAPH screen shown in Figure 40. |
Figure 40
| Figure 40 shows the new display. It is focused onto the box that we drew in Figure 39.
In addition, we are still in ZBox mode.
Note the pointer at position (0.7,-0.35). This is the point
precisely in the center of the box that we drew in Figure 39,
and it is the point in the center of Figure 40.
|
Figure 41
| Figure 41 represents the result of moving the pointer one pixel to the left
and one pixel down
from where it was in Figure 40. We did that by pressing the key
one time, and then presing the key one time.
Notice that we no longer have nice decimal values for the pixels. That is because we have ruined the
required ratio of length to width for the screen. |
Figure 42

| We can continue to box in the intersection of the two lines. We
press the key to mark a corner of our next box.
Figure 42 shows that corner has been set. |
Figure 43
| We use the cursor keys to move to the opposite corner position. The calculator
draws the box around the area we wish to expand to a full screen. Figure 43 shows that box.
We press the key to move to Figure 44. |
Figure 44
| The box that we created in Figure 43 has been expanded to the full screen
of Figure 44. Again our ratios are off so lines that should be (and are) perpendicular
do not appear to be so on the screen. We are still in ZBox mode as noted by the marker and
the coordinate display. |
Figure 45
| Pressing the key
will take us to the WINDOW screen so that we can see just how the ZBox operations that we
have performed have changed the settings.
Note in Figure 45 that the limits on x and y force us to focus in on a small area
of the coordinate plane.
|
Figure 46
| We can return to the ZOOM screen, by pressing , and
we can use one of the earlier options, ZSquare, to adjust the x and y limits to
make our graph have equal vertical and horizontal movements.
As before, we move to highlight the option we want and then we press
to accept that option. |
Figure 47
| Figure 47 shows a new graph, but this time adjusted for equal horizontal and
vertical movement. Note tht the lines appear to be perpendicular, again. |
Figure 48
| Figure 48 shows the result of pressing the key.
The calculator shifts into a mode where it displays a + as a marker, along with the
coordinates of the pixel at the center of the +.
|
Figure 49
| Figure 49 shows the screen as we have moved the + to the right and down,
moving toward the point of intersection of the two lines. |
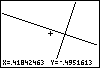
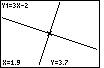
Figure 50
| In Figure 50 we have moved the + as much onto the intersection of the two lines as
we can. It is partially hidden by the lines. The coordinates suggest that we are quite close to the
point (0.5,-0.5).
We might notice that (0.5,-0.5) is a solution to y=3x-2 and to y=(-x-1)/3. In short,
it is the point of intersection.
For the given Xmin, Xmax, Ymin,
and Ymax, the point (0.5,-0.5) is not one of the pixels
on the screen. In a sense it is between pixels. That is why we can get close, but we can not
hit it exactly on the screen in Figure 50. If we were to properly adjust the settings on
the WINDOW screen we could get this to be such a point. (Xmin=0.453, Xmax=0.547,
Ymin=-0.531, Ymax=-0.469 would work.) |
Figure 51

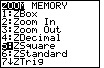
| We will return to the ZOOM screen to try out another option. Press
and then use the key
two times to move the 3:ZOut option, as in Figure 51.
The ZOut option allows us to determine a new center for the graph and then to
increase the horizontal and vertical span around that center point.
Press the key to start the ZOut option. |
Figure 52
| The red circle drawn in Figure 52 is meant to help identify the blinking
pointer that is at the last place we had the + pointer.
We will leave that point where it is and press the key
to finish the ZOut option. |
Figure 53
| The ZOut option has been performed to transform Figure 52 into Figure 53.
The point has not moved, but the graph covers a larger area, as is evidenced by the appearance
of the axes. Also, as expected, our point is now in the center of the screen. And, we are
still in ZOut mode. We can perform the option again merely by
pressing the key, which we do to move to Figure 54. |
Figure 54
| Here we have moved out further. We can even see a portion of the second
function over on the left side. |
Figure 55
| Again, we return to the ZOOM screen via the key.
This time we will investigate the 2:ZIn option.
We move the highlight down to the second line, and then press
to move to Figure 56.
|
Figure 56

| Again, as in Figure 52, there is a marker at the intersection of the
first and third functions.
It is difficult to see the marker because the lines cover it. However, we can notice the
white spot in the intersection. In addition, we are familiar enough with
the graph to use the coordinates to locate the marker. |
Figure 57
| We use the cursor keys, and
, to move the marker closer to the
intersection of the second and third functions.
Figure 57 shows that we have moved the marker. This will be the
center of a new screen where we focus in on this region.
We press the key to
complete the ZIn option. |
Figure 58
| In Figure 58 we see the result of the ZIn option.
The center is where we had set the marker in Figure 57. We now have a
close-up view of this region. And, we are still in ZIn mode, as
noted by the marker. |
Figure 59
| We will move even closer to the point of intersection, using the cursor
keys, and then press to perform another ZIn. |
Figure 60
| In Figure 60 we are so close to the point of intersection that we
have lost the axis from the screen. Note that we are
still in ZIn mode. |
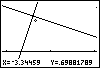
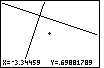
Figure 61
| Repeating the process one more time, we will move the marker so that it is
above and to the right of the point of intersection. This is shown in Figure 61.
Again, press the key to finish the ZIn option. |
Figure 62
| In Figure 62 we have closed in even more than before, but it is
hard to tell from the screen. After all, we are looking at two straight
lines and at their point of intersection. Once we are so close that we
can not see other lines or the axes, the picture just does not change.
We should notice the change if we moved the marker.
Each time we ZIn, we decrease the change in the coordinates
whenever we move the marker one pixel. |
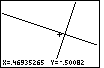
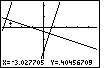
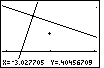
Figure 63
| Even without leaving the ZIn mode, we can move the marker to the point of
intersection to see if we can get a good approximation to the
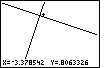
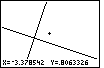
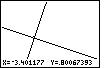
coordinates of that point. From Figure 63, where the marker has been moved
to the approximate point of intersection, we might expect x=-3.4 and y=0.8.
|
Figure 64
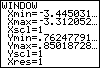
| In Figure 64 we return to the WINDOW screen by pressing the
key. We can see that the entire width of the
graph in Figure 63 represented x-values from about -3.445031
to -3.312052, while the entire screen height represented y-values
from about .76247791 to .8501728. |
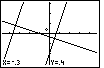
Figure 65
| There is more that we want to demonstrate here. Let us return to the
standard view of the GRAPH. To do this we move to the ZOOM screen
via the key, and then move the highlight to the
6:ZStandard option. |
Figure 66
| We move from Figure 65 to Figure 66 by pressing the
key to accept the ZStandard option. This re-displays the graph.
Notice that we have lost the sense of equal horizontal and vertical scales by doing this.
The lines no longer appear perpendicular.
|
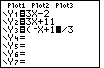
Figure 67
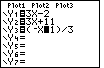
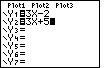
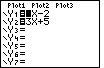
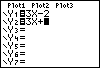
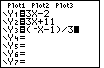
| The next change that we will make will be to modify the third equation
from Y3=(-x-1)/3 to Y3=(-x+13)/3.
To do this, first move to the Y= screen by
pressing the  key.
Then, we use the cursor keys to move the blinking cursor onto the subtraction sign,
as shown in Figure 67. key.
Then, we use the cursor keys to move the blinking cursor onto the subtraction sign,
as shown in Figure 67.
|
Figure 68
| In Figure 67 we positioned the cursor on top of the subtraction sign.
Now we replace that subtraction with a plus sign by
pressing the  key. Then we move to the right
two places by using the key twice.
This leaves us with the blinking cursor on top of the right parenthesis, as is shown in Figure
68. key. Then we move to the right
two places by using the key twice.
This leaves us with the blinking cursor on top of the right parenthesis, as is shown in Figure
68. |
Figure 69
| We want to insert a character here. We move the calculator into INSERT mode
by pressing   .
The blinking block cursor changes to a blinking underline cursor
to indicate that we are in INSERT mode. Figure 69 has been augmented with
a red parenthesis to remind us that the parenthesis character is still there. .
The blinking block cursor changes to a blinking underline cursor
to indicate that we are in INSERT mode. Figure 69 has been augmented with
a red parenthesis to remind us that the parenthesis character is still there. |
Figure 70
| The character that we want to insert is the number 3, so we
press the  key. We have done this in Figure 70. Since we are in
INSERT mode, the 3 is inserted in the text. The blinking underline
cursor moves to the right, along with the rest of the line. Again,
the figure has been augmented with the red parenthesis. key. We have done this in Figure 70. Since we are in
INSERT mode, the 3 is inserted in the text. The blinking underline
cursor moves to the right, along with the rest of the line. Again,
the figure has been augmented with the red parenthesis.
|
Figure 71
| We exit INSERT mode and return to the GRAPH screen
by pressing the  key.
The new plot shows the change in the third equation. key.
The new plot shows the change in the third equation. |
Figure 72
| We have looked at four of the
five keys at the top of the keypad. Let us check out the remaining key.
If we press the  key, the calculator moves
into TRACE mode. The display has been changed by placing a copy of the
first equation at the top of the screen.
In addition, a blinking marker is placed on the first equation, in this case at the point (0,-2).
And the coordinates of the location of the blinking marker have been displayed
at the bottom of the screen. key, the calculator moves
into TRACE mode. The display has been changed by placing a copy of the
first equation at the top of the screen.
In addition, a blinking marker is placed on the first equation, in this case at the point (0,-2).
And the coordinates of the location of the blinking marker have been displayed
at the bottom of the screen.
In TRACE mode, we use the left and right cursor keys to
move the blinking marker along the equation displayed at the top.
We use the up and down cursor keys to make the blinking marker jump from one
equation to the next.
|
Figure 73
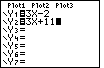
| For Figure 73 we have used just the key
to move the blinking cursor along the first equation.
Note the changing coordinates as you do this.
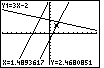
We stop, in Figure 73, when x=1.4893617. |
Figure 74

| To move from Figure 73 to Figure 74 press
the key. This moves the trace from the first
equation, Y1=3X-2, to the second equation, Y2=3X+11. Notice that it is the second
equation that is now displayed at the top left of the screen.
But, where is the blinking cursor? If we look at
the coordinates at the bottom of the screen, we see that the x-value has
not changed from what it was in Figure 73. However, the corresponding y-value
for the second equation is Y=15.468085, a point that is off of the screen.
Therefore, we are tracing the second equation, but our marker is off the screen at this point.
|
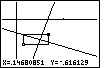
Figure 75
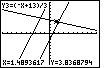
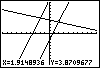
| We can press the key to
jump the trace to the third equation. The x-value has not changed, but the corresponding y-value is
now on the screen. Therefore, we can see the blinking marker sitting on the
third line. |
Figure 76
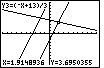
| We will use the key to move that
blinking marker to the intersection of the
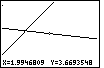
two lines. We can see, in Figure 76, that we are close to the intersection,
that we are tracing Y3=(-X+13)/3, that the x-value is 1.918936 and the y-value is
3.6950355. |
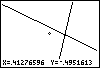
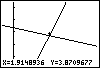
Figure 77
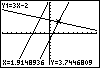
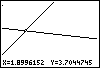
| For Figure 77 we have pressed the key
so that we are again tracing the Y1=3X-2 equation.
The x-value remains unchanged from Figure 76.
However, there is a new y-value, namely, 3.7446809. The two lines are not at the
same y-value for the given x-value. In other words, we are not really at
the point of intersection. Let us zoom in on the picture.
|
Figure 78

| For Figure 78 we have shifted to the ZOOM
screen by pressing the key. Then
we moved down to the ZIn option. To leave Figure 78 and
move to Figure 79 we press the key. |
Figure 79
| In Figure 79 we are in the middle of the ZIn option.
We need to place the blinking cursor at the point we want to be the center of
the new screen. Once that is done, we press
to perform the ZIn option.
|
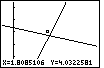
Figure 80
| Here, in Figure 80, we have zoomed in to the area around the point
of intersection. We can see that we are not at the point of intersection,
but we are close. Let us zoom in further, but this time we will use the ZBox option. |
Figure 81

| We return to the ZOOM screen via the
key. ZBox is the default selection.
We need only press the key to start the process,
and move to Figure 82. |
Figure 82
| We are in the ZBox process. We need to place the marker at a corner
of the box that we want to draw. We will use the cursor keys to move the marker
to the position shown in Figure 82. Then we press the
key to set that corner. |
Figure 83
| In Figure 83 we have used the cursor keys to move the cursor to
the opposite corner of the box. The calculator expands the box as we move the cursor.
|
Figure 84
| Pressing the key accepts this point as the opposite corner and
uses that region to define a new area for the next GRAPH screen, shown in Figure 84.
Note that the blinking cursor is right in the middle of the graph, covered a bit by the
line.
|
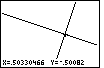
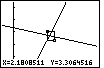
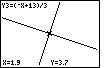
Figure 85
| We can use the cursor keys to move the blinking cursor to the
intersection of the two lines, as has been done in Figure 85.
This gives us a good approximation to the true value of the
coordinates of the point of intersection, somewhere close to (1.9,3.7). |
Figure 86
| In Figure 86 we press the key to move back to the WINDOW screen to check out the
current settings. |
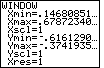
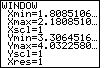
Figure 87
| Rather than use the ZOOM options, we can perform our own ZOOM by
changing the settings on the WINDOW screen. If we want the
point (1,9,3.7) to be at the center of the screen, then we need to change the WINDOW settings
so that those values are exactly between the low and high values for both x and y.
In addition, we recall that the screen is 63 pixels high by 95 pixels wide.
Therefore, we can chose our x-limits as 1.9±0.0047 and our y-limits as 3.7±0.0031.
Those values will not only put the point (1,9,3.7) in the middle, they will also
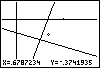
give us a display with equal horizontal and vertical spacing, and they will give us pixels
with coordinates that change by 0.0001 in each direction.
Those values are
shown in Figure 87.
|
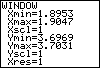
Figure 88
| We press the key to move from Figure 87 to Figure 88.
We observe in Figure 89 that we have been successful in placing the intersection
in the middle of the graph. |
Figure 89
| For FIgure 89 we have moved into TRACE mode by pressing the
key. Note that the first equation is displayed at the top left.
Also, note that the marker is at (1.9,3.7). |
Figure 90
| If we use the key to shift the trace to the third function
we see Figure 90. Again, the marker is at the same point. We have found the exact
point of intersection of the two lines. |
That is all for this page. Hopefully, it has given you a chance to do some graphing and
to learn to use the various keys and options on the calculator.


 . (NOTE: it is essential that we use the
"negative" key,
. (NOTE: it is essential that we use the
"negative" key,  key when we enter this value.
We want a negative value. We do not want to subtract.)
This leaves the screen as seen in Figure 10.
key when we enter this value.
We want a negative value. We do not want to subtract.)
This leaves the screen as seen in Figure 10.


 keys.
The display should match Figure 14.
keys.
The display should match Figure 14.
 .
This produces the changed screen shown in Figure 17.
.
This produces the changed screen shown in Figure 17. 


 key. This is a faster method.
It selects and executes a line in one push of a key. I will not employ that method here because
it is harder to follow with pictures.)
key. This is a faster method.
It selects and executes a line in one push of a key. I will not employ that method here because
it is harder to follow with pictures.)