After demonstrating the use of the linear regression command, this page will go on to
demonstrate the use of two programs that we have available to find the slope between two points, and
to find the equation of the line through those points.
Figure 1
|
In order to use the linear regression command, we will want to make use of two built-in lists,
L1 and L2. We can make sure that those, and in fact all,
lists on the
calculator have been cleared by using the ClrAllLists command. We find that command
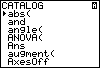
in the Catalog. Press the   keys to open the CATALOG as shown in Figure 1.
|
Figure 2
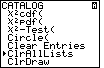
| We can skip down to the "C's" in the catalog by pressing the
 key. Then we use the key. Then we use the  key to move down the catalog to the ClrAllLists command.
 |
Figure 3
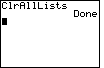
| Press  to paste the command to the main screen,
and press again to perform the command. to paste the command to the main screen,
and press again to perform the command. |
Figure 4

| Also in preparation for our work, we want to set up the Stat Editor.
We move to the STAT screen via the  key.
At this point we are interested in option 5, SetUpEditor. key.
At this point we are interested in option 5, SetUpEditor. |
Figure 5
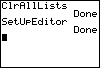
| Again, press  to paste the option onto the
main screen and then press to perform the command. to paste the option onto the
main screen and then press to perform the command. |
Figure 6

| Now, we return to the STAT screen via the key. |
Figure 7
| We select option 1 from Figure 6 by pressing  .
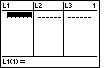
The calculator opens the Stat Editor screen where we find L1,
L2, and L3 displayed (because of our earlier
use of the SetUpEditor command), and we find that all of the lists are empty (because of
our earlier use of the ClrAllLists command). .
The calculator opens the Stat Editor screen where we find L1,
L2, and L3 displayed (because of our earlier
use of the SetUpEditor command), and we find that all of the lists are empty (because of
our earlier use of the ClrAllLists command). |
Figure 8
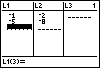
| We want to make Figure 7 become identical to the screen presented in the textbook.
To do this we use   to enter – 1 and then move the highlight to the right, into the
L2 column. Then use
to enter – 1 and then move the highlight to the right, into the
L2 column. Then use  to enter the – 2 and move down one position.
Press
to enter the – 2 and move down one position.
Press  to enter – 8.
Now we need to accept that value. Press which will move the cursor to the
third position in the L2 list, and then to enter – 8.
Now we need to accept that value. Press which will move the cursor to the
third position in the L2 list, and then  to
move the cursor to the L1 list. The cursor will be in the second position
there. Press to specify the – 5
value, and end with to accept that value. to
move the cursor to the L1 list. The cursor will be in the second position
there. Press to specify the – 5
value, and end with to accept that value.
|
Figure 9
| We leave the lists shown in Figure 8 and return to the STAT menu by
using the key. |
Figure 10
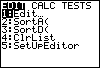
| The option that we want is not in the menu for Figure 8. However,
press to display the CALC submenu shown in Figure 9.
Here we find the desired command as the fourth option. |
Figure 11
| Press  to select the LinReg(ax+b)
option from Figure 10 and to paste it onto the main screen, as shown in Figure 11. to select the LinReg(ax+b)
option from Figure 10 and to paste it onto the main screen, as shown in Figure 11.
|
Figure 12
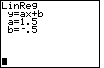
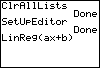
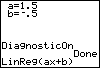
| All that remains is to press  to perform the command.
The result is shown in Figure 12. These are the values for the linear equation that are
given in the text. However, we seem to be missing the r2 and the r values
that are on the screen image in the textbook.
We have not made a mistake. Those values only appear if a particular switch is
set on the TI-83. to perform the command.
The result is shown in Figure 12. These are the values for the linear equation that are
given in the text. However, we seem to be missing the r2 and the r values
that are on the screen image in the textbook.
We have not made a mistake. Those values only appear if a particular switch is
set on the TI-83. |
Figure 13
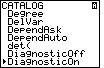
| To set that switch we return to the CATALOG screen,
, jump to the "D's",  ,
and then use the to highlight the
DiagnosticOn command. ,
and then use the to highlight the
DiagnosticOn command.
|
Figure 14
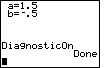
| will paste the command to the main screen, and
will perform the command. |
Figure 15
| We can recall the earlier command via the sequence
. |
Figure 16
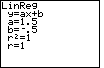
| We can execute the command in Figure 15 by pressing the
key. Figure 16 shows the same results as before (after all we are
still using the values in L1 and L2),
but now we are getting the diagnostic values. |
The text has correctly pointed out that we can use an advanced built-in feature, linear regressions,
of the TI-83 in order to find the equation of a line from two given points. However, the TI-83 is
programmable. The programs slope.83p and slope1.83p
(which requires the tosrt.83p program) have been written to
do exactly the task that we are doing, finding the equation of the line through
two points. The following Figures demonstrate the use of these two slope programs.
Note that these programs are not part of the calculator. They must be loaded into the
calculator, as they were for the calculator used to generate these Figures.
Figure 17
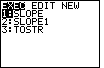
| The key opens the PROGRAM menu. We will demonstrate the
SLOPE program first. |
Figure 18
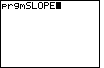
| Since SLOPE was highlighted in Figure 17, we press
to paste the name, with a "prgm" prefix, onto the screen. |
Figure 19
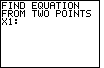
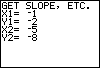
| We start the program by pressing the key.
The program responds with the heading seen in Figure 19, and then it asks for the
X1 coordinate. We will use the point (– 1,– 2)
and (– 5,– 8). |
Figure 20
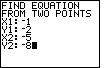
| We respond to the query in Figure 19 with
.
The calculator then asks for Y1. We respond with
.
The calculator then asks for X2. We respond with
.
The calculator then asks for Y2. We respond with
.
That leaves the screen as shown in Figure 20.
|
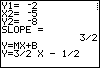
Figure 21
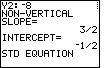
| Press to accept that last value
and the program responds with Figure 21, showing us that the slope is 3/2 and
the y-coordinate of the y-intercept is – 1/2.
Given that we can see that the equation of the line is
y=(3/2)x+(– 1/2)
The program is in a PAUSED state in Figure 21, as shown by the series of vertical dots at
the upper right corner of the screen. That is, there is more work for the program to do
but it is waiting for our signal to continue. The PAUSED state is useful to allow us
to read answers before they scroll off the screen. |
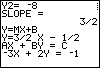
Figure 22
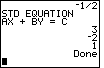
| We press to tell the calculator to continue.
The rest of its work is to produce three values that correspond to A, B, and
C in the standard form of a linear equation
AX + BY = C
From the values given we see that the standard form for this equation is
3X + – 2Y = 1
Note the Done at the right side of the screen indicates that the program has terminated.
|
Figure 23
| To continue our demonstration, we press to start
the program again, and we enter values shown in Figure 23. |
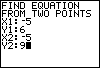
Figure 24
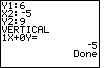
| Pressing accepts that last value. THe program responds
with the output shown in Figure 24. Here the program correctly identifies the fact that this
is a vertical line. Therefore, there is no slope-intercept form of the equation. However,
we still have the standard form of the equation. |
Figure 25

| The SLOPE program demonstrated above produces all the output that we need, but it is
not quite as pretty as we might like it. To make the output look prettier, there is a different
version of the program, called SLOPE1, that does the same computations, but it uses another program,
called TOSTR, to do its work. We only run SLOPE1 and we let it call the other program as needed.
Figure 25 is the result of using the key. |
Figure 26
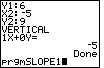
| To select the SLOPE1 program from Figure 25 we press .
This will create the main screen shown in Figure 26. |
Figure 27
| As usual, we press to start the command that we created
in the last step. The program starts and asks us for values. We respond as shown in
Figure 27. |
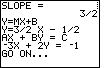
Figure 28
| Press to accept the last value in Figure 27. The
program does its calculations, it tells us the value of the slope, then it
displays the slope-intercept formula, and then it displays the
slope-intercept form of the equation of the line between
the given points. The program is in a PAUSED state, waiting our signal to continue. |
Figure 29
| We give that signal by pressing the key.
The program displays the standard form of a linear equation, and then it gives us
our equation in standard form. Again, the program is in a PAUSED condition. |
Figure 30
| allows the program to continue. It does not go far.
Rather is Pauses again to allow us to use ENTER to do another problem or we can break out
of the program if we wish.
|
Figure 31
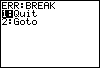
| To break out of the program we need to press the key.
The calculator responds with Figure 31. This gives us the option to QUIT.
We would leave Figure 31 and return to our main screen by
pressing the key. |