Figure 39 is assumed to follow Figure 38.
In Figures 39 through 49 we go on to develop the graph at the bottom of page 147. Although
the problem should be discontinuous, the graph is the calculator version of a continous
set of values for y1=8.5x–800.
The real trick here is that the graph is done on a split screen.
It only takes a few steps to shift the calculator to split screen mode,
but it takes a bit of planning to be able to get the screen and the exact table
given at the bottom of page 147.
Figure 1
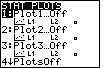
| The first 11 images on this page walk us through a process to
set up the calculator into a default mode. We do this so that
when we do the real work of the page (starting on Figure 12) you can follow along
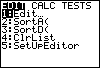
on your calculator. We start by turning off any "plots" that we may
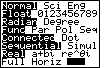
have on the calculator. We do this by moving to the STAT PLOTS screen,
shown in Figure 1, by pressing the
  keys. keys.
|
Figure 2
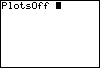
| We want to select the fourth option from Figure 1, therefore
we press  . This will paste the command
PlotsOff onto the screen, shown in Figure 2. . This will paste the command
PlotsOff onto the screen, shown in Figure 2.
|
Figure 3
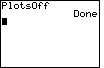
| We press  to perform the
PlotsOff. The calculator responds with Done.
That command turns off all "plots", which was our intent. to perform the
PlotsOff. The calculator responds with Done.
That command turns off all "plots", which was our intent.
|
Figure 4
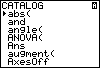
| Next, we would like to clear all of the
lists that are defined on the calculator. There is a command to do
this but we will have to find it in the catalog. We open the
catalog by pressing the
 keys.
This starts at the beginning of the catalog. keys.
This starts at the beginning of the catalog.
|
Figure 5
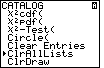
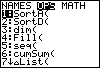
| The command that we want is called ClrAllLists.
We could use the down arrow to move to that command. However, we will
take the short-cut of pressing
 to move to the start of the "C's" in the calatog.
Strangely enough, the first "C" command is to move to the start of the "C's" in the calatog.
Strangely enough, the first "C" command is  .
This is a command that starts with the Greek letter "chi", which
gives us an indication of why we find it here. Then we press .
This is a command that starts with the Greek letter "chi", which
gives us an indication of why we find it here. Then we press
 to move the indicator arrow down to our desire command,
ClrAllLists. This is the condition shown in Figure 5.
to move the indicator arrow down to our desire command,
ClrAllLists. This is the condition shown in Figure 5.
|
Figure 6
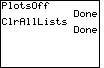
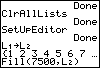
| We press to select the
command fromthe catalog listing in Figure 5. This will
pate the command to the screen. Then we press
to actually perform the command, as shown in Figure 6. At this point we have cleared
any list that had been defined in the calculator.
|
Figure 7
| Before we start the real work that we want to do,
we need to be sure that we do not have any functions already defined.
On the calculator used to generate these Figures, we press
to open the Y= screen.
Figure 7 demonstrates that one function is already defined on this calculator.
|
Figure 8
| We press  to clear that function. to clear that function.
|
Figure 9

| And, then we press  to quit the Y= screen of Figure 8 and return to the main screen, Figure 9.
|
Figure 10

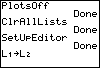
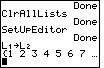
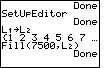
| Our final preparation will be to set up the list editor.
We do this by moving to the STAT screen
via the  key. On that screen, shown in Figure 10,
tour desired command, SetUpEditor, is option number 5. key. On that screen, shown in Figure 10,
tour desired command, SetUpEditor, is option number 5.
|
Figure 11

| We select that option by pressing  ,
which will paste the command onto our main screen. Then we press
to actually perform the operation. ,
which will paste the command onto our main screen. Then we press
to actually perform the operation.
SetUpEditor initializes the Stat Editor so that it uses the
built-in lists, L1 through L6.
|
That completes the steps needed to initialize the calculator. Of course,
these steps could have been done in a different order. In addition, some of the
steps may not have been needed, given that the calculator may already have been
set the way we want it.
The problem that we are examining is to express the tuition at a university as
a function of the number of credits taken.
The tuition is given as $7500, no matter how many credts
a student takes. We are lead to believe that a student
may only take a whole number of credits, between 1 and 25.
In order to simplify the example, the
steps below will further restrict that to a number between 1 and 9, inclusive.
The expression of the function is
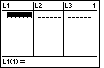
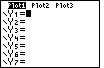
Figure 12

| We will start by moving to the STAT screen via the
key. This brings up the screen shown in Figure 12.
We want to move to the Stat Editor, which is the first option in Figure 12.
|
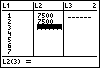
Figure 13
| Because it is the
highlighted option, ee press to select it.
This opens the Stat Edit screen shown in Figure 13. Note that the lists that are
displayed in Figure 13 are L1, L2,
and L3. Those lists are there because of the preparation
we took back in Figures 10 and 11. Furthermore, the lists do not hold anything
because of the preparation we took in Figures 4 through 6.
|
Figure 14
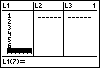
| We will add our x values to the
L1
list by pressing 


 . This results in Figure 14. . This results in Figure 14.
|
Figure 15
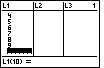
| Of course, in our restricted problem, we want the
x values to continue through 9. We press


 to add the rest of the values.
The display shifts down to allow us to enter each new value.
We have ended the entry of our x values. to add the rest of the values.
The display shifts down to allow us to enter each new value.
We have ended the entry of our x values.
|
Figure 16
| To add our y values we need to
move to the L2 list.
We can do this by pressing the  key.
The highlight moves to the L2 column, at the top of that
column since there are no values defined for L2 at this time. key.
The highlight moves to the L2 column, at the top of that
column since there are no values defined for L2 at this time.
|
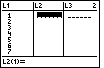
Figure 17
| We could enter the value 7500 into each of the
cells of L2.
In fact, by using
Figure 17 demonstrates such a process.
We could continue this pattern to enter the remaining 7 values for our restricted
version. It would have been harder to enter 25 values for the original problem.
However, here we will use another method that would be just as easy to enter
25 values or even 125 values.
|
Figure 18
| First we will get out of the STAT editor
by pressing .
This returns us to the main screen.
|
Figure 19
| We had left the Stat Editor when we had 9 values in
L1 but only 2 in L2.
We want to make L2
have 9 elements. One way to do this is to just copy
L1 to L2.
We use the key sequence
 to set up the command to do this.
|
Figure 20
| Then we press to
perform the command. The resulting values in L2
are shown in Figure 20. Of course, we do not want those values.
Rather, we want every value in L2 to be 7500.
There is a command to do this. But we need to find that command.
|
Figure 21
| We open the LIST screen
by pressing .
|
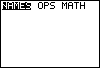
Figure 22
| We want one of the LIST related commands. Therefore, we
press to move the highlight to the OPS
choice. The calculator responds by displaying the choices shown in Figure 22.
We are interested in the Fill( command.
|
Figure 23

| We can press to select that
Fill( command and paste it onto the main screen, shown in Figure 23. |
Figure 24
| In Figure 24 we complete the Fill(
command by supplying the value to use, 7500, and the name of the
list to fill, L2.
We use the keys

 to do this. to do this.
|
Figure 25
| As usual, we press to perform the command that
we created in Figure 25.
|
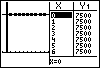
Figure 26
| We can check on our work by returning to the Stat Editor.
Press to move to Figure 26.
|
Figure 27
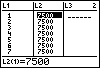
| The key will open the Stat Editor, shown in
Figure 27. The desired values are in the desired lists. It would look as if we
are ready to get our graph.
|
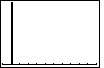
Figure 28
| The  will move us to the graph screen. will move us to the graph screen.
This is not what we wanted. What went wrong?
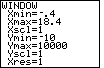
First, our WINDOW settings are clearly out of the required range.
|
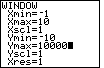
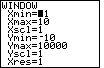
Figure 29
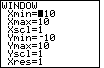
| The  key opens the WINDOW screen.
As shown in Figure 29, these values are clearly too limiting. There is no
way that we will see Y values such as 7500 when the Ymax is 10. key opens the WINDOW screen.
As shown in Figure 29, these values are clearly too limiting. There is no
way that we will see Y values such as 7500 when the Ymax is 10.
|
Figure 30
| We will change the settings by
using the keys  and
. This will produce Figure 30.
and
. This will produce Figure 30.
|
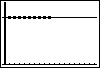
Figure 31
| Pressing the key takes the calculator
back to the graph screen. Our change in the WINDOW settings seems to have taken
effect, but our valeus are still not there. Now what is wrong?
We have a graph in Figure 31, but we needed to "plot" the two lists!
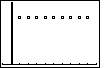
And, in Figures 1 through 3 we had turned off all of the plots. It must
be time to turn one of them on again. |
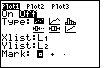
Figure 32

| To get back to the STAT PLOT screen,
press .
The resulting Figure 32 indicates that all the plots are indeed "Off". Let
us turn on the first plot.
|
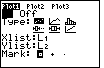
Figure 33
| The first plot was the highlighted plot in Figure 32.
Thus, pressing will move the
calculator to Figure 33. Note that Figure 33 was captured from a calculator
when the blinking cursor, which was on the "On", was hidden. We need to
change the setting from "Off" to "On".
The other settings in Figure 33 seem to be just fine. The Type
of plot will be a scatter plot, rather than a line or histogram plot.
Plot1 is set to use L1 for the Xlist and
L2 for the Ylist. And the plot character will
be a square around the desired value.
|
Figure 34
| We change the setng to "On", the highlighted option by
pressing . Figure 34 shows that the setting
has been changed.
|
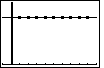
Figure 35
| Again, the returns the calculator to the
graph screen. This time, however, that screen contains the plot that we have constructed.
This is a good representation of the function for our restricted problem.
|
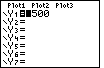
Figure 36
| We return to the Y= screen via the
key. We will define the usual constant function,
Y=7500, and then we can return to the graph to see that function.
|
Figure 37
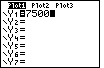
| The sequence
gives a constant value
to the first function, Y1.
|
Figure 38
| Once more, takes us back to the graph
screen. However, this time, we have both the plot that we generated and the
constant function that we just defined.
|
We will take a small diversion here to change the continuous function
definition developed in Figure 37 into a discontinuous function.
This is extra material, and it may be that the reader would like to skip
this fairly advanced use of the TI-83 calculator. Figure 39 will pick up
from the point that we have left in Figure 38.
It is an interesting and important characteristic of the TI-83 that in doing a graph
the TI-83 uses X values that represent the "center" of each pixel moving across the
screen. These values, in turn, are determined by the xMin and xMax settings
on the WINDOW screen, and by the fact that there 95 pixels across the screen.
Therefore, when we leave the WINDOW as it was set in Figure 30,
the first X value will be -1
and the last value will be 10. The step from pixel to pixel will be 11/94 (there being
94 steps from the first to the last). In particular,
the calculator will never try to evaluate the function for values such as 1, 2, 3, and so on.
We need to change the WINDOW settings so that the X values will hit our desired points.
In particular, if we set xMin to – .4 and xMax to
18.4, then the range of values will be 18.8 units. If we divide 18.8 by 94, we find that
each step between pixels will be 0.2, which means that we will "hit"
values such as 1, 2, 3, and so on.
Figure 38a
| We return to the WINDOW screen via the key.
Then we set the desired values via the
 and keys. The
result is shown in Figure 38a.
and keys. The
result is shown in Figure 38a.
|
Figure 38b
| Let us may a quick return to the graph screen,
via the key, to see the effect of our changes.
|
Figure 38c
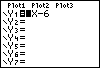
| Now we will enter the new function by moving to the Y= screen, via
, and then moving to the end of the 7500 by pressing
,
and then start appending the rest of the function via the
 
 keys. To generate the equal sign,
we use keys. To generate the equal sign,
we use
 to open the TEST menu,
and then to select the equal sign, which is
then pasted into the function. To find the iPart( component, we press
to open the MATH menu,
press
to move to the NUM sub menu, and then select the third item in that menu by
pressing the key.
Again, the choice is pasted into our function. That leaves
us the task of pressing the
and keys
to complete the function. to open the TEST menu,
and then to select the equal sign, which is
then pasted into the function. To find the iPart( component, we press
to open the MATH menu,
press
to move to the NUM sub menu, and then select the third item in that menu by
pressing the key.
Again, the choice is pasted into our function. That leaves
us the task of pressing the
and keys
to complete the function.
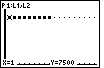
|
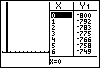
Figure 38d
|
We return to the graph screen by pressing . This
graph is captured in Figure 38d. Note that the "plot" squares are filled in
because we have "graphed" the points inside them. The new points, the ones
to the right of the "plot" points, represent more of the discontinuous function graph.
|
Figure 38e
| To further support and demonstrate our actions, press
 to shift the calculator into TRACE mode. Figure
38e shows that we start by tracing the "plot", as shown by the to shift the calculator into TRACE mode. Figure
38e shows that we start by tracing the "plot", as shown by the
 displayed in the upper left corner of the
graph. displayed in the upper left corner of the
graph.
|
Figure 38f
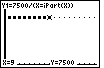
| We can press  to change the TRACE
to follow the function definition. Note the change in Figure 38f. Also, in
Figure 38f, we note that the trace is at the point where X=9 and Y=7500. to change the TRACE
to follow the function definition. Note the change in Figure 38f. Also, in
Figure 38f, we note that the trace is at the point where X=9 and Y=7500.
|
Figure 38g
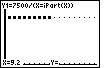
| If we press the new value of X becomes 9.2.
However, when X=9.2 the function is "undefined". Note the display at the bottom of
Figure 38g.
|
Figure 38h
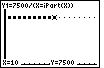
| If we press
we shift the X value to 10.
Now the function is defined.
The TI-83 displays both the value of Y and it highlights the point on the screen.
|
We return, at this point, to the state of the calculator after Figure 38.
Our next challene will be to produce the screen image given at teh bottom of
page 147. That image has a split screen, one showing both the graph and a supporting table.
It does not take many steps to shift the calculator into such a split screen mode.
It will take a bit of work to really produce the results at the bottom of page 147.
Figure 39

| We start by moving to the MODE screen.
We do this by pressing the key.
The value that we want to change is the last one on the screen.
|
Figure 40
| We move down to that line by pressing
and
. Then we press
to move the
blinking cursor over the G-T option.
Finally, we press to change the selection to
be G-T, the option requesting a Graph and a Table.
|
Figure 41
| We return to the Graph window by
using the key. In Figure 41 we note that we do have
the desired split screen, but it is showing the values that we had earlier.
We need to change the function definition to that of page 147. |
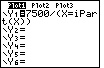
Figure 42
| The key returns us to the Y= screen.
|
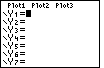
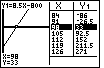
Figure 43

| We can clear the existing definition via the
key. Then we enter the new function Y=8.5 – 800
by pressing

|
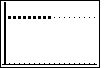
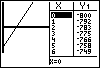
Figure 44
| We can check our fforts by going to the graph window
via the key. The result is shown in Figure 44. The
graph does not show our function. However, we can see why when we look at the table.
There we note that for small integer values of X the
value of the function is quite negative.
Our graph shows X values from -1 to -10. The graph of the Y values
is off the screen.
|
Figure 45
| We need to change the WINDOW settings.
Press to return to the WINDOW screen.
|
Figure 46
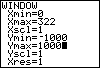
| From Figure 45 we know that we need to change the
WINDOW settings. But what values should we use?
For one thing, we note that the chart on page 147 has a step of 7
between X values.
In the split screen mode, the TI-83 uses 47 pixels across the graph.
Thus, there are 46 steps from pixel to pixel. If we want each of those
steps to represent a change of 7, then the range of our X values
will need to be 7*46 or 322.
The settings for the Y values are not obvious.
We will use the values – 1000 to 1000, even though
this is not quite the values in the book. Figure 46 reflects these
changes in the WINDOW settings. |
Figure 47
| We use to return to the graph window.
Figure 47 shows the result. Note that the graph looks reasonably correct,
but the table is unchanged. In fact, the steps between X values is still
1 in Figure 47.
|
Figure 48
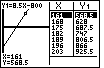
| However, in Figure 48 we move to TRACE mode by
pressing the key. Now, in Figure 48,
the steps between X values in the table is at our desired 7, however,
the wrong values are being displayed.
|
Figure 49
| Of course, we can trace back on the graph
by pressing  again and again until we have
moved the highlight to the point where X=84. Then, if we press
two times we will have the screen shown in Figure 49. again and again until we have
moved the highlight to the point where X=84. Then, if we press
two times we will have the screen shown in Figure 49.
|