This page is devoted to presenting, in a
step by step fashion, the keystrokes and the
screen images for
transferring programs from one TI calculator to another.
In this case we will demonstrate transferring two programs, SPHERE and SPHERE2,
from one TI-83/84 to another TI-83/84. This presentation
assumes that the two calculators are linked together by the appropriate cable.
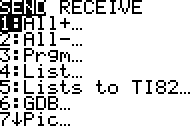
Figure 1: From Sending Calculator
|
On the "Sending" calculator, press   to get the
screen shown in Figure 1. to get the
screen shown in Figure 1.
|
Figure 2: From Receiving Calculator
 |
On the "Receiving" calculator, press to get the
screen shown in Figure 2.
Then, press  to highlight the RECEIVE
as shown in Figure 3. to highlight the RECEIVE
as shown in Figure 3.
|
Figure 3: From Receiving Calculator
 |
Figure 2 shows that this calculator is ready to accept the command to actually receive programs over
the link between the calculators. Now press  to actually put the calculator into receive mode.
|
Figure 4: From Receiving Calculator
 |
The Receiving calculator is now in receive mode
and it is waiting for
programs to be sent to it.
We will now return to the sending calculator in Figure 5.
|
Figure 5: From Sending Calculator
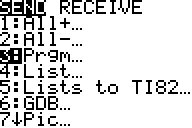 |
To move from Figure 1 to Figure 5 for the sending
calculator, we press  to move the highlight to select
just Prgm... (i.e., programs) to be sent.
to move the highlight to select
just Prgm... (i.e., programs) to be sent. Press
to actually select that option and move to Figure 6.
|
Figure 6: From Sending Calculator
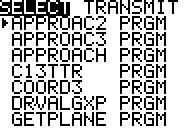 |
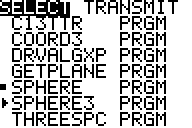
Figure 6 shows the list of programs that are on the sending
calculator. [Of course, the list is entirely dependent on
the sending calculator contents. A different
sending calculator will have a different list of programs.]
Note that the programs are listed in alphabetic order.
We want to send the SPHERE and SPHERE3
programs. They are not on this screen.
In Figure 6 we can see, just to the left of the first program, APPROAC2,
the indicator pointer. We want to move that pointer to the SPHERE name.
We will use
key repeatedly to move the highlight arrow down.
Moving the indicator pointer down from the GETPLANE
program will just cause the list of programs to scroll up.
We will continue to use the key
until our desired programs are on the screen.
|
Figure 7: From Sending Calculator
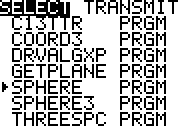 |
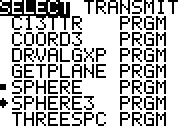
Figure 7 shows that we used the key a few too many
times (because we actually went all the way down to the THREESPC program)
and then we had to use the  key
to place the indicator arrow at the desired SPHERE program. key
to place the indicator arrow at the desired SPHERE program.
|
Figure 8: From Sending Calculator
 |
To move from Figure 7 to Figure 8 we press the key.
Unfortunately, the change, as shown in Figure 8 is hard to see.
The change is that there is now a small dark square to the left of the program name.
That square is under the indicator pointer. Press
to move the indicator pointer down to the next
program and we will see, in Figure 9, the small "selected" square to the left of the
SPHERE program.
|
Figure 9: From Sending Calculator
 |
We can see that the SPHERE program is selected.
Our next task is to select the SPHEE3 program.
The indicator pointer is just to the left of that program name.
We press to select that program and move to Figure 10.
|
Figure 10: From Sending Calculator
 |
In Figure 10 we can see that we have selected the two desired programs.
We are ready to send them to the other calculator.
Use the key to move the option at the top of the screen
to TRANSMIT as shown in Figure 11.
|
Figure 11: From Sending Calculator
 |
This calculator is now ready to accept the command to actually send the programs.
To give this command we press the key.
|
Figure 12: From Sending Calculator
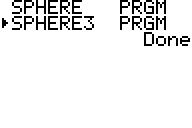 |
During the transmission process the sending calculator will list each program
as its transmission has been completed. At the end of the entire process
the sending calculator indicates that it is Done, as is shown in Figure 12.
|
Figure 13: From Receiving Calculator
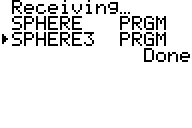 |
In a similar fashion, the receiving calculator lists each program that it has received.
At the end of the process the calculator displays Done.
A common cause of some confusion is that the receiving calculator display,
as shown in Figure 13, starts with the message Receiving...,
which replaced the Waiting... from Figure 4. This makes it look
like the calculator is still in a receiving mode, but it is not.
Once the Done is displayed the transmission has ended.
|
Figure 14: From Receiving Calculator
 |
To get to Figure 14 we have pressed the  key on the receiving calculator. This just lists the programs that are
now on this calculator. We can see that the transmission has been successful.
key on the receiving calculator. This just lists the programs that are
now on this calculator. We can see that the transmission has been successful.
|