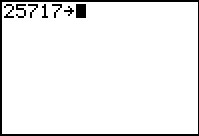
For this web page we want your calculator to be able to produce exactly the sequence that the calculator used here produced. To do this we will set the seed value.
In Figure 1 we have entered the value 25717 and then used the
 key. We are ready to store the value in the seed variable.
We have to find that variable.
key. We are ready to store the value in the seed variable.
We have to find that variable.
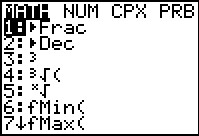
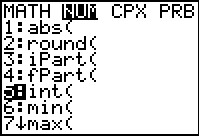
 to open the MATH menu shown in Figure 2.

 key to move the highlight to "PRB".
This will display the "Probability" sub-menu. The first item in that sub-menu is
rand. That is the item we want. It is already selected.
Therefore, press
key to move the highlight to "PRB".
This will display the "Probability" sub-menu. The first item in that sub-menu is
rand. That is the item we want. It is already selected.
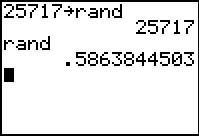
Therefore, press  to use that item, in this case, to paste that item onto
the calculator screen, as is shown in Figure 4.
to use that item, in this case, to paste that item onto
the calculator screen, as is shown in Figure 4.
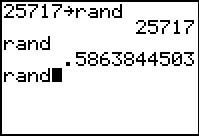
 to perform the command.

 key to open the MATH menu and then
use the key to move to the PRB submenu.
Again, we want to paste the rand item onto the main screen. Press
to do this.
key to open the MATH menu and then
use the key to move to the PRB submenu.
Again, we want to paste the rand item onto the main screen. Press
to do this.
 to perform the command.
 to recall the last command. Either way,
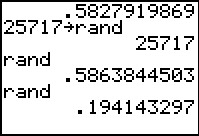
Figure 9 shows that we are ready to perform the rand command again.
to recall the last command. Either way,
Figure 9 shows that we are ready to perform the rand command again. Press
to perform the command.
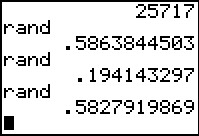
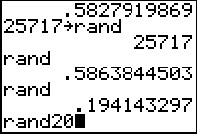
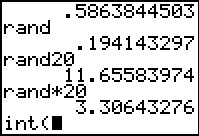
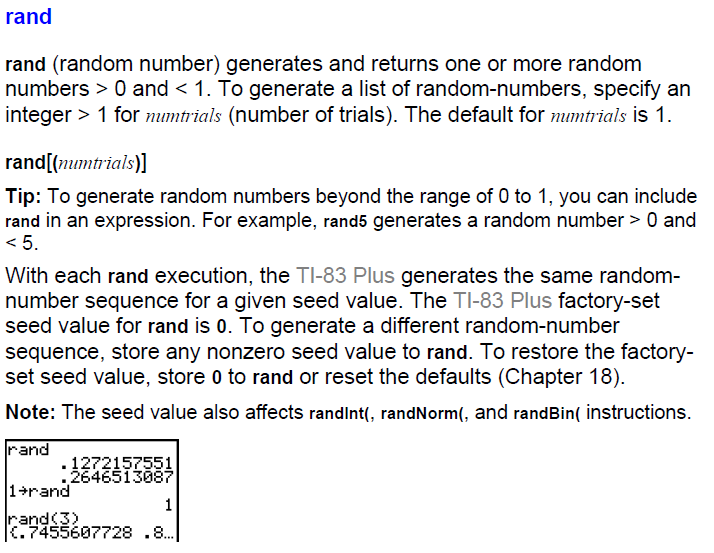
Figure 10 goes on to show yet a third use of the rand command, this time producing the value .5827919869. We could continue to perform the rand command and we would find that it continues to produce what seem to be random values between 0 and 1.
Before we do anything like that let us demonstrate the effect of changing the seed value.
 and then press

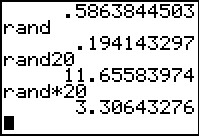
 the resulting command is rand20
which the calculator interprets as rand*20.
We know that the next value of rand
will be .5827919869, and we could compute 20
times this to arrive at the value
11.65583974, or we could just press
and let the calculator do that work.
the resulting command is rand20
which the calculator interprets as rand*20.
We know that the next value of rand
will be .5827919869, and we could compute 20
times this to arrive at the value
11.65583974, or we could just press
and let the calculator do that work.
 key, and then we use the
key to move to the NUM submenu shown in Figure 14.
Then we use the
key, and then we use the
key to move to the NUM submenu shown in Figure 14.
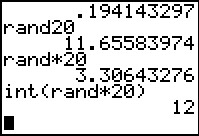
Then we use the  key to move the highlight to point to the fourth item, int(.
The int( function returns the largest integer less than or equal to the value it is given.
If we give the int( function a random value between 0 and 20, then the only
results of that will be integers etween 0 and 19 inclusive. We press
to past the int( function onto the main screen
as shown in Figure 15.
key to move the highlight to point to the fourth item, int(.
The int( function returns the largest integer less than or equal to the value it is given.
If we give the int( function a random value between 0 and 20, then the only
results of that will be integers etween 0 and 19 inclusive. We press
to past the int( function onto the main screen
as shown in Figure 15.
 key,
use teh key to move to the PRB submenu.
To paste rand to the main screen we can just press
key,
use teh key to move to the PRB submenu.
To paste rand to the main screen we can just press
 .
.

 and then press
to have the calculator perfom the command. In this case the result is 12.
and then press
to have the calculator perfom the command. In this case the result is 12.
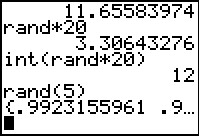 |
Figure 18 picks up where we left things in Figure 17,
but now we have created and had the calculator perform the command
rand(5).
The result is that we have produced a list of 5 values, the first one being .9923155961
and the second value is shown as starting with .9.
The three dots after that indicate that there is more to see. We can
use the key to scroll to the right on that last line of the display.
We have done this a number of times to generate Figure 19.
|
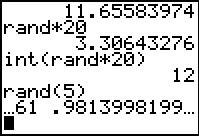 |
In Figure 19, on the last line of the display, we see the end of the first random value from Figure 18, namely, ...61 and that is followed by most of the second value in the list, namely, .9813998199..., where the three dots mean that there is more to the display. |
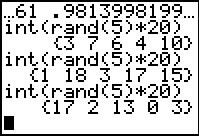 |
For Figure 20 we have combined the things we have learned to form the command int(rand(5)*20). To perform this command the calculator will produce 5 random values, each between 0 and 1. It will multiply each of those random values by 20. Then, for each of the five values, it will find the largest integer less than or equal to that value. The result is a list of 5 integer values, in the first case this was {3 7 6 4 10}. Then we recalled the command and executed it to get a new list. Then we recalled the command again and performed it to get the third set of five values. |
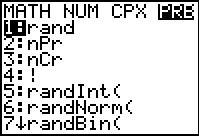
The task of producing random integers within a given range happens so often
that the TI–83/84 family of calculators has a special
command that does just that. The command is randInt(.
The TI documentation for randint( is:
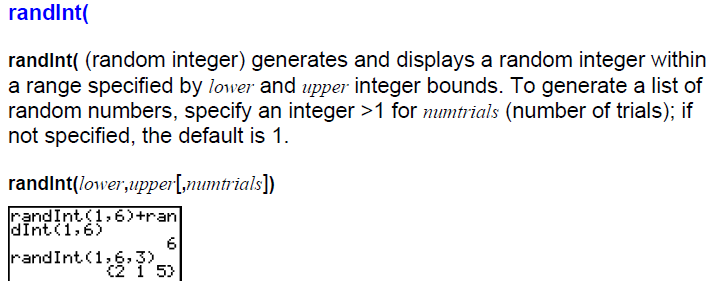 That documentation gives the syntax of the command as
randInt(lower,upper[,numtrials]) meaning
that we have a required lower and
upper specification but an optional numtrials value.
We will explore this command.
That documentation gives the syntax of the command as
randInt(lower,upper[,numtrials]) meaning
that we have a required lower and
upper specification but an optional numtrials value.
We will explore this command.
 |
For Figure 21 we have returned to the MATH menu and moved to the PRB submenu.
Then we moved the highlight down to the
fifth item, randInt(. We press
to paste that item to the main screen.
|
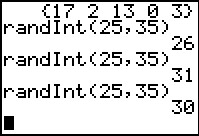 |
In Figure 22 we completed the randInt( command by using 25 as the
lower value and 35 as the higher value. Adding a closing right parenthesis, the
command was complete and we press to have the calculator perform it.
The result was 26. Then we recalled and performed the command two more times and the
results were 31 and 30, all results being in the range of 25 to 35.
|
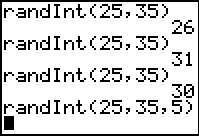 |
For Figure 30 we have built the same command, but this time we have
specified the numtrials as 5. As usual, press
to have the calculator perform the command and move to Figure 24.
|
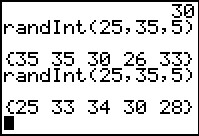 |
Our first execution of the command randInt(25,35,5)
produced the list {35 35 30 26 33}.
We note that all the values are within the desired
range and that we actually have a repeated value, namely 35.
There is nothing to say that this cannot happen.
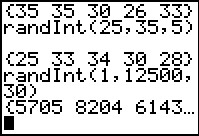
We then recalled the command and performed it again, this time generating the values {25 33 34 30 28}. We were lucky enough this time to not have any repeated values. |
 |
If the range of values is large enough, that is
if higher-lower is a large enough value,
then picking even a moderate number of random values in the
range will likely not result in having any
duplicate values.
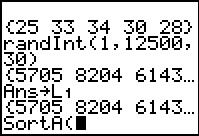
For example, if there are 12,500 credit students at the
college this term and we want to
select a random grup of 30 students then we could just
number the students 1 to 12,500 and ask the calculator to
choose 30 random values in the range from 1 to 12,500. The
command to do this, randInt(1,12500,30) is on Figure 25,
along with the start of the resulting list of values. We could just scroll over that list to see all the values, but we might as well take advantage of some of the features of the calculator to ease this task. |
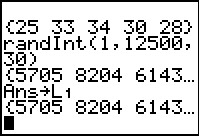 |
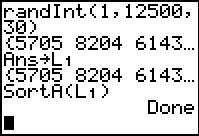
To generate Figure 26 we press
. The calculator
recognizes that by starting with the key we are implying that we want to store the previous answer.
Therefore, the calculator generates the Ans in that line.
We are storing that answer in a list called L1.
Naturally, we perform the command via the key.
The calculator displays the start of the list of values again.
However, now that the answer is in a standard list we can actually work with it.
|
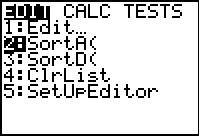 |
For example, we can sort that list. Press  to open the STAT menu. Then move the highlight down to item 2, SortA(,
and press .
to open the STAT menu. Then move the highlight down to item 2, SortA(,
and press .
|
 |
We have the start of the command specified. The command is to sort a list into ascending values. We just need to tell the calculator which list to sort. |
 |
We complete the command via
to say sort items in list
L1 into ascending order.
Press to perform the command and the calculator sorts the
values and displays Done.
|
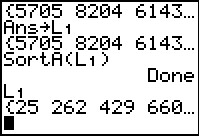 |
The key sequence
will display the contents of L1.
Of course they still do not fit on the screen but we
see the start of the list and we could use the key
to scroll across the list.
Because the list is sorted it will be easy to see if there are any
duplicates.
|
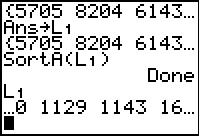 |
For Figure 31 we have indeed scrolled over some of the list do display more items. |
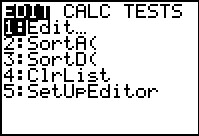 |
Another way to display the items in the list is to use teh List Editor
on the calculator. We get to that list editor via the STAT menu. We return to the STAT
menu via the key. Figure 32 shows that menu.
The option that we want is the first option. It is already highlighted so we just hit
the key to perform that option.
|
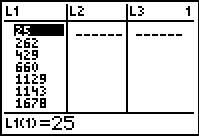 |
Figure 32 shows us the start of the List Editor screen.
Here we see, in the first column,
the first seven values in L1.
The highlight, in Figure 33 is on the first
item. As such, the bottom of the screen tells us that
item #1 in the list has the value 25.
If we use to move the
highlight the information displayed at the bottom will
change appropriately. If we move the highlight far
enough down the list new items appear as the list scrolls up.
|
 |
For Figure 34 we have scrolled down to display item 13 which has the value 4519. |
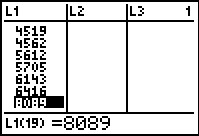 |
For Figure 35 we have scrolled down to display item 19 which has the value 8089. |
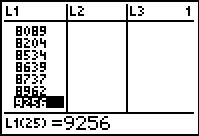 |
For Figure 36 we have scrolled down to display item 25 which has the value 9256. |
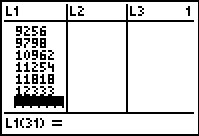 |
For Figure 37 we have scrolled down to display item 31 which has the no value at this time. Remember that we generated just 30 values via the command in Figure 25. In Figures 33 through 37 we have seen the list of the 30 students that we have randomly selected from the 12,500 credit students this term. |
©Roger M. Palay
Saline, MI 48176
August, 2013