All of this would be of little interest if the new software just made the calculator run faster.
However, over a number of different software releases, TI has provided
new functionality with the newer software. That new
functionality includes changing how the
claculator screen apears and how the calculator works with its user.
In general, the improvements are just that. It would be nice to use those improvements.
However, for those of us who
try to guide students through the complex process of using the
claculators, having a class of students using what appear to be different
calculators (because they are running different operating systems) just makes
the instructional process more complex. If you add the older TI-83 Plus (and even the even older TI-83)
calculators to that mix, the learning process slows to a crawl as
the confusion of having different screens and seemingly different
options overwhelms the material that students are supposed to learn.
Fortunately, TI has made it possible to turn off some of the newer alternative features and to
have the newer software behave as did the older software. [It is almost a shame to
have to do this, but it is the only way to get the entire class to "see" the same things
on all of the calculators being used.
This page walks through some screen images from different
versions of the TI-84 operating system. The Figures below specifically note the operating system
being used on the calculator from which those images were captured. In addition, where
appropriate, this page shows users how to "turn off" certain features of the newer operating systems.
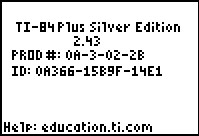
In each case we examine the calculator to find out the operating system being used
and then we explore some of the capabilities and/or characteristics of
that operating system.
To do this I used three different calculators:
Now on to a different calculator.
Now on to a different calculator.
Figure 9a (from OS 2.53)
 |
We use the   sequence to open the screen shown in Figure 9a.
Then we press  to move to Figure 9b. to move to Figure 9b.
|
Figure 9b (from OS 2.53)
 |
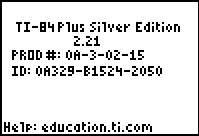
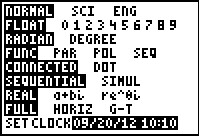
The screen image in Figure 9b shows that this calculator is running
the 2.53 version of the operating system. This version has the
MATHPRINT feature. We will see the changes in the
display related to this setting.
|
Figure 9c (from OS 2.53)
 |
To get to the image in Figure 9c, we press the
 key. The particular settings shown on this
calculator are the settings that we use for the Basic Statistics course. key. The particular settings shown on this
calculator are the settings that we use for the Basic Statistics course.
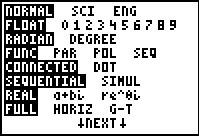
Here we see the first evidence that something has changed. Note the
 at
the bottom of the screen.
We can use the at
the bottom of the screen.
We can use the  key to move to the bottom of the
screen. When we move to point
to the
calculator will jump immediately to the image in Figure 9d. key to move to the bottom of the
screen. When we move to point
to the
calculator will jump immediately to the image in Figure 9d.
|
Figure 9d (from OS 2.53)
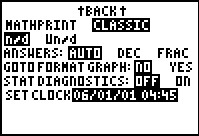 |
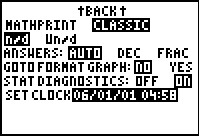
This is a new, second page, for the MODE settings.
At this point this calculator is in CLASSIC
mode. We will leave this page
via the
key sequence.
|
Figure 9e (from OS 2.53)
 |
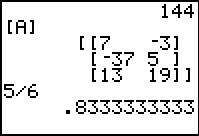
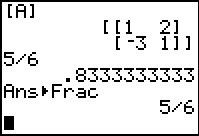
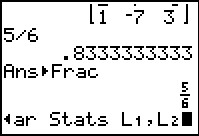
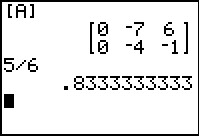
Back on the main page we display a matrix
(one that had been entered into the calcualtor at some earlier time).
The resulting output is in the classic format that uses the left and right
square brackets to signal the start and end of the matrix, as well as a pair of]
such characters to signal the start and end of each row of values.
We follow this with a simple division and then we as the calculator
to resiply the answer but in fractional form. The result is the
correct fraction but one written on a signle line.
|
Figure 9f (from OS 2.53)
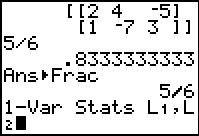 |
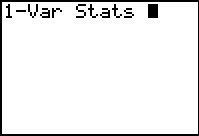
One final display of classic bahavior: the command
1-Var Stats L1,L2
is too long to fit on one line. The classic method for displaying something that is too
long is to wrap that command onto the next line. This is what was done here.
|
Figure 9g (from OS 2.53)
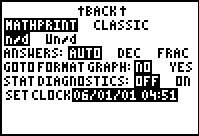 |
We have returned to the MODE settings,
moved to the second page of the display,
and changed the setting to MATHPRINT.
Then we use
to leave the settings and return to the main page.
|
Figure 9h (from OS 2.53)
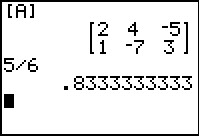 |
In Figure 9h we repeat our earlier actions.
This time when we ask for a display of the vector [A]
the calculator displays the array with extended left and right
brackets, a more traditional display of a matrix.
The original division problem still produces the same results
that we say n the classic mode in Figure 9e.
|
Figure 9i (from OS 2.53)
 |
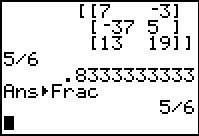
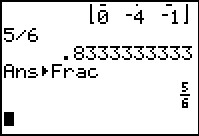
However, when we ask the calculator to redisplay the result
as a fracion, the calculator does this with smaller characters and it
formats them with a horizontal line as the division bar.
|
Figure 9j (from OS 2.53)
 |
Next we re-enter the
1-Var Stats L1,L2
command that is too long to fit aon a line. This time, instead
of moving to a new line to complete the command, the calculator
automatically scrolls the line we are constucting
so that the beginning of the line moves off the left
hand side of the screen. Compare this to the same command being entered in
Figure 9f.
|
Figure 9k (from OS 2.53)
 |
Finally we return to the second MODE screen
because there is one more setting to change.
In particular, we will want to have the
STATDIAGNOSTICS: setting turned ON.
|
Now on to a different calculator.
Figure 10 (from OS 2.55)
 |
We use the
sequence to open the screen shown in Figure 1.
Then we press to move to Figure 11.
|
Figure 11 (from OS 2.55)
 |
The screen imge in Figure 11 shows that this calculator is running
the 2.55 version of the operating system. This is
a significantly different system from the software of version 2.21 or 2.43.
|
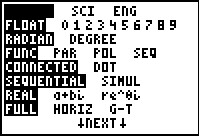
Figure 12 (from OS 2.55)
 |
To get to the image in Figure 8, we press the
key. The particular settings shown on this
calculator are the settings that we use for the Basic Statistics course.
Note the
at the
bottom of the screen.
We can use the key to move to the bottom of the
screen. When we move to point
to the
calculator will jump immediately to the image in Figure 13.
|
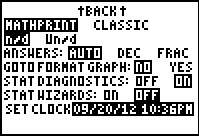
Figure 13 (from OS 2.55)
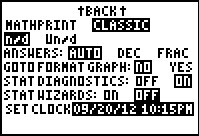 |
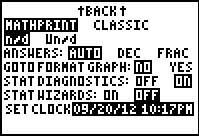
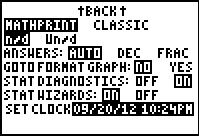
This "second" screen of the MODE settings holds the key
to using or not using the newer features of the 2.55 operating system. The
particualr claculator shown here has these settings configured to
turn off most of those settings.
-
The CLASSIC setting will make the calculator display matrices and fractions
in the same way that they were displayed on earlier software versions.
- The STATDIAGNOSTICS has been turned ON and this is something
that we would have done once via the "DiagnosticOn" command on earlier
versions of the operating system. Supposedly, once turned ON this value
stays ON. It is just that in this version of the operating system it is easier
to change this setting by using this second MODE page.
- The STATWIZARDS has been turned OFF, telling the
calculator to behave in many of the statistical operations the same
way that older calculators behaved.
We exit the MODE screen
via the
sequence.
|
Figure 14 (from OS 2.55)
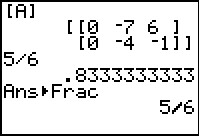 |
Figure 14 confirms that the CLASSIC setting, noted above, produces output
identical to that of the earlier calculators.
Note that the
matrix is displayed using one set of square brackets to surround the entire matrix and
additional sets of square brackets to surround each row of the matrix.
The fraction is displayed as a decimal, and then the
calculator is asked to convert that back to a fraction which it
does and displays on a single line.
|
Figure 15 (from OS 2.55)
 |
In Figure 15 we have returned to the second MODE page, put the cursor on the
MATHPRINT option and pressed the key.
This changes that setting.
We exit the MODE screen
via the
sequence.
|
Figure 16 (from OS 2.55)
 |
In Figure 16 we see the effect of the new MATHPRINT setting. The matrix
is now displayed without the clutter of the
many sets of square brackets (the "[" and "]") but with the
full height left and right brackets drawn around the matrix.
|
Figure 17 (from OS 2.55)
 |
A second difference is shown in Figure 17 where we asked the calculator to display the current answer in fractional form.
Now, instead of having the fraction on one line, the calculator has
produced the result, using smaller characters, in a more traditional fractional form.
|
Figure 18 (from OS 2.55)
 |
Prior to capturing the image in Figure 18, we made sure that there was some data in
L1.
As usual, we went to the STAT menu (via the  key)
and from there used the key)
and from there used the  key to move to
the CALC sub-menu, and from there we
pressed to select the
1-Var Statsoption and paste it to our screen.
Once the command is present we press the to perform it. key to move to
the CALC sub-menu, and from there we
pressed to select the
1-Var Statsoption and paste it to our screen.
Once the command is present we press the to perform it.
|
Figure 19 (from OS 2.55)
 |
In OS 2.55, with STATWIZARDS turned OFF,
the result is shown if Figure 19. This is almost the same
output that we would have had on earlier software, the difference being
that the earlier software would have left the command,
 , at the top of the screen instead of the
slightly more fancy , at the top of the screen instead of the
slightly more fancy
 . .
|
Figure 20 (from OS 2.55)
 |
To see the new approach in the operating system w we return to the second MODE
page, move the cursor to the ON setting for STATWIZARDS
and press to select that option.
We leave that screen via .
We go to the STAT menu via ,
move to the CALC sub-menu via ,
and select the already highlighted 1-Var Stats option
via the key.
|
Figure 21 (from OS 2.55)
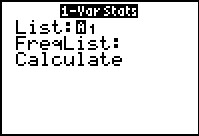 |
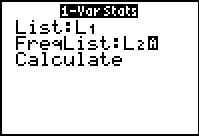
The result, now using the STATWIZARD, is to display
the screen shown in Figure 21. Note that the cursor, in "alpha" mode is now covering the
defualt L1. This would allow us to
easily alter the name of the list that we want the calculator to use
in doing this calculation. Furthermore, we now see that we could add
a second list, one giving the frequency for each of the items in the first list,
to this command.
|
Figure 22 (from OS 2.55)
 |
Using this wizard, to perform the command we move the cursor to the
Calculate option. Then press the key.
|
Figure 23 (from OS 2.55)
 |
The result is the same as the one we had in Figure 19.
|
Figure 24 (from OS 2.55)
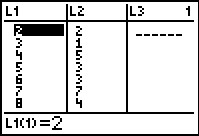 |
Prior to moving to the image in Figure 24 the values in L1
and L2 were altered.
Figure 24 shows the start of the contents of L1
and L2.
Not shown are the two lines:
9 2
10 1
In this case, we want
to use the L2 values as the frequency for each of
the corresponding L1 values.
|
Figure 25 (from OS 2.55)
 |
Returning to the 1-Var Stats command, still using the STATWIZARD,
we can make the change to that command so that
it uses the two lists as we want them used.
To make the change we positioned the cursor after the FreqList:
and pressed L1 L2.
|
Figure 26 (from OS 2.55)
 |
Again, to perform the command we move to the Calculate field
and press .
|
Figure 27 (from OS 2.55)
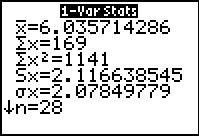 |
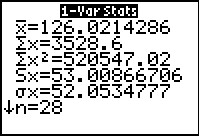
Figure 27 shows the output from this command.
|
Figure 28 (from OS 2.55)
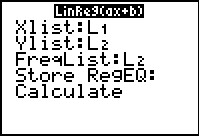 |
To get to Figue 28 we returned to the STAT menu via
, moved to the CALC sub-menu
using the key, then selected the
LinReg(ax+b) command by pressing  .
Because this calculator has the STATWIZARD set ON the
resulting display is shown here. .
Because this calculator has the STATWIZARD set ON the
resulting display is shown here.However the calculator determined that the
FreqList for this command should still be
L2, that choice is incorrect for us at this point.
Therefore, we need to remove that setting. To do this we use the
cursor keys to move the highlight
to that location and then we press  . .
|
Figure 29 (from OS 2.55)
 |
Hving cleared that value, we move to the Caculate
field and press to perform the command.
|
Figure 30 (from OS 2.55)
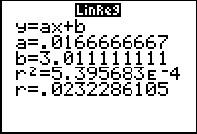 |
The result is shown in Figure 30. Note that the result gives values for r
and r². These values are shown because we have
STATDIAGNOSTICS set ON at this point.
|
Figure 31 (from OS 2.55)
 |
We return tot eh second page of the MODE screens and
set STATWIZARDS to the OFF condition so that we can see
the old style of using our commands.
|
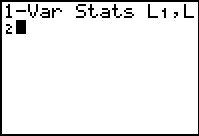
Figure 32 (from OS 2.55)
 |
To generate Figure 32 we returnede to the STAT menu, opened the
CALC sub-menu, and chose the 1-Var Stats command.
We recall that if we just give the command then, by default, we are asking the
calculator to do the computation based on the values
in L1. In order to tell the
calculator to use the
values in L1, but to use the
contents of L2 as the frequency for those
corresponding values, we need to append L1,L2
to the command. We have done that by pressing
 
 .
This produces the command, part of which has scrolled off the screen to the left,
in Figure 32. That "scrolling off the screen" is a result of still having the
MATHPRINT option turned ON. .
This produces the command, part of which has scrolled off the screen to the left,
in Figure 32. That "scrolling off the screen" is a result of still having the
MATHPRINT option turned ON.
|
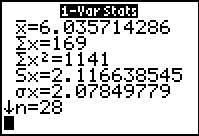
Figure 33 (from OS 2.55)
 |
We press to perform
the command and the results are shown in Figure 33.
|
Figure 34 (from OS 2.55)
 |
As a final demonstration, we return to the MODE screen and change
the calcualtor back to the CLASSIC setting.
|
Figure 35 (from OS 2.55)
 |
Then, in Figure 35, we reconstruct the command that we just used in Figure 32.
This time the command does not "scroll off to the left" but rather it extends
to a second line.
|
Figure 36 (from OS 2.55)
 |
Again we press to perform the command and get these results.
|
Figure 37 (from OS 2.55)
 |
Figures 37 and 38 merely redisplay the prefered settings for using
calculators with the 2.55 software in the Math 160, Basic Statistics, class.
|
Figure 38 (from OS 2.55)
 |
|