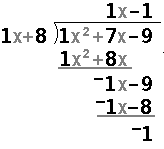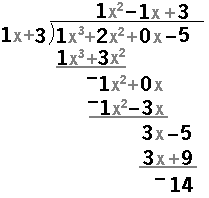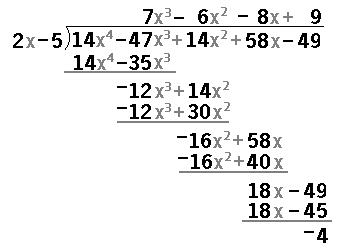
To demonstrate the use of POLY3 on the TI-85 and TI-86, consider three problems, the first being


|
Figure 1 illustrates the screen after we have opened the
PRGM menu, via the  key, selected the NAMES option via the key, selected the NAMES option via the
 key, used the key, used the  key to shift the menu until it displays the POLY3 item. On this calculator that
selection appears in the second position. To complete Figure 1, we
press the
  key to paste the name of the program onto the screen. key to paste the name of the program onto the screen.
|

| Then we press  to start the program.
The program has started in Figure 2,
but the only thing that has happened
is that the menu has changed.
In fact, the only thing that we can do is to select one of the
options given in the menu.
We want to "input" our problem. Therefore ,
we press to start the program.
The program has started in Figure 2,
but the only thing that has happened
is that the menu has changed.
In fact, the only thing that we can do is to select one of the
options given in the menu.
We want to "input" our problem. Therefore ,
we press  to move to the input phase. to move to the input phase.
|

| The input phase changes the menu again.
Now we need to decide among these menu items. We want to enter
a list for the dividend. We will put that list into {P1}.
Therefore,
we press  to input the {P1} list. to input the {P1} list.
|

| The program prompts us for the list of values to put into {P1}.
The menu has disappeared. We need to enter the list.
However, to do this we need to be able to
type the brace, {. That character is not on the
keyboard. We can find the { and the } on the LIST menu.
We press   to open that menu, shown
at the bottom of Figure 5. to open that menu, shown
at the bottom of Figure 5.
|

| Now we can use the menu ites to formulate our list
of coefficients for the dividend, namely,  to continue. to continue. |

| The program responds by displaying the earlier menu.
We will want to enter the second polynomial, {P2},
to hold the coefficients of the divisor.
Therefore, we press  . . |

| Again we want to enter a LIST, and again we need to open the
LIST menu so that we have access to the { and } characters.
We press   to open the LIST menu,
shown at the bottom of Figure 8. to open the LIST menu,
shown at the bottom of Figure 8.
|

| In Figure 8 we have used the menu items to help
enter the list that is to be assigned to {P1}.
Then we hit the  key to move to Figure 8a. key to move to Figure 8a. |

| We are done with our input phase. We want to return to the
earlier menu in the POLY3 program. Therefore, we presss the
 key to select the key to select the
|

| Our choices are limited to the items in the menu.
We have already input the lists that represent the two polynomials.
Press  to select the ALG option.
This will open a new menu, shown at the bottom of Figure 10. to select the ALG option.
This will open a new menu, shown at the bottom of Figure 10.
|

| The menu gives us the options of
P1*P2 to get the product of the polynomials P1/P2 to get the quotient of the polynomials P1^P to raise P1 to some power P1=0 to find the zeros of P1 Choose |

| The program responds with the quotient, given as a
list of coeeficients. Thus,  to continue. to continue. |

| The program has gone on to give us the
remainder, again as a list of coefficients. In this case that
remainder is just the constant, – 1. Note that the program is
in a paused condition again. Press  to continue the program.
 |

| In Figure 13 the program has returned to give us the options
of the menu at the bottom of the screen.
We are done with this problem. Therefore,
press |

| The options of this menu would allow us to quit if we are done with the program, or to enter new values if we want to do another polynomial division. |
Let us look at another problem, namely,


| Our first step will be to enter the two
polynomials. To move to Figure 15 we have pressed
 to onpen the INPUT menu.
Now we can press to onpen the INPUT menu.
Now we can press  to allow us to enter
the LIST of coefficients for the DIVISOR. to allow us to enter
the LIST of coefficients for the DIVISOR.
|

| In Figure 16 the program is prompting us for the
list of coefficients. As before, we need to open the LIST menu in order
to
make the braces, { and } available to us.
Press   to open that menu, shown at the bottom of Figure 17.
|

| To produce Figure 17 we have entered the list of coefficients for
{P1}, pressed  to accept that list
and return to the INPUT menu, chosen to enter {p2} from
that menu, opened the LIST menu again, and entered the coefficients for
the DIVISOR list. to accept that list
and return to the INPUT menu, chosen to enter {p2} from
that menu, opened the LIST menu again, and entered the coefficients for
the DIVISOR list.
|

| Press the  key
to accept that list and return to the INPUT menu, shown in Figure 18. Then
press key
to accept that list and return to the INPUT menu, shown in Figure 18. Then
press |

| We will use the  key
to select the ALG menu option, and move to Figure 20. key
to select the ALG menu option, and move to Figure 20. |

| Figure 20 represents the result of having asked for the
P1/P2 option, getting the quotient list, pressing
 to continue, and having the program
display the remainder list. According to Figure 20, the quootient is to continue, and having the program
display the remainder list. According to Figure 20, the quootient is
|
Here is one more example:


| Figure 21 shows the result of moving through the program until we have entered the two polynomials by giving the program the two lists of coefficients. |

| Once the input phases has been completed, we move through the menus to find the menu item requesting the program to compute the quotient. |

| Figure 23 shows the resulting answers. In addition, to generate
Figure 23 we have moved though the menus to return to the main menu.
This will allow us to demonstrate terminating the program by pressing the
 key to select the QUIT menu option. key to select the QUIT menu option. |

| The Done in Figure 24 indicates that we have terminated the program. |
PRECALCULUS: College Algebra and Trigonometry
© 2000 Dennis Bila, James Egan, Roger Palay