The following screen images trace the steps needed to generate a graph on a TI-89 for the solution to the problem given as
 .
However, because the TI-89 does not
respresent the values TRUE and FALSE by the numbers 1 and 0,
the screens here use the tester() function to convert the inequality
into the value 1 for TRUE and the value 0 for
FALSE.
.
However, because the TI-89 does not
respresent the values TRUE and FALSE by the numbers 1 and 0,
the screens here use the tester() function to convert the inequality
into the value 1 for TRUE and the value 0 for
FALSE.
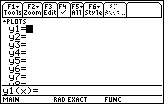
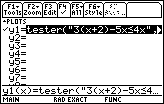
| We have opened the y= menu in
Figure 1 by pressing the   keys. The calculator used to generate these screens did not have any
previously defined graphs on it. Had a graph been defined
earlier on the calculator, we would need to CLEAR any old definitions
in order to arrive at Figure 1.
keys. The calculator used to generate these screens did not have any
previously defined graphs on it. Had a graph been defined
earlier on the calculator, we would need to CLEAR any old definitions
in order to arrive at Figure 1. |
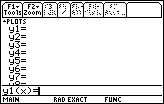
| We need to from the top portion of the screen in Figure 1
to the function entry and edit line at the bottom. To
do this we can press the
 key. Now we are ready to enter the inequality. key. Now we are ready to enter the inequality.
|

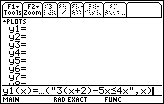
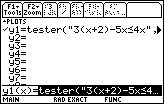
| The actual command that we want to enter is
4x",x)  to lock the calculator in
alphabetic mode, and then press to lock the calculator in
alphabetic mode, and then press
  
 ,
followed by to leave alphabetic mode.
Then we can continue creating the line shown in Figure 3 via the keys ,
followed by to leave alphabetic mode.
Then we can continue creating the line shown in Figure 3 via the keys


  .
Now we need to genreate the "less than or equal to" sign. It is not on the
keyboard, but we can get it by pressing the .
Now we need to genreate the "less than or equal to" sign. It is not on the
keyboard, but we can get it by pressing the
 keys.
And, we complete Figure 3 with the keys.
And, we complete Figure 3 with the
 key. The desired command is not done. More text must be entered, and
we will do that in Figure 4. key. The desired command is not done. More text must be entered, and
we will do that in Figure 4.
|
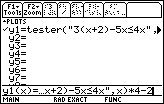
| To complete the command started in Figure 3 we press
 and .
The result should be the line shown at the bottom of Figure 4. and .
The result should be the line shown at the bottom of Figure 4.
|

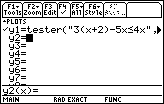
| Move from Figure 4 to Figure 5 by pressing the key.
The calculator is now ready for a second function. We do not have a second function to graph.
Instead, we wish to graph the first function on a standard graph. We will move to
the ZOOM window to select such a setting. Note the
|

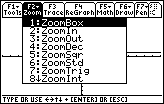
| We open the ZOOM window by pressing the  key. The ZOOM window is shown in Figure 6. We want to select the
ZoomStd item, item 6, from the menu. To do this we press the
key. The ZOOM window is shown in Figure 6. We want to select the
ZoomStd item, item 6, from the menu. To do this we press the
 key. key.
|
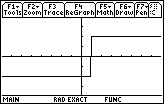
| The result of all of our efforts is the graph shown in Figure 7. Note that the
inequality is TRUE, that is tester() produces a 1, for all values of x
greater than or equal to 1.
For values of x that make the inequality FALSE, the graph is at level 0, which,
unfortunately, means that the graph is right on top
of the x-axis.
We know from solving the problem by hand that the answer is indeed all values of x greater than or equal to 1. However, looking at the graph in Figure 7 it is not quite so easy to be so exact. The raised part of the graph does not start at exactly 1. What other tools are there to help us examine the graph? |

|
To move to Figure 8 we have pressed the
 key to place the calculator in TRACE mode.
The initial x value is .12658228, and the corresponding y value is 0, indicating that
the inequality is FALSE for that x value. key to place the calculator in TRACE mode.
The initial x value is .12658228, and the corresponding y value is 0, indicating that
the inequality is FALSE for that x value.
|
|
We can use the cursor key,  , to move the pointer to the right.
Figure 9 captures the screen with the pointer as far to the right as possible before it jumps
to the raised portion of the graph. , to move the pointer to the right.
Figure 9 captures the screen with the pointer as far to the right as possible before it jumps
to the raised portion of the graph.
|

|
Pressing the key one more time moves the
pointer to x=1.1392409 with the corresponding y value 1, indicating that
the inequality is TRUE for that x value.
|
|
The x values chosen by the calculator in Figures 8, 9, and 10 have
been inconvenient. We can have the calculator choose "nicer" x values
by using the ZOOM window to change the WINDOW settings.
Therefore, in Figure 11, we return to the ZOOM menu via the
key. This time we will choose
the ZoomDec option, via the key,
to set the WINDOW so that we have nice decimal x values.
|
|
The actions described above produce the graph shown in Figure 12. Note that
both the x and the y scales have changed. The raised part of the graph,
the values of x that make the inequality TRUE, remain at the 1 level, but 1
appears further away from the x-axis.
We can return to the TRACE mode by pressing |
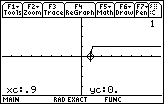
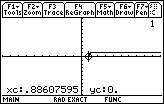
| The x value is as expected, 0.9, and the corresponding y value is 0. |
|
Pressing once moves the pointer to 1.1, where we have a TRUE
values. Note that in the ZoomDec setting, pressing the the right arrow, or the left arrow, cursor key results in
a change of the x-value by 0.2. later, in Figures 19 and 20, we will change that setting.
At the moment, we can demonstrate another feature of the TI-89. In particular, although the cursor keys
allow us to look at certain values, we can enter any x-value that we desire, and the calculator will
both determine the appropriate y-value.
|
|
To move from Figure 14 to Figure 15 we have pressed the key.
This will allow us to ask the calculator to evaluate the function when x=1 and to move the
pointer on the screen to the pixel that corresponds to that value. Once we press the
key the calculator does the evaluation and moves the pointer,
as is shown in Figure 16.
|
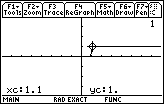
| From Figure 16 we can determine that x=1 is part of the solution to the original inequality. |
|
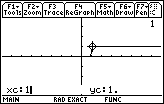
Let us test a value just less than 1. In particular, for Figure 17 we have pressed the
  key2.
We are getting ready to ask the calculator to evaluate the function and plot the result
for x=.99. key2.
We are getting ready to ask the calculator to evaluate the function and plot the result
for x=.99.
|
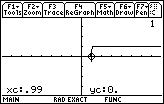
|
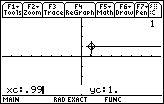
We press to accept the .99 value. The calculator
shows, in Figure 18, that the inequality is FALSE (produces the value 0) when x=.99.
|
|
In all of the images in Figures 12 through 18, a careful observer might be
concerned by the "step-like" climb from FALSE to TRUE. An enlargement
of the critical area shows these steps.
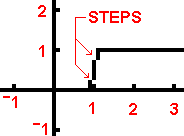 The explanation for these steps is as follows.
For all of these images, the ZoomDec setting has caused the xres value to be set at 2. The calculator
has evaluated every second x-value starting with xMin and with steps set at 0.1.
Therefore, the calculator evaluated x at 0.9 and at 1.1, in fact we observered exactly those values in
Figures 13 and 14. The calcualtor also tries to vertically connect adjacent plotted points. Therefore, the
calculator had to connect The explanation for these steps is as follows.
For all of these images, the ZoomDec setting has caused the xres value to be set at 2. The calculator
has evaluated every second x-value starting with xMin and with steps set at 0.1.
Therefore, the calculator evaluated x at 0.9 and at 1.1, in fact we observered exactly those values in
Figures 13 and 14. The calcualtor also tries to vertically connect adjacent plotted points. Therefore, the
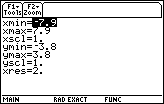
calculator had to connect To further demonstrate this, open the WINDOW screen by pressing
|
|
In Figure 20 we have used the  key to
move down to the xres line and we have changed the
value to 1 by pressing the key.
To return to the graph window we press .
The result is shown in Figure 21. key to
move down to the xres line and we have changed the
value to 1 by pressing the key.
To return to the graph window we press .
The result is shown in Figure 21.
|

|
The new graph in Figure 21 still has a step, but it is the single step
caused by trying to connect
the point We can make the graph a bit easier to follow if we change the function so that FALSE corresponds to something other than 0. This will get the FALSE portion of the graph off the x-axis. |
|
In Figure 22 we return to the "y=" screen via the
keys.
The "y1=" line is highlighted.
|
|
We press to move the highlighted function of Figure 22
down to the function entry and edit line, as shown in Figure 23.
|
|
Just pressing the key will move the cursor to the right end of
the function definition (because the entire function was highlighted in Figure 23).
Then we append the "*4–2" by pressing the
 keys. This produces the line at the bottom of
Figure 24. Multiplying by 4 and then subtracting 2 means that a TRUE value will now produce 2
keys. This produces the line at the bottom of
Figure 24. Multiplying by 4 and then subtracting 2 means that a TRUE value will now produce 2
|
|
To accept that line (the one at the bottom of Figure 24), we press the
key. Figure 25 has the new function definition assigned to "y1=" even though the additional
characters can not be seen on that screen.
Then we press |
|
The graph shown in Figure 26 has the advantage that we can see the FALSE region as well as the TRUE region.
In addition, because xres is still 1, the calculator is plotting each of the x-values.
Therefore, it connects the point |
PRECALCULUS: College Algebra and Trigonometry
© 2000 Dennis Bila, James Egan, Roger Palay