Complex 3 equations in 2 variables, 2 parallel, no unique solution
The main page for solving systems of linear equations on the TI-85 and TI-86.
The previous example page covers a Complex 3 equation 2 variable situation,
with no unique solution.
The next example page covers a Complex 3 equation 2 variable situation,
where there is a solution.
WARNING: The TI-85 and TI-86 are almost identical in their use of the SIMULT function.
The major difference is the labels that are on certain keys. On the TI-85,
SIMULT is the 2nd function on the  key, whereas on the TI-86
SIMULT is the 2nd function on the
key, whereas on the TI-86
SIMULT is the 2nd function on the  key. When a difference is
important it will be presented in the text below. The exception to this is the "3" key. On the
TI-85 it appears as
key. When a difference is
important it will be presented in the text below. The exception to this is the "3" key. On the
TI-85 it appears as  , while on the TI-86 it is
 . To save some space, and to ignore this difference, the numeric keys
(the gray ones) have been changed here to only show the key
face, as in
. To save some space, and to ignore this difference, the numeric keys
(the gray ones) have been changed here to only show the key
face, as in  .
In addition, the
.
In addition, the  key will be shown as
  , again to save space.
The problem we will use on this page is
5x - 3y = 26
-2x + y = -10
5x - 3y = 17
As was the case in the previous example, we have just two variables, but
we have 3 equations.
The "SIMULT" function always expects the same number of equations as we have variables.
In a real sense, we have an extra equation here. If we only had two equations then we could use
"SIMULT" to find their point of intersection. Let us move ahead in that direction. At first
we will restrict our analysis to the first two equations:
5x - 3y = 26
-2x + y = -10
Figure 1
|
The keystrokes to start this process are the same on the two calculators, although
the keys have a different name. For the TI-85 we start with  and , but for the TI-86
we start with
and . On either calculator this selects the "SIMULT" function.
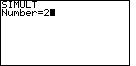
The calculator responds with a request for the
value of "Number" as shown in Figure 1. The "SIMULT" function expects to have exactly the
same number of equations as we have variables. For our restricted version
of the problem, we have 2 variables
and 2 equations. Therefore we respond with the
and , but for the TI-86
we start with
and . On either calculator this selects the "SIMULT" function.
The calculator responds with a request for the
value of "Number" as shown in Figure 1. The "SIMULT" function expects to have exactly the
same number of equations as we have variables. For our restricted version
of the problem, we have 2 variables
and 2 equations. Therefore we respond with the  key to complete
Figure 1. key to complete
Figure 1.
|
Figure 2
| We leave Figure 1 by pressing the key.
That will cause the display to change to Figure 2.
In that figure we have also entered the desired values,
5, -3, and 26, via the

 and
and  keys. keys. |
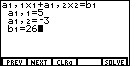
Figure 3
| We leave Figure 2 by pressing the key.
That will cause the display to change to Figure 3.
In that figure we have also entered the desired values,
-2, 1, and -10, via the
 and
and  keys.
After pressing
those keys the screen should appear as in Figure 3. keys.
After pressing
those keys the screen should appear as in Figure 3. |
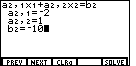
Figure 4
| At this point we are ready to ask the calculator to solve the
problem. We press the
 key, and the calculator responds with the solution as
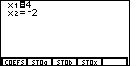
shown in Figure 4. The solution, x1=4
and x2=-2, translates, in the restricted version of the equations
as x=4 and y=-2. This is the point of intersection for the first two equations. key, and the calculator responds with the solution as
shown in Figure 4. The solution, x1=4
and x2=-2, translates, in the restricted version of the equations
as x=4 and y=-2. This is the point of intersection for the first two equations. |
It is nice to have a solution to the first two equations.
Having that intersection means that the point (4,-2) solves both of the first two
equations. If we were to graph the first two equations, they would cross at the point (4,-2).
What about the third equation? If we were to graph the third equation,
5x - 3y = 17
would it cross the other two at the same point? One way to
answer this is to try the values (4,-2) in the third equation.
If it works, then (4,-2) will
solve all three equations and it would be the solution to the problem.
However, 5(4)+3(-2) is 26 not 17.
Therefore, (4,-2) does not satisfy the third equation, and there
is no unique solution to the system of three equations
5x - 3y = 26
-2x + y = -10
5x - 3y = 17
Actually, as we look at the equations, we see that the first 5x - 3y = 26 and third
5x - 3y = 17 are parallel. The second equation is a transversal (a crossing line)
for the parallel lines. With the first and third equations being parallel, they can not
have any point in common. The second equation, 5x - 3y = 26 must intersect the first and the third
equations at different points.
Another way to see this is to re-use the "SIMULT" operation to see where the third
equation intersects with the second equation. The keystrokes and screens
needed to do this are given below.
Figure 5

| We had the solution to the first two equations displayed in Figure 4. Now we want to
return to the data entry screen. To do this we select the
"COEFS" command from the menu by pressing the  key. The result is shown in Figure 5.
The calculator has returned to the screen where we enter the coefficients and constant
for the first equation. The blinking cursor is covering the 5.
key. The result is shown in Figure 5.
The calculator has returned to the screen where we enter the coefficients and constant
for the first equation. The blinking cursor is covering the 5.
|
Figure 6
|
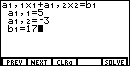
Now we need to enter the coefficients and the constant for the third equation, namely,
5, -3, and 17. However, the 5 and the -3 are already in place. Therefore,
we can use the down arrow key to move to the b1 entry.
At that point we can enter the value 17. We do this via the keys
 and
and  . The result is shown in Figure 6. . The result is shown in Figure 6.
|
Figure 7
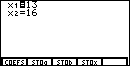
| Figure 6 shows that we have entered the values of the third equation.
The coefficients for the second equation are already in the machine. Therefore,
we need only select the "SOLVE" command from the menu, via the
key, to have the calculator find the intersection of the
third and the second equations. Figure 7 shows that those two equations have the point
(13,16) in common. Since this is not the point where the first and the second equations cross,
we can see that the three equations do not have a single point in common.
|
At this point we have shown in two ways that the three original equations do not have a
single point in common, that they do not have a unique solution. For completeness, the presentation
below verifies this yet again by looking at the intersection of the first and the third equations.
We know that these are parallel equations and that there should not be a point of intersection.
Figure 8

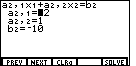
| We leave Figure 7 by selecting the "COEFS" menu item via the
key. This returns the calculator to the data entry screen
shown in Figure 8. The blinking cursor is covering the value 5. We recognize these values
as the coefficients of the third equation. We want these values. Therefore, we
will leave them here and move to the next screen to re-enter the coefficients and constant
for the original first equation. We do this by selecting the "NEXT" menu item
via the  key. key.
|
Figure 9
| Figure 9 shows the values for the second equation. We know that the
previous screen held the coefficents and constants for the third equation.
We want to replace the values shown in Figure 9 with the values for the first
equation. |
|
Figure 10
|
We re-enter the first equation values via the
and keys.
Figure 10 shows those values. Agan, the calculator is ready to solve the system of
two equations, this time for the third and the first equation.
We press to select the "SOLVE" menu item.
|
Figure 11
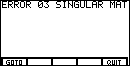
| Figure 11 shows the result of the computation. The third and first equations
do not have a single point of intersection. This is exactly the result
that we expect from parallel, or identical, lines. |
The main page for solving systems of linear equations on the TI-85 and TI-86.
The previous example page covers a Complex 3 equation 2 variable situation,
with no unique solution.
The next example page covers a Complex 3 equation 2 variable situation,
where there is a solution.
©Roger M. Palay
Saline, MI 48176
November, 2010