
 key to get to the MATRIX
screen. The TI-83 Plus and TI-84 Plus calculators use the two key sequence

 to get to the MATRIX
screen. The results of the calculator survey for the Fall 2010 semester are:


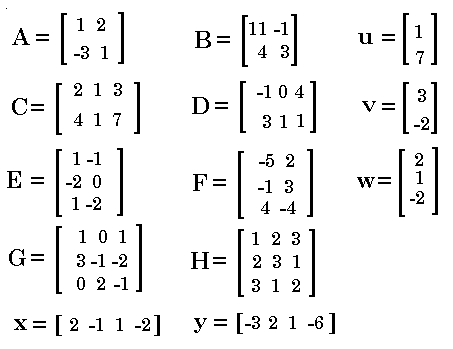
 to demonstrate moving to the
MATRIX screen. Users of tthe TI-83 will have to substitute their one key action for the two key presented here.
An almost as important note: The TI-84 Plus allows for software upgrades. The newest version of the software, version 2.53, allows for a much prettier display of matrices. If you are using the calculator with the new software you can turn off the prettier display (directions to do so are way down at Figures 60 through 65) to make following the first 60 figures a bit easier.
|
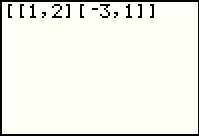
Figure 1 demonstrates the most straight forward method for entering a matrix. The entire
matrix is enclosed in square brackets, [ and ].
Each row of the matrix is also enclosed in square brackets. When entering the matrix we separate numeric
values with a comma. The keystrokes to enter Figure 1 would be


    . .
|
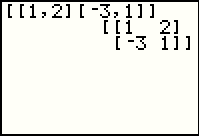 |
If we now press the  key, the calculator accepts our definition and displays the matrix.
Note that the displayed matrix is on multiple lines, the enclosing square brackets are still there, each row is still
surrounded by square brackets, but that the commas are not present. key, the calculator accepts our definition and displays the matrix.
Note that the displayed matrix is on multiple lines, the enclosing square brackets are still there, each row is still
surrounded by square brackets, but that the commas are not present.
|
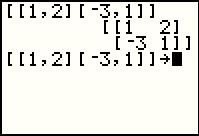 |
We want to store the matrix in one of the ten (10) defined matrices on
these calculators. Those matrices have specific, given names. In particular, they are
[A], [B], [C], [D], [E], [F], [G], [H], [I], and [J]. We can recall a previous entry
by using the   sequence. Following that
we press the sequence. Following that
we press the  key to arrive at Figure 3. key to arrive at Figure 3.
|
 |
Even though we can enter square brackets and we can type letters, we cannot type the single symbol
[A]. We need to move to the MATRIX menu to find that symbol. We move to
Figure 4 by pressing the   key sequence.
[Remember, on the TI-83 there is a single MATRIX key to do this.] We ant to store this in [A],
the highlighted selection, so we press the key sequence.
[Remember, on the TI-83 there is a single MATRIX key to do this.] We ant to store this in [A],
the highlighted selection, so we press the  key to move to Figure 5. key to move to Figure 5.
|
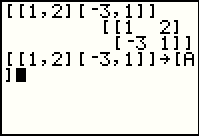 |
This is the entire command to define a matrix and store it in [A].
Pres  to perform the command. to perform the command.
|
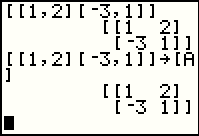 |
Again, the calculator displays the matrix, but this time the matrix is stored in [A]. There is no indication of the fact that it is stored on this screen. |
 |
Figure 7 shows the definition of another matrix, the one we want to store in [BD], along with
the arrow indicating that we have already pressed the  key.
Now we want to enter the symbol [D]. To do that we need to return to the
MATRIX menu. key.
Now we want to enter the symbol [D]. To do that we need to return to the
MATRIX menu.
|
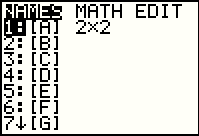 |
Having returned to the MATRIX menu, we see that the display has changed to show that [A] is defined as a 2x2 matrix. This reflects our earlier steps. However, at this point we merely want to select [D], item number 4. |
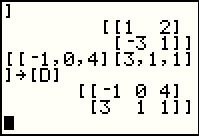 |
Press  to insert the [D] at the end of our command and then
press to insert the [D] at the end of our command and then
press  to perform the command and move to Figure 9.
The matrix [D]
is displayed as a 2 row, 3 column matrix. to perform the command and move to Figure 9.
The matrix [D]
is displayed as a 2 row, 3 column matrix.
|
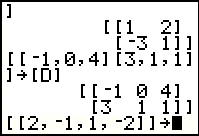 |
In Figure 10 we have entered the definition of the matrix originally named x in the image at the top of this web page. Notice that this is a matrix with 1 row and 4 columns. It must still be entered in the matrix form with the surrounding square brackets and the single row enclosed in square brackets. Unfrtunately, we cannot have a matrix with the name x on the TI-83 family of calculators. We are restricted to the 10 defined matrices on the calculator. Therefore, we will have to select a different name. We will assign this matrix to [J]. |
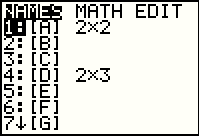 |
We move to the MATRIX page to find the name [J], but it is not there.
You might notice that there is a downward pointing arrow after the final option number, 7,
at the bottom of the screen. This indicates that there are more options.
We will need to move down (or up) using the cursor keys
 or or  to find the desired name, [J]. to find the desired name, [J].
|
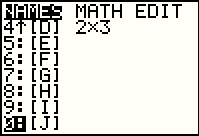 |
In Figure 12 we have located the name [J] and highlighted its selection key, 0.
We can choose the [J] entry by pressing the  key. key.
|
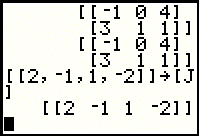 |
Figure 13 shows that the [J] matrix name was inserted in our command. We then
pressed the  key to perform the command.
The calculator responded with a display of the matrix. key to perform the command.
The calculator responded with a display of the matrix.
|
 |
In the previous screens we have seen a method of just typing in the
matrix, giving the STORE command via the  key,
selecting the matrix name from the MATRIX
window, and pressing key,
selecting the matrix name from the MATRIX
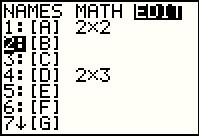
window, and pressing  to perform the command. to perform the command. Starting with Figure 14 we will look at another way to enter a matrix. Here, in Figure 14, we return to the MATRIX window, but this time we use the  key to move to highlight the EDIT feature.
Once there we use the key to move to highlight the EDIT feature.
Once there we use the  key to highlight matrix
[B], the one we will enter now usign the editor. Finally, we press the key to highlight matrix
[B], the one we will enter now usign the editor. Finally, we press the  key to move to Figure 15.
|
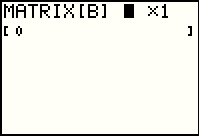 |
The calculator displays [B] in its current state. The top of the screen gives the current dimensions, that is, the number of rows and columns of [B]. We can change those dimensions by entering new values in this region. |
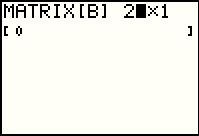 |
The matrix that we want to enter has 2 row and 2 columns. We press the
 key to indicate the 2 rows. key to indicate the 2 rows.
|
 |
Press  to move to the number of columns.
Notice in Figure 17 that the highlight is now on the number of columns and taht the editor has created
two rows for our matrix. to move to the number of columns.
Notice in Figure 17 that the highlight is now on the number of columns and taht the editor has created
two rows for our matrix.
|
 |
Use the  key to indicate that there are two columns. key to indicate that there are two columns.
|
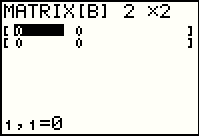 |
Press the  key to accpt that value.
The calculator changes the display to have two rows and two columns.
In addition, the calculator cursor is positioned at the first item in the matrix, ready
for us to enter a value. key to accpt that value.
The calculator changes the display to have two rows and two columns.
In addition, the calculator cursor is positioned at the first item in the matrix, ready
for us to enter a value.
|
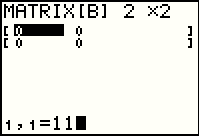 |
The value for row 1 column 1 is 11, so we enter the value and the display changes
to that shown in Figure 20.
Press the |
 |
The calculator has accepted the value of 11 for row 1 column 1 and it has moved to the next item in the matrix. |
 |
We pressed  
 to put the -1 value into row 1 column 2
and then move to the next item. to put the -1 value into row 1 column 2
and then move to the next item.
|
 |
Pressing the  
  gets us to Figure 23. gets us to Figure 23.
|
 |
Figure 23 completed the data entry for [B]. We can return to the MATRIX window
by using the   keys.
Then move to the EDIT
subwindow and move the highlight down to [C]. keys.
Then move to the EDIT
subwindow and move the highlight down to [C].
|
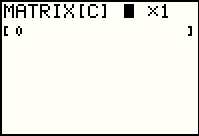 |
Press  to move to the matrix edit window
in Figure 25. Now we are ready to enter the dimensions, row and column, of the
matrix, followed by the daa values that we want in the matrix. to move to the matrix edit window
in Figure 25. Now we are ready to enter the dimensions, row and column, of the
matrix, followed by the daa values that we want in the matrix.
|
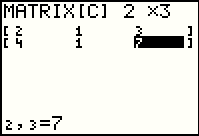 |
Matrix [C] has 2 rows and 3 columns. We entered those values and then the six values that fill the matrix. |
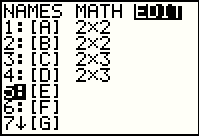 |
Having completed [C] in Figure 26, we return to the MATRIX window, move to the EDIT subwindow, highlight [E] so that we are redy to specify and fill [E]. |
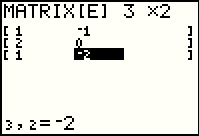 |
Figure 28 shows [E] specified as 3 rows and 2 columns, and the values have been entered. But wait! There is a data entry error! The item in row 2 column 1 was entered as 2 but it needs to be -2. |
 |
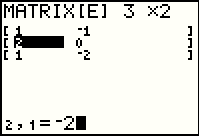
Correcting the vlaue is not a problem. We use the cursor keys to move the highlight back to row 2 column 1. |
 |
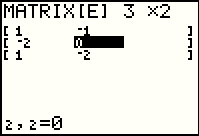
Now we enter the correct value. It is displayed at the bottom of the screen. |
 |
We tell the calculator to accept the new value by pressing the  key. Figure 31 shows that the correction has been made.
|
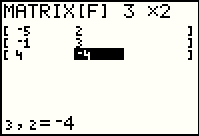 |
Figure 32 shows the data entry for [F]. |
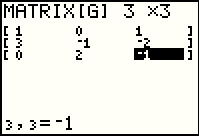 |
Figure 33 shows the data entry for [G]. |
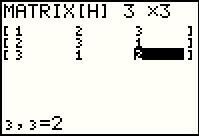 |
Figure 34 shows the data entry for [H]. |
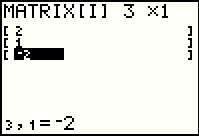 |
Figure 35 shows the data entry for [I]. |
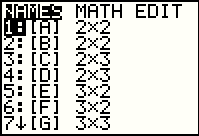 |
Returning to the MATRIX window, we see that all of our matrices, at aleast oall the ones that fit on the window, are defined. |
Thus far we have seen how to get matrices into the calculator. The section below discusses matrix addition, scalar multiplication, and matrix transposition on the TI-83 family of calcualtors.
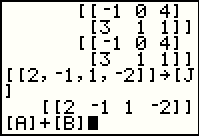 |
First, let us look at adding  and and
 .
Pleasantly, matrix addition is straight forward.
We do have to return to the MATRIX window to retrieve the names of the
matrices, but the form of the command is just [A]+[B],
as shown in Figure 37. .
Pleasantly, matrix addition is straight forward.
We do have to return to the MATRIX window to retrieve the names of the
matrices, but the form of the command is just [A]+[B],
as shown in Figure 37.
|
 |
Press  to perform the task. The calculator does the matrix
addition and displays the result.
As expected, matrix addition adds corresponding matrix
entities and puts them into a cooresponding position in the
resulting matrix. to perform the task. The calculator does the matrix
addition and displays the result.
As expected, matrix addition adds corresponding matrix
entities and puts them into a cooresponding position in the
resulting matrix.
|
 |
In fact, not only can we do matrix addition, we can also do matrix subtraction. Figure 39 demionstrates the [B] - [A]. |
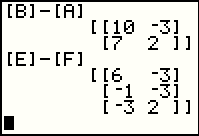 |
Figure 40 conntinues the demonstration of matrix subtraction with
another example, this time using
 and and
 . Notice that both
[E] and [F] are 3 row and 2 column matrices, and therefore, the
result is a 3 row, 2 column matrix. . Notice that both
[E] and [F] are 3 row and 2 column matrices, and therefore, the
result is a 3 row, 2 column matrix.
|
 |
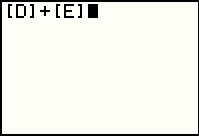
Matrix addition and subtraction require that the two matrices being used
have the same dimensions (i.e., they have the same
number of rows and columns). In Figure 41 we formulate the command to add
 and and  .
These two matrices do not have the same dimensions.
We saw that [E] had 3 rows and 2 columns, but
[D] has 2 rows and 3 columns.
When we attempt this operation by
pressing the .
These two matrices do not have the same dimensions.
We saw that [E] had 3 rows and 2 columns, but
[D] has 2 rows and 3 columns.
When we attempt this operation by
pressing the  key, the calculator
responds as in Figure 42. key, the calculator
responds as in Figure 42.
|
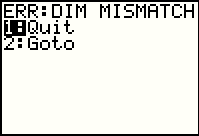 |
This is a typical error message: short and cryptic.
We are told that we have a DIMension MISMATCH and that wour options are
to quit or to Goto (meaning go to the offending statements so that a correction can
be made. We press the  key to select the second option. key to select the second option.
|
 |
The calculator has returned us to the offending command. We are now free to change the comamnd or even just clear it. |
 |
In this case we will use the  key to back up.
Note that even pressing that key once moves us back to the start of the
matrix name. That is because the matrix name, [E], is an entity, an item we
selected from the list of matrices rather than separate characters (the left bracket, the E, and
the right bracket). key to back up.
Note that even pressing that key once moves us back to the start of the
matrix name. That is because the matrix name, [E], is an entity, an item we
selected from the list of matrices rather than separate characters (the left bracket, the E, and
the right bracket).
|
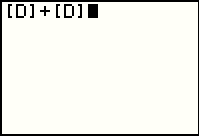 |
To continue to modify the old, erroneous, command, we return to the MATRIX
window and select [D]. The calculator replaces the old entity, []
with the new one, [D].
Press |
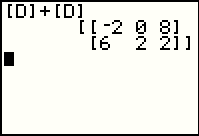 |
[D] has the same dimensions as itself, so we can clearly add [D] to [D] as shown in Figure 46. As you might expect, every matrix element in the answer is just twice the corresponding element in the original matrix. This suggests that we should be able to define scalar multiplication of a matrix as multiplying each element of the matrix by the scalar value. |
 |
In Figure 47 we test out scalar multiplication in the form of
2 * [C], giving exactly the answer we expected.
We follow that by an example where the scaler is not an integer and see that the process works the same way. |
 |
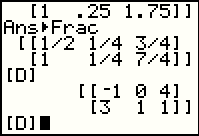
If the decimal values in the display in Figure 47 are bothersome, we can ask the calculator to convert those values to
fractions by using the  command found
in the MATH window. command found
in the MATH window.
|
 |
There are times when we want to rearrange a matrix such that the rows become the columns and the columns become the rows. Figure 49 redisplays [D]. Here we see that [D] has 2 rows and 3 columns. The first row contains the values -1, 0, and 4, while the second row contains the values 3, 1 and 1. We would like to produce a new matrix that has -1, 0, and 4 in the first column with 3, 1, and 1 in the second column. The process for doing this is called a transposition. |
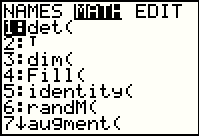 |
We find the command to do a transposition in the MATRIX window, MATH subwindow. The command is the second option in the list, the one symbolized by the raised small T. This operation is different from many of the other processes available in the list of options in that this is a "post-fix" operation. "Pre-fix" operations have the name of the operation followed by the thing upon which we are to operate. Thus, we say det([H]), Fill([B]), or dim([C]). A "post-fix" operation appeaars after the name of the thing upon which it is to work. In order to "transpose" matrix [D] we place the T symbol after the matrix name, as in [D]T. |
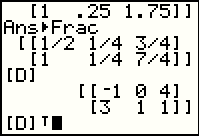 |
In Figure 51 we have placed the "transpose" symbol after the name of the matrix. We are ready to performe the operation. |
 |
For Figure 52 the transpose operation has been performed giving the answer that we anticipated, a new matrix with three rows and two columns. |
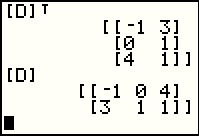 |
Notice that the process performed between Figures 51 and 52 did not change the contents of [D]. The process merely produced a new answer. |
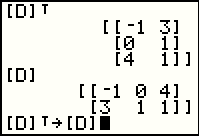 |
If we indeed want to transpose [D] and have the answer be stored in [D] then we need to store the result of the transposition back into [D]. A coomand to do this is shown at the ottom of Figure 54. |
 |
Performing that command producess the same screen results as we had before, but it also changes what is stored in [D]. We see that when we look at Figure 56 where we go back to echo the then current value of [D]. |
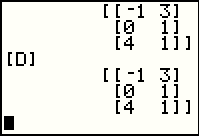 |
Figure 56 verifies that the value stored in [D] has changed. |
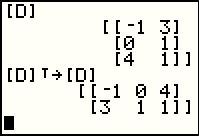 |
Of course, now that [D] has three rows and two columns, a further transposition of [D] will take it back to its original 2 row and 3 column state. |
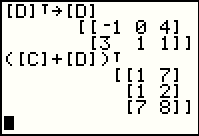 |
Figure 58 illustrates that we can ask for the transposition of a sum of two matrices. To do this the calculator will add the two matrices to produce a new matrix which will then undergo the transposition process. |
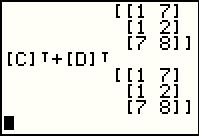 |
Here we see that we can ask the calculator to find the sum of the transposition of two matrices. The results suggest that the transposition of aa sum is the same as the sum of the transposition. |
The TI-83 family of calculators has been around for a long time. The most recent variation, the TI-84 Plus allows users to update the operating system on the calculator. TI has released a new version of the operating system, version 2.53. That version enables a MODE called MATHPRINT. The following screens show the new way that TI-84 Plus calculators, running under the new software, may display matrices. The fancier output can be turned off if you so desire.
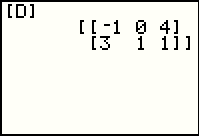 |
We start with a screen image of our [D] as it would appear on a TI-83 or TI-83 Plus. |
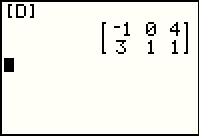 |
The TI-84 Plus, running version 2.53 of the operating system and with MATHPRINT turned on, would display the same matrix as shown in Figure 61. |
 |
On the TI-84 with version 2.53, the MODE window appears
as shown in Figure 62 but with the cusor flashing on NORMAL.
The choice between MATHPRINT and CLASSIC does not appear
on this windoe.
Note the small down arrows surrounding the word NEXT at the
bottom of the screen. We use the  key to move
down eight to shift the display to the second screen
shown in Figure 63. key to move
down eight to shift the display to the second screen
shown in Figure 63.
|
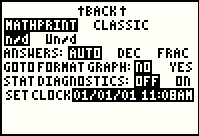 |
On this screen we see that the two options are MATHFORMAT and CLASSIC,
with the current setting on the former.
Use the  key to move the
flashing cursor to CLASSIC and then press key to move the
flashing cursor to CLASSIC and then press  to produce the screen
in Figure 64.
|
 |
This screen shows the second MODE window set to the "classic" view. Press
  to quit. to quit.
|
 |
Now when we go to the MATRIX window and select [D], then press
 to paste the [D] onto the main screen
and to paste the [D] onto the main screen
and  again to finish the command, the calculator displays the matrix
in the "classic" format. again to finish the command, the calculator displays the matrix
in the "classic" format. The calculator will remain in "classic" format until we return tot he MODE window and reset the value to MATHPRINT. |
©Roger M. Palay
Saline, MI 48176
September, 2010