Basic Statistics on the TI-85
The first problem to look at is to calculate basic statistics, mean and
standard deviation, for the following set of data:
2290, 2281, 2237, 2309, 2442, 2118, 1941, 1942, 1866,
2028, and 1865. These are the reported fall enrollments from 1987
through 1997 at Alpena Community College. We will do this work on the
TI-85. After doing the initial problem we will do the same analysis for
similar data from Bay de Noc Community College.
Figure 1
|
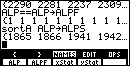
We start by entering the data values as elements of a list. We use the
  to open the List Menu,
shown at the bottom of Figure 1. Then the to open the List Menu,
shown at the bottom of Figure 1. Then the  key to
generate the left brace, followed by the eleven values separated by commas (using the key to
generate the left brace, followed by the eleven values separated by commas (using the
 key, and closing the list with the right key, and closing the list with the right
 key to generate the right brace. The key to generate the right brace. The
 key generates the key generates the  and shifts the calculator to alpha mode. We assign the list to ALP via the
  key sequence, and submit the command via
  .
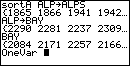
The calculator displays the start of the ALP list, using the ... to
inidcate that more appears off the screen.
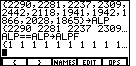
The TI-85 STAT menu, which we will be using, is going to want two lists.
Look ahead to Figure 3 and you will see that we will need to provide
an "xlist Name" and a "ylist Name". The xlist is expected to hold
the values. The ylist, which needs to be exactly as long as is the xlist, is expected
to hold the frequency for each xlist element. Thus, we need to generate a list of 11 ones.
Figure 1 demonstrates one way to do this. We use the statement
ALP==ALPALPF to create a new list,
exactly as long as is ALP, filled with 1's. .
The calculator displays the start of the ALP list, using the ... to
inidcate that more appears off the screen.
The TI-85 STAT menu, which we will be using, is going to want two lists.
Look ahead to Figure 3 and you will see that we will need to provide
an "xlist Name" and a "ylist Name". The xlist is expected to hold
the values. The ylist, which needs to be exactly as long as is the xlist, is expected
to hold the frequency for each xlist element. Thus, we need to generate a list of 11 ones.
Figure 1 demonstrates one way to do this. We use the statement
ALP==ALPALPF to create a new list,
exactly as long as is ALP, filled with 1's.
|
Figure 2

| For Figure 2 we exit from the List menu, via  and open the Stat menu, via
  . To finish Figure 2
and move to figure 3, press the key to select the
"CALC" option. . To finish Figure 2
and move to figure 3, press the key to select the
"CALC" option.
|
Figure 3
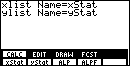
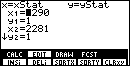
| Once CALC has been selected, the TI-85 prompts us for an xlist and a ylist,
proposiong xStat for the former and yStat for the latter. In addition, the names of the
available lists are given in the lower menu. Your lower menu may be different
if you have other lists that are defined on your calculator.
|
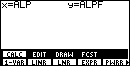
Figure 4

| We want to select ALP for the xlist so we press  .
Then we move to select a ylist by pressing the down arrow, .
Then we move to select a ylist by pressing the down arrow,  ,
and then ,
and then  to select ALPF from the menu. to select ALPF from the menu.
|
Figure 5
| To move from Figure 4 to Figure 5, press the
key. The calculator responds with Figure 5, confirming the choice for xlist and
ylist. Now, to leave Figure 5 we press to select
the 1-VAR option.
|
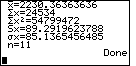
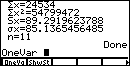
Figure 6

| The TI-85 responds with the data in Figure 6. This gives us
six values, the first three of which are the mean
of the values, 2119.90909091, the sum of the values, 23319, and the sum of the
squares of the values, 49843809.
The next two values are standard deviations. The first of these,
marked as Sx is calculated assuming that the data values are a
random sample of a much larger population. The calculated value Sx
is mant to be the best approximation to the standard deviation of the larger
population. (The text does not cover this until Chapter 9). The second value,
marked as  x, considers the
data values to be the population, and this is the standard deviation of those
values. The text presents this version of the standard deviation in Chapter 5.
Finally, Figure 6 ends with n, the number of elements in the list. x, considers the
data values to be the population, and this is the standard deviation of those
values. The text presents this version of the standard deviation in Chapter 5.
Finally, Figure 6 ends with n, the number of elements in the list.
|
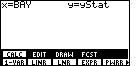
One of the interesting and important consequences of doing statistics on the TI-85
is the fact that the TI-85 automatically copies the xlist to xStat and the ylist to yStat.
We can see this, and learn something about the edit mode in the Stat menu, by moving to
that mode.
Figure 7

| We get to Figure 7 by pressing
to select EDIT from the top
menu of Figure 6. In response, the TI-85 asks for the lists that we want to edit. It is
suggesting ALP and ALPF in Figure 7. However, we can change that selection, and the
choice of available lists is given in the lower menu.
|
Figure 8
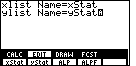
| We want to look at xStat and yStat. Therefore, we use
to select xStat, to move down
to the ylist, and to select yStat. This is the situation
shown in Figure 8. We can move from here to Figure 9 by pressing the
key.
|
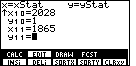
Figure 9
| Figure 9 shows the beginning edit screen for two lists, given at the top of the
screen as the x list and the y list. They are, in the case of Figure 9, xStat and yStat,
respectively, as we had asked. The actual screen shows the first two elements in
each list. We can see from this that xStat really does hold the values that we
placed into ALP and that yStat holds the 1's we placed into ALPF. We could use the
to move down the list to see other elements of each
list. Furthermore, we could change values, insert new value pairs,
via to select iNSi, or delete value pairs from
the lists via to select DELi.
|
Figure 10
| Figure 9 shows the start of the two lists. By using the  key we can move directly to the end of the list. This was done in order to arrive
at Figure 10.
key we can move directly to the end of the list. This was done in order to arrive
at Figure 10.
|
Figure 11
| Figure 11 has left the STAT menu, via
, started the
List menu via ,
initaited the OPS submenu via  , and selected the sortA
item via . , and selected the sortA
item via .
|
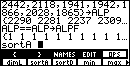
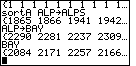
Figure 12
| In Figure 12, we complete the sort statement by going back to the NAMES
submenu, via , selecting
ALP via , following that with a store command
, pasting another ALP via ,
and then appending the final S with
  . .
|
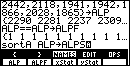
Figure 13
| To move to Figure 13, we merely use the key
to accept the command at the bottom of Figure 12. The sorted list,
now stored in ALPS is displayed. This will give us a chance to look at the
editor in the List menu.
|
Figure 14
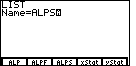
| To start the List menu editor, we leave Figure 13 via
. The
calculator starts the List Edit process by asking for the name of the list to edit,
while displaying the defined lists at the bottom of the screen. We want to look at
ALPS so we press , producing FIgure 14. To finish
this screen, and move to Figure 15, press .
|
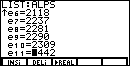
Figure 15

| In FIgure 15 we are in the List Editor. The name of the list appears at the top.
List elements are given on the screen (note that for e1 the cursor
is covering the leading 1 in 1865). Wecould move down the list by using the
key. However, we will use the same technique
as we used before, pressing the key to move to
the bottom of the list as shown in Figure 16.
|
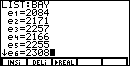
Figure 16
| Figure 16 shows the elements at the bottom of the list.
|
Not only can we move around in the list, we can insert new elements or we can
delete elements by using the menu items. Having seen the List Editor, let us use it
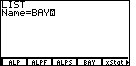
to create the list of values needed for Bay de Noc. First we will get out of the
editor via and to Figure 17 by starting the List menu,
, and selecting
the NAMES submenu via .
Figure 17

| Figure 17 shows us creating the list BAY by copying ALP to BAY.
Once that is done, we move to start the List Editor by
pressing .
|
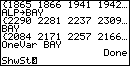
Figure 18
| Again, as in Figure 14, we need to supply the name of the
list to edit. In Figure 18 we choose BAY via .
|
Figure 19

| We move from FIgure 18 by pressing . The
calculator responds with Figure 19, and we are now ready to change the values
in the list to conform to the values we want for Bay de Noc.
|
Figure 20
| As we finish replacing values in the list, we use the
key to move to the next element. Figure 20
shows this process after we have entered the first 6 elements. We have completed
element 6, so we move to Figure 21 by pressing the
key.
|
Figure 21

| Figure 21 shows that as we move down from element 6, the calculator shifts the
display so that we now see the old element 7, and we have lost sight of element 1.
|
Figure 22

| We continue making the changes to get all eleven values for Bay de Noc.
Then we can leave the List Editor via the key and
move to Figure 23.
|
Figure 23
| Just to verify our work, in Figure 23 we have entered the name BAY and pressed
to cause the calculator to display the new list.
|
Figure 24

| We start the STAT menu and select the CALC option as shown in FIgure 24.
|
Figure 25

| This time we want to do the statistics on the values in BAY, and we already have
the desired frequencies in yStat. Therefore, we choose  to find the BAY item in the submenu, and then to select
BAY. We follow that with to move to the ylist which
we can leave as yStat. We press to accept our choices.
to find the BAY item in the submenu, and then to select
BAY. We follow that with to move to the ylist which
we can leave as yStat. We press to accept our choices.
|
Figure 26
| The TI-85 confirms our choices and waits for the next command, as in FIgure 26.
We select to perform our 1-VAR option. The
resulting display is shown in FIgure 27.
|
Figure 27

| Figure 27 has the calculated statistics for Bay De Noc.
|
The material presented in Figures 1 through 27 demonstrated using the menu system
to enter and edit lists of values and to do basic 1-variable statistics on those lists.
One requirement outlined above is that we need two lists. The xlist holds the values
to be used, and the ylist holds the frequency for each value in the xlist. For most of
our work, that ylist will be a list of 1's. If our xlist is called ALP, as it was above,
we found that we could generate the required frequency list, which we called ALPF, via
the statement ALP==ALPALPF. Furthermore, once we have
done a statistical analysis on our lists, ALP and ALPF, those lists are copied to
the standard lists xStat and yStat, respectively. As long as the length of the list
does not change, as was the case for the new list BAY, we can use the old
frequency list, either yStat or ALPF, to help in the computation of the 1-variable
statistics for the new list.
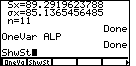
The TI-85 has a second method for doing 1-variable statistical analyses. That
second method does not use the STAT menu, but rather it uses two commands,
OneVar and ShwSt. Figures 28 through 38 demonstrate finding, using, and saving these
special commands. One big advantage of using the OneVar command is that it does
not require a second frequency list. For OneVar, if the frequency list is not given, then it
is assumed to be a list of 1's. Furthermore, doing the OneVar command without a
frequency list will cause the
standard list yStat to become the required frequency list of 1's. Let us look
at using these commands.
Figure 28
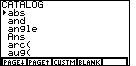
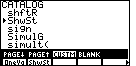
| All of the commands on the TI-85 are provided by the Catalog. To
access these commands press  .
That will produce the screen seen in Figure 28. .
That will produce the screen seen in Figure 28.
|
Figure 29

| The items given in the catalog are in order. We are looking for the OneVar
command, so we need to page down by using the key.
Actually, if we use 18 time we will get to the screen in
Figure 29, and then we will need to use the twice
to point to the OneVar command. Once there, as shown in Figure 29,
press to move to Figure 30.
|
Figure 30
| In Figure 30 we can see that the selection OneVar has been pasted onto the
screen. It is no different than if we had typed that command. If we were to end the
command here, the TI-85 would do the 1-variable calculations on the xStat data, which
is currently a copy of the BAY data. However, to demonstrate the OneVar command
we will get it to do the analysis on the original BAY data. To do this, we simply follow the
OneVar command with the name BAY.
|
Figure 31
| Figure 31 shows the state of the screen after we have appended BAY to the OneVar
command and then pressed . The calculator merely
responds with DONE. To see the results of the OneVar command we need to
issue another command, ShwSt. We could return to the Catalog, page down to
the ShwSt command, select it, press and therefore
paste the cammand onto the screen as in Figure 31. Or we could merely type the
command, being careful to use the proper upper and lower case letters. Finding the
command in the catalog is a pain but it gets the right word. Typing it with mixed mode
characters is a pain, but it requires fewer keys. Either way works and produces Figure 31.
|
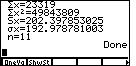
Figure 32
| We leave Figure 31 by pressing . This displays
the screen n Figure 32. Note that this shows the same values that we saw in Figure 27.
The OneVar and ShwSt sequence is really quite powerful, especially when you remember
that you do not need the frequency list. The drawback is that you need to generate these
two commands. Either typing the commands or finding them in the catalog is a pain.
Fortunately there is an alternative.
|
Figure 33

| In Figure 33 we have returned to the catalog via
, and moved
down to the OneVar command. Then we use the key
to select the CUSTM option. This opens the lower menu. In Figure 33 that lower
menu is blank because we have not identified any values to be placed into our custom
menu. We will do that now by pressing to place the
selected OneVar command into position 1 of our custom menu. The
result of this is shown in Figure 34.
|
Figure 34

| Figure 34 shows the revised custom menu with OneVa placed into position 1. Note
that altough item 1 shows only the first 5 characters, the real value will be the full
OneVar command.
|
Figure 35
| While we are at this, we can page down to the ShwSt item, select it, and
press to place that command into the second position
of our custom menu. This is shown in Figure 35.
|
Figure 36
| Having finished modifying our custom menu in Figure 35, leave the catalog via
. Then we will open the
custom menu via the key, and we can paste OneVar
onto the screen by using to select that item from our
custom menu. This is shown in Figure 36.
|
Figure 37
| We can now complete the OneVar command by entering ALP and
pressing . Agian, the TI-85 responds with
DONE and we will need to issue the ShwSt command to see the results.
However, we have placed that command in the custom menu. Therefore,
a simple will paste that command to the screen,
as shown in Figure 37.
|
Figure 38
| The key finishes the sequence in Fgure 37 and move to
Figure 38 to show the results of the OneVar ShwSt sequence. Note that Figure 38
shows the statistics for the ALP data, just as we saw in Figure 6. Unfortunately,
in Figure 38, because the custom menu is displayed, the output from ShwSt scrolls
off the top of the screen and we lose the value of the mean. This could have
been avoided by doing to paste ShwSt from the custom
menu onto the screen, then doing to close the custom
menu, and then doing the to perform the command.
|
©Roger M. Palay
Saline, MI 48176
November, 2010