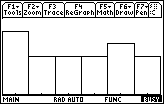
Figure 1
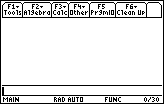
| Figure 1 represents a "clean" TI-89 home screen. That screen has a
command entry line, almost at the bottom, and a history area for
most of the screen (between the menu items at the top
and the command entry line at the bottom). Pressing the
 key will clear the command line.
It is not necessary to clear that line, but doing so does remove some of the clutter. key will clear the command line.
It is not necessary to clear that line, but doing so does remove some of the clutter.
In the same way, we can clear the history area
by using the two key sequence

 . This will open a small window and select the
Clear Home option. Again, this is not necessary. . This will open a small window and select the
Clear Home option. Again, this is not necessary.
|
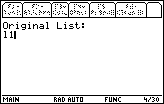
Figure 2

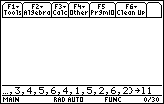
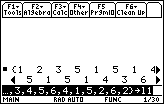
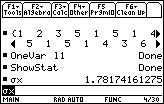
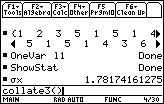
| We will start the problem by creating a list of values. We start a list
with the { character. We press
  to generate that curly brace in the data line. Then we enter each of
the numbers in the list, separating numbers with a comma. The keys to complete Figure 2 are
to generate that curly brace in the data line. Then we enter each of
the numbers in the list, separating numbers with a comma. The keys to complete Figure 2 are


 and .
This takes us to the right edge of the screen. We are not
done entering the list, however.
and .
This takes us to the right edge of the screen. We are not
done entering the list, however.
|
Figure 3
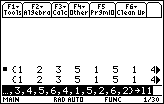
| In Figure 3 we continue entering the numbers in our list. Note that the
command area display scrolls to the right so that we can see the
new numbers and the commas.
The remaining numbers are generated via
and
.
We complete the list by entering the right curly brace, }, via the sequence
 .
Finally, we want to store this list under the name
l1 (note that this is a lowercase
letter "l" and
the digit "1"). The keys .
Finally, we want to store this list under the name
l1 (note that this is a lowercase
letter "l" and
the digit "1"). The keys
  complete the input line from Figure 3.
|
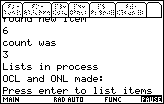
Figure 4
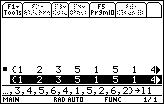
| We left Figure 3 with the complete command formulated in the command
entry line. However, we still have to tell the TI-89 to perform the command.
We do this by pressing the
 key. The TI-89
responds by first echoing the command in the history area and then
displaying the result of the command in that same history area.
We can see this in Figure 4 where we have two new lines in the history area.
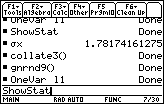
Note that the result of our creation of a list called l1 is an echo of that list.
At the same time, the entire command input line has been highlighted. key. The TI-89
responds by first echoing the command in the history area and then
displaying the result of the command in that same history area.
We can see this in Figure 4 where we have two new lines in the history area.
Note that the result of our creation of a list called l1 is an echo of that list.
At the same time, the entire command input line has been highlighted.
|
Figure 5
| We can move from the input line into the history
area to inspect the information that is displayed there. To
do this we press the  key. Note in Figure 5 that the
input area is no linger highlighted, and that the bottom line in the history
area is now highlighted.
The right-pointing
arrow in that line indicates that we can shift the display to the right to see more of that
information. key. Note in Figure 5 that the
input area is no linger highlighted, and that the bottom line in the history
area is now highlighted.
The right-pointing
arrow in that line indicates that we can shift the display to the right to see more of that
information.
|
Figure 6

| Figure 6 is the result of pressing the
 key 6 times, shifting the display for the
highlighted line. First, note that the other lines are not affected. Second, we
observe that the highlighted line now has both a left-pointed and right-pointed arrow
at the respective edges of the list. These indicate that there are more values to be
viewed at either end of the list. key 6 times, shifting the display for the
highlighted line. First, note that the other lines are not affected. Second, we
observe that the highlighted line now has both a left-pointed and right-pointed arrow
at the respective edges of the list. These indicate that there are more values to be
viewed at either end of the list.
|
Figure 7
| We can move back to the input line area by
pressing the  key.
Note, in Figure 7, that we have moved back to the input line, but that the
shift in the bottom line of the history has not been changed. key.
Note, in Figure 7, that we have moved back to the input line, but that the
shift in the bottom line of the history has not been changed.
Now that the desired list has been created in the calculator, we
can proceed to doing the statistical computations. As noted above, we
want to use the OneVar command. We could type this command. However,
that would require a number of keystrokes and it would require that we completely
remember the command that we want to use.
|
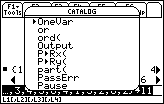
Figure 8

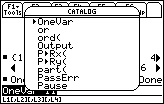
| A method for manufacturing the OneVar command is to find that
command in the catalog, a list of commands on the calculator. We open that
catalog by pressing the
 key. Figure 8 shows the catalog window.
The contents of the catalog are arranged alphabetically. The pointer is at the first entry,
abs(. We need to move that pointer down the list to find our
desired command. key. Figure 8 shows the catalog window.
The contents of the catalog are arranged alphabetically. The pointer is at the first entry,
abs(. We need to move that pointer down the list to find our
desired command.
|
Figure 9
| One way to jump down, or up, the list is to press the key associated with the
first character of the command we want. In our case, we want the OneVar command.
Therefore, we press the key that is associated with the letter "o", namely the
 key. Pressing that one key causes the
calculator to jump down the catalog names to the o's.
Fortunately for us, the first "o" command is the one we want, OneVar. Figure 9
shows that command at the top of the list with the selector arrow pointing
to it. key. Pressing that one key causes the
calculator to jump down the catalog names to the o's.
Fortunately for us, the first "o" command is the one we want, OneVar. Figure 9
shows that command at the top of the list with the selector arrow pointing
to it.
A careful examination of the screen in Figure 9 reveals that the calculator
gives us some helpful hints about the appropriate use of the OneVar command.
At the very bottom left of the screen we find the new message
 .
This is information about the required and the optional parameters that
are to follow the OneVar command. In this case we note that the command
is to be followed by at least one list, and possibly by as many as four lists. .
This is information about the required and the optional parameters that
are to follow the OneVar command. In this case we note that the command
is to be followed by at least one list, and possibly by as many as four lists.
|
Figure 10
| We press the
key to actually select the OneVar
command from Figure 9 and to paste it into the command line, replacing our entire
former command, as is shown in Figure 10.
As noted in the discussion following Figure 9, the OneVar command
needs to be followed by the name of a list. Quite by accident, our list is named "l1"
much like the "l1" suggested by the calculator in Figure 9.
We will enter our name for our list in Figure 11.
|
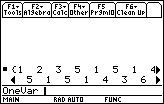
Figure 11
| We enter our list name by pressing the
keys. Figure 11 shows our complete command.
|
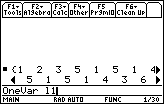
Figure 12
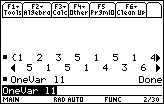
| Now we press to perform the
OneVar command. Figure 12 illustrates the results of that command.
It almost appears as if the command did nothing. The only thing that has changed is
that we have the command added to the history area, at the bottom left, and the
word "Done" has been added to the lower right of the history area.
Unfortunately, the OneVar command instructs the calculator to
do certain computations, but it does not cause the TI-89 to display
those results. The "Done" is our only indicator that the command was
successfully completed.
|
Figure 13
| We still need to find some way to see the results of the OneVar command.
The command to show those results is the ShowStat command. Again, we can
find it in the catalog, which we re-open via the
key. Note that the catlog appears just as
we left it in Figure 9.
|
Figure 14
| We are looking for the ShowStat command. To move down the command
list to the "S's" we press the
key. The calculator display
shifts to that shown in Figure 14. Unfortunately,
there are many commands that start with the letter S. Our desired command is
not even on the screen yet.
|
Figure 15
| We can press the
key 11 times to move down to the ShowStat command, as has been done
in Figure 15. Note that we merely want the selector arrow to be pointing to the
ShowStat command.
|
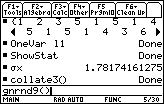
Figure 16
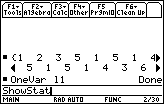
| Having selected the ShowStat command in Figure 15, we
press to place that command into the
command line in Figure 16.
|
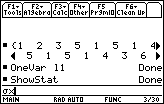
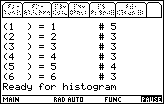
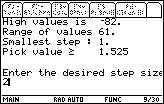
Figure 17
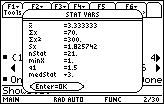
| Once the command is in place in Figure 16, we press
again to perform the command.
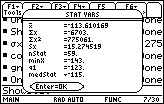
Figure 17 displays the window that the ShowStat command opens.
That window indicates that the mean of the data is 3.333333, that the sum of the
values in our "l1" list is 70, and that the sum of the squares of the values in
the list is 300.
The fourth value,
 gives an estimate of a standard deviation
based on a sample. This statistic is beyond the scope of the material presented here.
The next three lines in the window indicate that the number of items in the list is 21,
that the lowest value in the list is 1, and that the first quartile point is at 1.5.
The final line in the window, gives an estimate of a standard deviation
based on a sample. This statistic is beyond the scope of the material presented here.
The next three lines in the window indicate that the number of items in the list is 21,
that the lowest value in the list is 1, and that the first quartile point is at 1.5.
The final line in the window,  , gives us
the median value of the list as being 3. Although, at first,
there is no special indication of the
fact, we might suppose that there is even more to see in this window.
After all, we have seen
the first quartile, but not the third, and we have seen the minimum value,
but not the maximum value in the list. A closer examination shows that the equal sign
in the line is really a tiny arrow pointing down.
This seems to be meant as our only on-screen indication that more information is available. , gives us
the median value of the list as being 3. Although, at first,
there is no special indication of the
fact, we might suppose that there is even more to see in this window.
After all, we have seen
the first quartile, but not the third, and we have seen the minimum value,
but not the maximum value in the list. A closer examination shows that the equal sign
in the line is really a tiny arrow pointing down.
This seems to be meant as our only on-screen indication that more information is available.
|
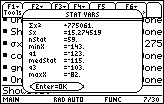
Figure 18
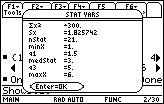
| We press the
key 2 times to shift the display to that shown in Figure 18. Here we see the
final two values: the third quartile is at 5 and the maximum value is 6.
At the same time, note that the equal sign for the median, the medStat line, is now
correctly formed, whereas, the equal sign in the top output line of the window now
has its equal sign contorted to be an up-arrow.
|
Figure 19
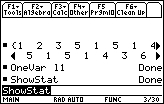
| We have seen all that the ShowStat command has to offer.
We press the to close that window.
We do need to recognize that ShowStat displays the results computed
by the OneVar command issued earlier. The two commands need to be given to
compute the values and then to display those values.
We might have noticed that the ShowStat command does not display
the population standard deviation for our values. This is a value that is computed by
the OneVar command. It is just not displayed by ShowStat on the TI-89.
|
Figure 20
| We would like to see the value of the population standard deviation.
It is stored in a system variable called  .
We will need to generate that name. We can use the TI-89 menu system to do this.
We press .
We will need to generate that name. We can use the TI-89 menu system to do this.
We press
 to open the CHAR window, shown in Figure 20. to open the CHAR window, shown in Figure 20.
|
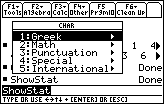
Figure 21
| In Figure 20, the Greek option was highlighted,
and that is the option we want. We open the Greek sub-window by
pressing the key. Figure 21
shows that window. Our desired Greek character,  ,
is not in that window.
However the down-arrow on the sixth line suggests that more characters follow. ,
is not in that window.
However the down-arrow on the sixth line suggests that more characters follow.
|
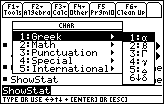
Figure 22
| We move down the sub-window by pressing the
key until we find the desired character,
as shown in Figure 22.
|
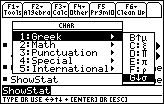
Figure 23

| Now we paste that character into the command line
by pressing the key.
(Note: we have used the TI-89 menus to generate the Greek letter sigma,
. An alternative method
to generate the sigma character is to remember the sequence
 .)
.)
|
Figure 24
| Of course, we wanted
not just ,
so we need to complete our command by
pressing  .
This produces the command line shown in Figure 24. .
This produces the command line shown in Figure 24.
|
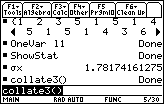
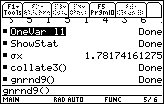
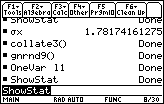
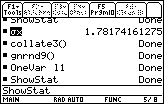
Figure 25
| Press to perform that command.
The result is shown in Figure 25 where the history area
holds the command and the associated
value, 1.78174161275. This is the population standard deviation of the
numbers in our original list.
|
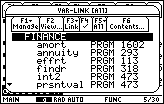
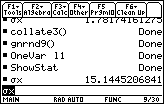
Figure 26
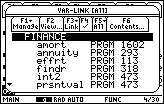
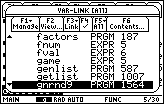
| In order to run the program COLLATE3 we need to
manufacture that name in the command line. We could do this by
typing the characters, or we could find the program in the variable listing
on the TI-89. We will choose this second approach.
We open the VAR-LINK window by pressing the
keys.
Note that the calculator used here has many programs and variables defined on it.
If you are following along on a different calculator, then your display will be
different, reflecting your different list of available programs and variables.
|
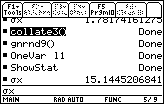
Figure 27
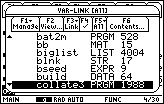
| As before, we can move to the names that start with the letter "C"
by pressing the
key. On this calculator that action took
our selection highlight directly to the collate3 program item.
|
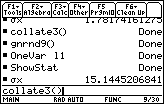
Figure 28

| Pressing
copies collate3
to the command line, along with
a left parenthesis. Programs on the TI-89 are followed by a possible list of
parameters enclosed in parentheses. COLLATE3 does not have any parameters.
nonetheless, the TI-89 will insist that the name be followed by a pair of parentheses
enclosing whatever parameters there may be.
|
Figure 29
| We complete our command by adding the required closing parenthesis by
pressing the
key.
|
Figure 30
| In Figure 29 we completed forming the desired command.
We press the key to start the program.
Figure 30 shows us the input/output screen for the running program.
Note how the TI-89 hazes out the menu area. Those menu items are no longer available.
The program has prompted us for the name of the list of values that we wish it
to process.
|
Figure 31
| We respond to the prompt of Figure 30 by pressing the keys
to generate our list name,
l1.
|
Figure 32
| Having typed the list name in Figure 31, we use
to submit that name to the program. The
collate3 program will process that list of values and it will produce
many lines of output that just flow across the input-output screen.
Finally, when the entire l1 list
has been processed, the collate3 program pauses as shown in Figure 32.
Note the  indicator in the lower right corner of the
screen.
indicator in the lower right corner of the
screen.
|
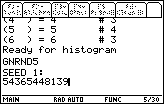
Figure 33
| We press to continue the program.
The output gives us the details on the frequency distribution of the
values in the original list. From Figure 33 we can see that the number 1
appears 5 times in l1. The numbers 2, 3, 4, and
6 each appear 3 times, while the value 5 appears 4 times.
Therefore, the mode value is 1.
Again, the calculator is paused, waiting for our command to go on to its next step.
|
Figure 34
| Pressing the key moves
us from Figure 33 to Figure 34. The collate3 program concludes by producing a
histogram of the input data values.
In a subtle change, the calculator has also moved from the input-output screen
of Figure 33 to the graphics screen of Figure 34. Note that an entirely new
set of menu options has appeared for Figure 34.
|
Figure 35
| So far we have seen a three different kinds of screens.
We started on the HOME screen. The programs accept input and produce
output on their own screen. And, there is a graphics screen.
To continue our work we will want to return to the HOME screen.
We do this by pressing the  key.
For Figure 35 we have returned to the HOME screen. key.
For Figure 35 we have returned to the HOME screen.
|
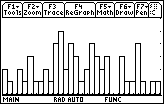
The first 35 Figures demonstrate statistical processing for a 21-element data set.
It is nice to see the TI-89 do all of the computations, but the process seems to
take many steps just to process those 21 values.
The real power of the TI-89 can be seen if we look
at processing a much larger set of data. For example, consider the
following table of numbers taken from a sample test on this material.
We could process this data using exactly the same steps that we used before.
The first step will be to get this list into the calculator. Even that seems to
be a formidable task. However, in this case,
you can generate this same list on your calculator as
as l1 via the gnrnd9 program on the TI-89
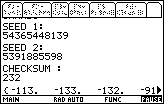
with
SEED 1=
54365448139 and SEED 2= 5391885598 and CHECKSUM=232.
We will demonstrate using the program to do this.
Figure 36
| We open the VAR-LINK window via th
keys.
|
Figure 37
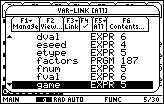
| We want to find the gnrnd9 program in the list.
We press  to jump to the
start of the "G" entries in the window.
On the calculator used to make these images, the first such "G" entry is "game".
This is the situation shown in Figure 37. to jump to the
start of the "G" entries in the window.
On the calculator used to make these images, the first such "G" entry is "game".
This is the situation shown in Figure 37.
|
Figure 38
| We move from Figure 37 to Figure 38
by pressing the key 3 times to
move the highlight to the gnrnd9 program entry.
|
Figure 39
| Presing the key will paste
gnrnd9 and the left parenthesis onto the command line. Then we press
to enter the closing parenthesis. Again, the
gnrnd9 program does not use parameters.
|
Figure 40

| Pressing the key again starts the
program. The TI-89 shifts back to the input-output screen. Here, in Figure 40,
we see the remnants of the earlier program, and the new output from our program.
The GNRND5 is text produced by the program (it should be changed to GNRND9, but the original
version of the program was written on a TI-85 and the text output was not changed in the
conversion to TI-89 code). The program has prompted us for the first seed value.
|
Figure 41
| In Figure 41 we have pressed the keys needed to generate that
seed value, as given above, 54365448139.
|
Figure 42
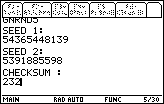
| Press to accept that value. The
program then asks for the second seed value. Enter the number
5391885598 and press
.
The program asks for the checksum value. Enter the value
232 as given in the problem above.
|
Figure 43
| Press to accept
the checksum. Assuming that we entered the correct values, the
program works on the task for a while. When it has completed the
task of generating all of the numbers that were in the
problem table, the program displays those values, and pauses while
we inspect the values. Note the PAUSE.
|
Figure 44
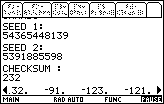
| We can use the key to shift the display
so that we can see more of the generated list. For Figure 44 we have pressed
that key 6 times.
|
Figure 45
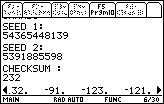
| Remembering that the GNRND9 program is still running,
we press to allow the program
to run to completion. The only noticeable change in Figure 45 is that the
indicator has disappeared.
Figure 45 continues to reflect the input-output program
screen. If we are to do more work we will have to return to the main
HOME screen.
|
Figure 46
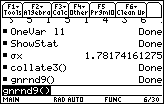
| We press to return
to the HOME screen. It appears just as we left it, expect that we can see
that gnrnd9 has run to completion.
GNRND9 produced our desired list of values in a list called
l1.
Our next step is to do the OneVar analysis on the values stored in
l1. We could go back to the
catalog to find the OneVar command, and then we could append the name of our list.
However, this is exactly the command that we gave earlier. In fact,
we can see that earlier command at the top of our history area.
Our approach will be to retrieve that command and to re-issue it
to do a new analysis on the new data stored in
l1.
|
Figure 47
| We can move the highlight
up to the OneVar command by using the
key 10 times.
Figure 47 shows the result of doing this.
|
Figure 48
| We press to
retrieve that command and to paste
it into the command line, as shown in Figure 48.
|
Figure 49
| We press again to perform the
action in the command line.
The result is the simple acknowledgement that the task was DONE.
Recall that we need to issue the ShowStat command to see the results.
That command is in the history area. Let us return there to retrieve it.
|
Figure 50
| Press 10 times to
move the highlight to the desired command..
|
Figure 51
| Press to paste that
command into the command line, as in Figure 51.
|
Figure 52
| Then we press to perform the
command. This opens the new window, seen in Figure 52.
We can read the most of our desired values from this table.
|
Figure 53
| To see the remaining values, the
3rd quartile point and the maximum value, we press the
key 2 times. Figure 53
shows the change in the display window.
|
Figure 54
| We press the
key to leave the statistics display window and return to the HOME
screen. We still want to find the population standard
deviation. Again, the desired command,
,
is in the history area.
|
Figure 55
| Press the
key 10 times to move the highlight to the
command in the history area.
|
Figure 56
| Press to retrieve the command and
to perform it.
The result is shown in Figure 56.
Continuing to repeat our earlier actions, we
want to run the COLALTE3 program so that we can examine
the frequency distribution of the values in the original list.
That way we can identify the mode value in the list.
|
Figure 57
| We return to the history area and
select the old command by
pressing 10 times.
|
Figure 58
| Paste that command into the
command line by pressing the key.
|
Figure 59

| We start the program by pressing
. The program asks for
the name of our original list.
We respond by pressing
to indicate that the name of the list is
l1.
|
Figure 60
| We press
to accept
the name l1 from Figure 59.
The program processes the values in that list, producing
lines of output as it goes along.
The program pauses, as shown in Figure 60, when it is ready to
give us the results.
|
Figure 61

| Pressing
has the calculator display the first
six values, and their associated frequencies.
|
Figure 62
| Pressing
causes the next group of values to be shown.
|
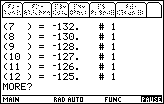
Figure 63
| Another
brings up another set of values and
their associated frequencies.
Note that the output on this screen indicates
both – 122 and – 120
appear 3 times in the original list.
|
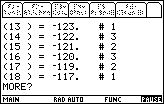
Figure 64

| Yet another
causes the calculator to display
the 19th throught the 24th values.
Also, we note that – 116 joins the previous most frequently
found values with a frequency of 3.
|
Figure 65
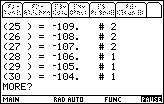
| We go on with another
key.
|
Figure 66

| Pressing
shows another set of six pairs of values.
|
Figure 67

| And, pressing
gives us the final five values and their
associated frequencies.
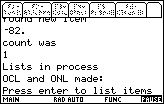
In this final set of values we see that – 91 appears 3 times
in the original list of values. Thus, we have a 4-way tie
for the most frequently occurring value. THe list is multi-modal with
mode values of
– 122,
– 120,
– 116, and
– 91 .
The program is now ready to try to produce a histogram of the
original data.
|
Figure 68
| We press to move to the
next phase of the program.
The program determines that the width of a
histogram column will have to be greater than 1, in fact it must
be greater than 1.525, in order to be displayed nicely. We respond
by pressing
to set the width at 2.
|
Figure 69
| Now we need to press
to get the calculator to
accept our value of 2, from Figure 68, and to create the histogram, shown
in Figure 69.
|
Figure 70

| As before, we can return to the HOME screen by pressing the
key.
|
Figure 71
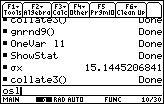
| To look at an item in OSL we can create its name
followed by the position number in brackets, as a command. We press
to lock in alphabetic mode. Then we continue with
to generate osl.
|
Figure 72
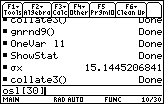
| We press
to leave alphabetic mode, and
we continue to form the psoition number in brackets, [30], by
pressing

 . .
|
Figure 73
| Now, we press to give that command.
The TI-89 responds, in the history area, with the command and the value of the
list item in the 30th position. This is indeed the median value.
|
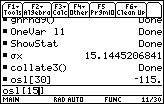
Figure 74

| As we look back at Figure 73, the entire
command line is highlighted. If we want to look at the
first quartile point, it will be in position 15 in that same list.
We can use the text that was left in the command line and modify it to
read osl[15]. To do this, we press
to move the cursor to the end of the line.
|
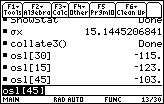
Figure 75
| We edit the contents of the command line by using the cursor control key
 to move one position to the left.
Then we delete the 0 and the 3 by pressing to move one position to the left.
Then we delete the 0 and the 3 by pressing
 and
. Then we insert 15 by pressing
and
.
These changes are reflected in Figure 75. and
. Then we insert 15 by pressing
and
.
These changes are reflected in Figure 75.
|
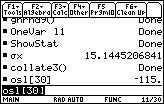
Figure 76
| As usual, press
to perform the command that was created in Figure 75.
Then, to complete Figure 76, we edit the command to read osl[45] by pressing
and
. Finally, we have the TI-89
perform the command by pressing
.
The history area shows all of the results, namely, the first quartile is
– 123 and the third quartile is – 103.
These are the same values that we saw back in Figure 53.
|