TI 83


 key sequence
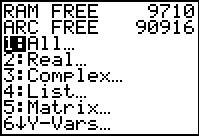
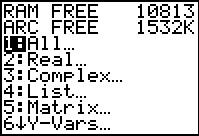
on the TI–83 brings up the screen shown in Figure 1.
There is really not much of concern on
this screen. If, at some point, there are too many programs
on the calculator, or too many lists on the calculator, then
we can use the option "Delete..." to delete certain programs or lists.
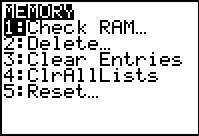
We can find out how much memory is available,
and how much memory is allocated for different items,
by selecting the first option, Check RAM...
We can select this in one of two ways.
First, because it
is item 1, we can just press the
key sequence
on the TI–83 brings up the screen shown in Figure 1.
There is really not much of concern on
this screen. If, at some point, there are too many programs
on the calculator, or too many lists on the calculator, then
we can use the option "Delete..." to delete certain programs or lists.
We can find out how much memory is available,
and how much memory is allocated for different items,
by selecting the first option, Check RAM...
We can select this in one of two ways.
First, because it
is item 1, we can just press the  key.
Alternatively,
because that option is currently highlighted, we could just press the
key.
Alternatively,
because that option is currently highlighted, we could just press the
 key. Either one will take us to a
screen that looks like that shown in Figure 2.
key. Either one will take us to a
screen that looks like that shown in Figure 2.
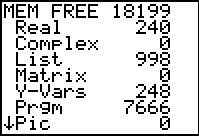
The screen also shows that the allocated memory amounts
to 240 bytes for some numeric variables, 998 bytes
for some list variables, 248 bytes for some Y-Variables,
and 7,666 bytes for some stored
programs.
As a demonstration, we will look at the stored programs and delete one of them.
To do this we want to return to the MEMORY screen by using the same key sequence
we used before, .
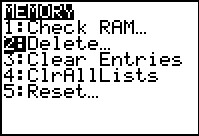
 key to move the highlight to the second option,
Delete... This is the option we will use to get the calculator to delete a program.
We will press the key to
have the calculator perform that option and move to Figure 4.
key to move the highlight to the second option,
Delete... This is the option we will use to get the calculator to delete a program.
We will press the key to
have the calculator perform that option and move to Figure 4.
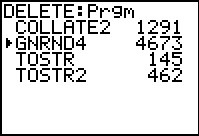
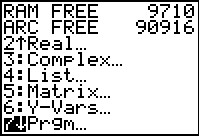
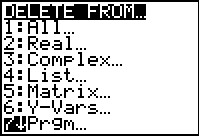 key a number of times to move
the highlight to the seventh option, Prgm..., the option
used to display a list of the programs stored on the
calculator and to allow us to delete a program from the
calculator. We press
to have the calculator perform that option.
key a number of times to move
the highlight to the seventh option, Prgm..., the option
used to display a list of the programs stored on the
calculator and to allow us to delete a program from the
calculator. We press
to have the calculator perform that option.
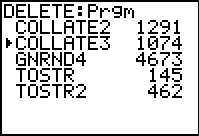 key to
highlight the COLLATE3 program.
Now, to delete the program from the calculator we just need to press .
key to
highlight the COLLATE3 program.
Now, to delete the program from the calculator we just need to press .
WARNING: There is no "undo" to this action. On the TI–83 deleting a program completely removes the program from the calculator. There are three ways to reload the program: you could type it in again (known as the bad way), you could transfer the program from another TI–83 or 83 Plus or 84 Plus calculator, or you could transfer the program from a computer to the calculator.
 key sequence to take us to Figure 7.
 to select the first option,
taking us to the screen shown in Figure 8.
to select the first option,
taking us to the screen shown in Figure 8.

We can get out of this screen, and return to just using the calculator via the
key sequence  .
.
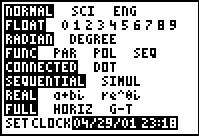
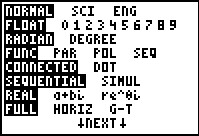
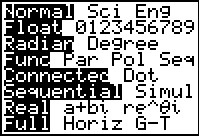 key on the TI–83 to bring up a screen
similar to the screen in Figure 9. For the Math 160 class we will be
quite satisfied to have all
of the values set on the leftmost option, as shown in Figure 9.
key on the TI–83 to bring up a screen
similar to the screen in Figure 9. For the Math 160 class we will be
quite satisfied to have all
of the values set on the leftmost option, as shown in Figure 9.
Note that later in the Math 160 course there is a program that modifies the setting of the second line of this screen to set the number of decimal digits displayed to 3 rather than to let that value Float, a setting that causes values to appear with as many decimal digits, up to the limits of the calculator, as is needed. After you are finished with that program you would need to return to this screen to change the setting back to the Float option.
TI 83 Plus
 key sequence
on the TI–83 Plus brings up the screen shown in Figure 10.
We notice that there are
special options on this screen to Archive and to Unarchive specific
items. (Rather than use these items we will demonstrate moving
programs to and from the Archive memory in a different manner.
Figures 14 through 17 will do this.)
The memory on the TI–83 Plus is segmented into two types of
memory. Part of the total memory is reserved for programs and
entities, such as variables,
lists, and matrices, that can be accessed directly.
This is the working memory.
The rest of the memory on the
TI–83 Plus is set aside to hold any such entities
in an archived state. Entities, be they programs or lists
or matrices, or other items, that are in the
Archive are not available to use in doing computations or in
running programs.
The Archive acts as an off-line storage place to hold items.
We would move items to the archive
if we want to free up space in the working memory without
really losing the item.
It is important to note that an item is either in working
memory or in the archive; it cannot be in both at the same time.
key sequence
on the TI–83 Plus brings up the screen shown in Figure 10.
We notice that there are
special options on this screen to Archive and to Unarchive specific
items. (Rather than use these items we will demonstrate moving
programs to and from the Archive memory in a different manner.
Figures 14 through 17 will do this.)
The memory on the TI–83 Plus is segmented into two types of
memory. Part of the total memory is reserved for programs and
entities, such as variables,
lists, and matrices, that can be accessed directly.
This is the working memory.
The rest of the memory on the
TI–83 Plus is set aside to hold any such entities
in an archived state. Entities, be they programs or lists
or matrices, or other items, that are in the
Archive are not available to use in doing computations or in
running programs.
The Archive acts as an off-line storage place to hold items.
We would move items to the archive
if we want to free up space in the working memory without
really losing the item.
It is important to note that an item is either in working
memory or in the archive; it cannot be in both at the same time.
Before we go further into the use of the working and the archived memory,
we will look at the first option, About.
In Figure 10, the highlight is on that option so we can just press the
to move to Figure 11.
Depending upon the age of the calculator, there are a number of different versions of the operating system software for the TI–83 Plus. All of them behave the same way as far as this dicussion goes.
We want to go back to look at more items on the MEMORY screen. Therefore,
we press the key sequence
to return to that
screen, as shown in Figure 12.
 key to move the highlight to the second option,
namely, to Mem Mgmt/Del... We can have the calculator perform that option
by pressing the key, taking us to Figure 13.
key to move the highlight to the second option,
namely, to Mem Mgmt/Del... We can have the calculator perform that option
by pressing the key, taking us to Figure 13.
 key to move the highlight down to the 7th
option, Prgm... Once there we just press the
key to move to Figure 15.
key to move the highlight down to the 7th
option, Prgm... Once there we just press the
key to move to Figure 15.
[Note that instead of moving the highlight, we could have just pressed the
 key to perform the 7th option.
This is true even if the 7th option is not visible, as was
the case in Figure 13.]
key to perform the 7th option.
This is true even if the 7th option is not visible, as was
the case in Figure 13.]
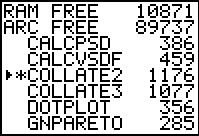
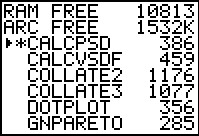
Programs that are in working memory are listed without an asterisk before the program name; programs that reside in the archive are listed with an asterisk before the program name. All of the programs in shown in Figure 15 are in working memory. Our plan is to move COLLATE2 from working memory to the archive memory. To do this we will have to move the highlight to point to the COLLATE2 program.
 key, we have moved the highlight to
the desired COLLATE 2 program.
To move the highlighted program, COLLATE2,
to the archive memory, and to move to Figure 17,
we just press the key.
key, we have moved the highlight to
the desired COLLATE 2 program.
To move the highlighted program, COLLATE2,
to the archive memory, and to move to Figure 17,
we just press the key.
Remember that an entity in the archive space is held
in the calculator but is not available
for us to use in a computation. As it turns out, we want
COLLATE2 back in the working memory.
Becuase it is the highlighted program in Figure 17 we can move it
back to the working memory, and move to
Figure 17a, by pressing the key.
On the other hand we can simply delete a program from the calculator. This is dangerous because once removed the program is really gone. To restore the program we would need to re-enter it, or transfer it from another calculator, or transfer it from a computer.
In Figure 17a the program COLLATE2 is still highlighted.
If we press the  at this point we will
start the process of deleting the program from the calculator.
at this point we will
start the process of deleting the program from the calculator.
 key to move the highlight
to the Yes option, as in Figure 17c.
key to move the highlight
to the Yes option, as in Figure 17c.
 to have the calculator perform that option and move to Figure 17d.
We can get out of this screen, and return to just using the calculator via the
key sequence .
key on
the TI–83 Plus to bring up a screen
similar to the screen in Figure 18.
For the Math 160 class we will be quite satisfied to have all
of the values set on the leftmost option, as shown in Figure 18.
Note that later in the Math 160 course there is a program that modifies the setting of the second line of this screen to set the number of decimal digits displayed to 3 rather than to let that value Float, a setting that causes values to appear with as many decimal digits, up to the limits of the calculator, as is needed. After you are finished with that program you would need to return to this screen to change the setting back to the Float option.
TI 84 Plus (not the color version)
 key sequence
on the TI–84 brings up the screen shown in Figure 19.
This is identical to the screen shown in Figure 10 for the TI–83 Plus.
Just as with the TI–83 Plus we notice that there are
special options on this screen to Archive and to Unarchive specific
items. (Rather than use these items we will demonstrate moving
programs to and from the Archive memory in a different manner.
Figures 23 through 27 will do this.)
The memory on the TI–84 Plus is segmented into two types of
memory. Part of the total memory is reserved for programs and
entities, such as variables,
lists, and matrices, that can be accessed directly.
This is the working memory.
The rest of the memory on the
TI–84 Plus is set aside to hold any such entities
in an archived state. Entities, be they programs or lists
or matrices, or other items, that are in the
Archive are not available to use in doing computations or in
running programs.
The Archive acts as an off-line storage place to hold items.
We would move items to the archive
if we want to free up space in the working memory without
really losing the item.
It is important to note that an item is either in working
memory or in the archive; it cannot be in both at the same time.
key sequence
on the TI–84 brings up the screen shown in Figure 19.
This is identical to the screen shown in Figure 10 for the TI–83 Plus.
Just as with the TI–83 Plus we notice that there are
special options on this screen to Archive and to Unarchive specific
items. (Rather than use these items we will demonstrate moving
programs to and from the Archive memory in a different manner.
Figures 23 through 27 will do this.)
The memory on the TI–84 Plus is segmented into two types of
memory. Part of the total memory is reserved for programs and
entities, such as variables,
lists, and matrices, that can be accessed directly.
This is the working memory.
The rest of the memory on the
TI–84 Plus is set aside to hold any such entities
in an archived state. Entities, be they programs or lists
or matrices, or other items, that are in the
Archive are not available to use in doing computations or in
running programs.
The Archive acts as an off-line storage place to hold items.
We would move items to the archive
if we want to free up space in the working memory without
really losing the item.
It is important to note that an item is either in working
memory or in the archive; it cannot be in both at the same time.
Before we go further into the use of the working and the archived memory,
we will look at the first option, About.
In Figure 19, the highlight is on that option so we can just press the
to move to Figure 20.
Depending upon the age of the calculator, and upon whether or not the software on the calculator has been updated, there are a number of different versions of the operating system software for the TI–84 Plus. All of them behave the same way as far as the first part of this discussion goes. The big change will not become apparent until Figure 31.
We want to go back to look at more items on the MEMORY screen. Therefore,
we press the key sequence
to return to that
screen, as shown in Figure 21.
 key to move the highlight to the second option,
namely, to Mem Mgmt/Del... We can have the calculator perform that option
by pressing the key, taking us to Figure 22.
key to move the highlight to the second option,
namely, to Mem Mgmt/Del... We can have the calculator perform that option
by pressing the key, taking us to Figure 22.
 key to move the highlight down to the 7th
option, Prgm... Once there we just press the
key to move to Figure 15.
key to move the highlight down to the 7th
option, Prgm... Once there we just press the
key to move to Figure 15.
[Note that instead of moving the highlight, we could have just pressed the
key to perform the 7th option.
This is true even if the 7th option is not visible, as was
the case in Figure 22.]
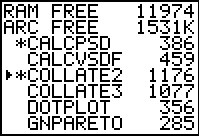
Programs that are in working memory are listed without an asterisk before the program name; programs that reside in the archive are listed with an asterisk before the program name. Therefore, CALCPSD is currently in the archive, while the rest of the programs shown in Figure 24 are in working memory. Our plan is to move COLLATE2 from working memory to the archive memory. To do this we will have to move the highlight to point to the COLLATE2 program.
 key to move the highlight to point to
COLLATE2.
Once the program is highlighted, we
press the
key to move that
program from the working memory to the archive memory; this is shown in Figure 26.
key to move the highlight to point to
COLLATE2.
Once the program is highlighted, we
press the
key to move that
program from the working memory to the archive memory; this is shown in Figure 26.
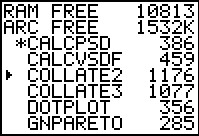
Press the again and the COLLATE2 program moves back to working memory
as shown in Figure 27.
 key to start
the process of deleting
that program.
key to start
the process of deleting
that program.
 key to move the highlight
to the Yes option, as in Figure 29.
key to move the highlight
to the Yes option, as in Figure 29.
 to have the calculator perform that option and move to Figure 30.
We can get out of this screen, and return to just using the calculator via the
key sequence .
Specifically for Version 2.43
 key on
the TI–83 Plus to bring up a screen
similar to the screen in Figure 31. [Attention: the screen
shown here is from the calculator that we have been using to generate these images.
In particular, that calculator was running version
2.43 of the operating system software, as was shown in Figure 20.
The newer version of the software, version 2.55 MP
produces a different screen. Move to Figure 34 to see that version.]
For the Math 160 class we will be quite satisfied to have all
of the values set on the leftmost option, as shown in Figure 31.
It is somewhat interesting to note that the format of the
display has changed slightly from that used in the earlier TI calculators,
but that the only new feature is the
inclusion of a system clock.
key on
the TI–83 Plus to bring up a screen
similar to the screen in Figure 31. [Attention: the screen
shown here is from the calculator that we have been using to generate these images.
In particular, that calculator was running version
2.43 of the operating system software, as was shown in Figure 20.
The newer version of the software, version 2.55 MP
produces a different screen. Move to Figure 34 to see that version.]
For the Math 160 class we will be quite satisfied to have all
of the values set on the leftmost option, as shown in Figure 31.
It is somewhat interesting to note that the format of the
display has changed slightly from that used in the earlier TI calculators,
but that the only new feature is the
inclusion of a system clock.
Note that later in the Math 160 course there is a program that modifies the setting of the second line of this screen to set the number of decimal digits displayed to 3 rather than to let that value Float, a setting that causes values to appear with as many decimal digits, up to the limits of the calculator, as is needed. After you are finished with that program you would need to return to this screen to change the setting back to the Float option.
For Version 2.55 MP
Press to move to the
MEMORY page.
Then press to perform the ABOUT option.
For Version 2.55 MP
We exit this screen via the
key sequence.
For Version 2.55 MP
 key,
we start to see the change in the options and capabilities of the
new operating system software.
Comparing this screen to the screen, shown in Figure 31
for the older software, we see that the clock has
been replaced by a NEXT line at the
bottom of the screen. This is the only change that is obvious at this time.
key,
we start to see the change in the options and capabilities of the
new operating system software.
Comparing this screen to the screen, shown in Figure 31
for the older software, we see that the clock has
been replaced by a NEXT line at the
bottom of the screen. This is the only change that is obvious at this time.
However, if we use the
key to move to that NEXT option,
the screen changes to that shown in Figure 35.
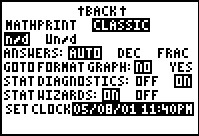
For Version 2.55 MP

 whereas
the "MATHPRINT" version displays as
whereas
the "MATHPRINT" version displays as
 .
.
It may seem silly to forego the improvement in the display available through the "MATHPRINT" option. However, in writing all of the support pages for the course one needs to recognize that there are still students using the older calculators or using the older versions of the operating system on the newer calculators. Those students do not have the option to use the MATHPRINT feature because it is not on their calculator. Therefore, it is just easier to just assume that everyone is using the "CLASSIC" display.
To be consistent with the other calculators, use the
 key to move the
blinking indicator to the CLASSIC option, then press the
key to change the option to
the CLASSIC mode. This has been done
on this calculator as shown in Figure 36.
key to move the
blinking indicator to the CLASSIC option, then press the
key to change the option to
the CLASSIC mode. This has been done
on this calculator as shown in Figure 36.
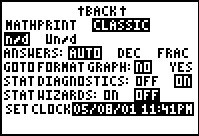
For Version 2.55 MP
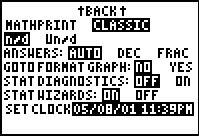 key to move to the fifth option on the page,
STATDIAGNOSTICS. The default, shown in Figure 36, is to have this turned off.
As it turns out, for the Math 160 class, there is only one place where
we need this turned ON, but there is no harm in having it on all the
time. We can turn STATDIAGNOSTICS "ON" by using the
key to move the blinking indicator to the ON option,
then press to set the option to "ON".
key to move to the fifth option on the page,
STATDIAGNOSTICS. The default, shown in Figure 36, is to have this turned off.
As it turns out, for the Math 160 class, there is only one place where
we need this turned ON, but there is no harm in having it on all the
time. We can turn STATDIAGNOSTICS "ON" by using the
key to move the blinking indicator to the ON option,
then press to set the option to "ON".
For Version 2.55 MP
 key to move the blinking option to the next line, the
STATWIZARDS option. By default, this option is "ON", as shown in Figure 37.
The STATWIZARDS feature is interesting, but, as before,
to have this calculator function as do the earlier calculators
we will turn this option "OFF".
To do this use the
key to move the blinking indicator to the "OFF"
value and then press the key to select that setting.
The result is shown in Figure 38.
key to move the blinking option to the next line, the
STATWIZARDS option. By default, this option is "ON", as shown in Figure 37.
The STATWIZARDS feature is interesting, but, as before,
to have this calculator function as do the earlier calculators
we will turn this option "OFF".
To do this use the
key to move the blinking indicator to the "OFF"
value and then press the key to select that setting.
The result is shown in Figure 38.
For Version 2.55 MP
The key sequence exits this
option page and returns the calculator to its normal screen.
TI–84 Plus C (the color version) | |
|
For the color TI–84 Plus C 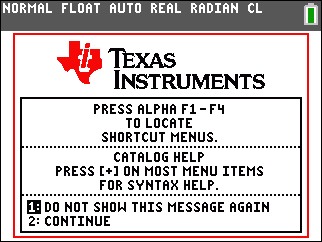
These images have been reduced to save space for those who print out these pages. |
Figure 39 shows the splash screen that comes up on a new TI–84 Plus C
calculator. The difference in the quality of the display between this calculator
and the earlier versions presented above should be obvious. Not only do we have color, the
resolution of the screen is much higher than was that of the
earlier versions. From the TI–83 (introduced in 1996) through the currently sold
TI–83 Plus (introduced in 1999), the TI–84 Plus (introduced in 2004
and including the Silver Edition of the same) the TI screens have had a resolution of
95 pixels across the screen and 63 pixels top to bottom of the
screen. The TI–84 Plus C (introduced in 2013) produces graphs
with 265 pixels across the graph and 165 pixels from the top to the bottom of the graph.
Some note should be made here that the screen on the TI–84 Plus C calculator actually has a resolution of about 320 by 240 pixels but that the graphing area is only 265 by 165. Furthermore, that screen resolution is significantly lower than the resolution on most current smart phones. Given the better resolution on its screen, the TI–84 Plus C expands its main display (the non-graphing disply) to hold 26 characters across the screen and ten lines of characters down the screen. These values are different from the earlier versions of the calculator that only had 16 characters across the screen and 8 lines of text on the screen. The splash screen shown in Figure 39 explains two new features of the TI–84 Plus C calculator. In particular, there are now some shortcut menus, accessed by using the ALPHA key and then one of the F1 through F4 keys. Also, when you are using the menus, pressing the + key will often bring up a small help screen showing the appropriate syntax for that command. |
|
For color TI–84 Plus C 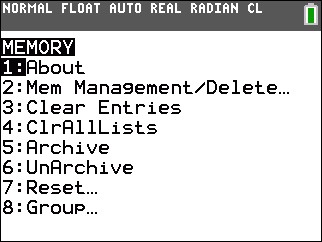 |
Pressing the
key sequence
on the TI–84 Plus C brings up the screen shown in Figure 40.
This is similar to the screen shown in Figure 10 for the TI–83 Plus.
The difference is that this screen has more available display area.
Therefore, option 2 is expanded and option 8 is displayed on the screen.
Just as with the TI–83 Plus we notice that there are
special options on this screen to Archive and to Unarchive specific
items. The memory on the TI–84 Plus C is segmented into two types of
memory. Part of the total memory is reserved for programs and
entities, such as variables,
lists, and matrices, that can be accessed directly.
This is the working memory.
The rest of the memory on the
TI–84 Plus C is set aside to hold any such entities
in an archived state. Entities, be they programs or lists
or matrices, or other items, that are in the
Archive are not available to use in doing computations or in
running programs.
The Archive acts as an off-line storage place to hold items.
We would move items to the archive
if we want to free up space in the working memory without
really losing the item.
It is important to note that an item is either in working
memory or in the archive; it cannot be in both at the same time.
Before we go further into the use of the working and the archived memory,
we will look at the first option, About.
In Figure 40, the highlight is on that option so we can just press the
|
|
For the color TI–84 Plus C 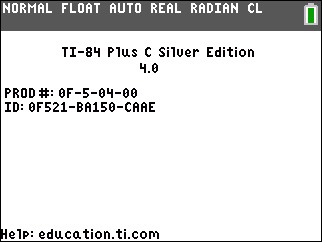 |
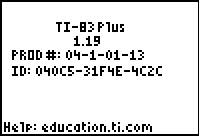
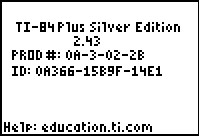
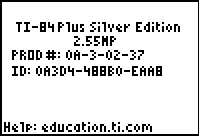
This screen tells us that this is indeed a
TI–84 Plus C Silver Edition calculator, that it is running
version 4.0 of the operating system software,
and we learn the product number and
the ID number for this calculator.
Finally, at the bottom of the screen we see that we are directed to
the web page education.ti.com for help.
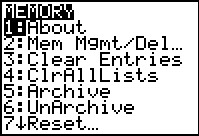
We want to go back to look at more items on the MEMORY screen. Therefore,
we press the key sequence
|
|
For the color TI–84 Plus C 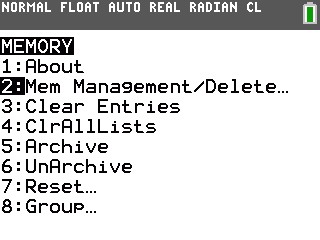 |
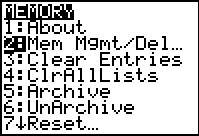
We have not only returned to the MEMORY screen, we have used the
key to move the highlight to the second option,
namely, to Mem Management/Delete...
We can have the calculator perform that option
by pressing the key, taking us to Figure 43.
|
|
For color TI–84 Plus C 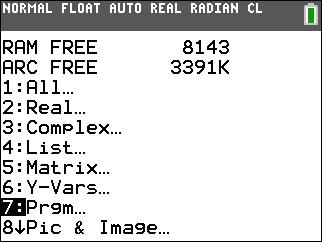 |
Figure 43 gives two pieces of information and then a list of options
for the next action. The information is the amount of
RAM memory, that is the amount of working memory, that is free and the amount
of ARChive memory that is free to hold additional entities.
The free working memory is called RAM FREE.
On the calculator used to
generate these images, at the moment of taking this image, there were
8,143 bytes of working memory free and 3,391K bytes (essentially 3.4 megabytes)
of archive memory free.
For the purposes of the Math 160 class, having 4,000 or
more bytes free should be sufficient to
run any programs or generate any data that we will be asked to do.
To demonstrate the use of archive memory, we will move a program, COLLATE2, from
working memory to archive memory. To get to the list of programs we have
used the
[Note that instead of moving the highlight, we could have just pressed the
|
|
For the color TI–84 Plus C 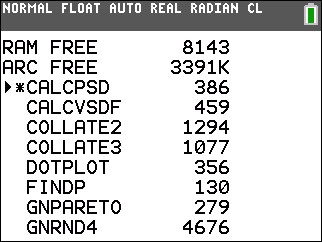 |
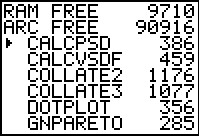
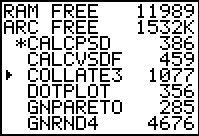
Figure 44 continues to display the amount of free working memory and
the amount of free archive memory. In addition, Figure 44 starts
an alphabetic list of the programs that are installed on this calculator.
Each program is given with its size, that is,
with the number of bytes needed to store the program.
Thus, CALCPSD uses 386 bytes, CALCVSDF uses 459 bytes,
COLLATE2 uses 1,294 bytes, and so on.
Programs that are in working memory are listed without an asterisk before the program name; programs that reside in the archive are listed with an asterisk before the program name. Therefore, CALCPSD is currently in the archive, while the rest of the programs shown in Figure 44 are in working memory. Our plan is to move COLLATE2 from working memory to the archive memory. To do this we will have to move the highlight to point to the COLLATE2 program. |
|
For the color TI–84 Plus C 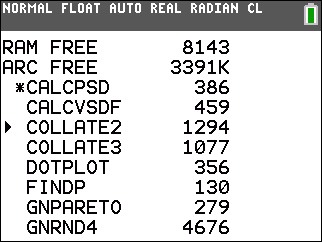 |
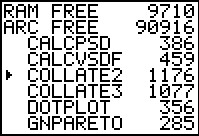
To change Figure 44 to Figure 45 we pressed the
key to move the highlight to point to
COLLATE2.
Once the program is highlighted, we
press the
key to move that
program from the working memory to the archive memory; this is shown in Figure 46.
|
|
For color TI–84 Plus C 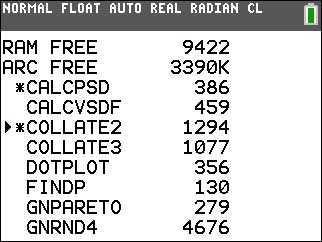 |
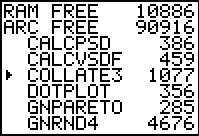
The COLLATE2 program now has an asterisk before it, the working memory
has increased to 9,422 bytes and the archive memory has decreased to 3,390 kilobytes.
There is so much archive memory on this calculator that the change is hardly noticeable.
Press the |
|
For the color TI–84 Plus C  |
The TI–84 Plus–C calculator has so much archive memory that there
should be little or no need to ever remove a program from the calculator.
However, if you wanted to remove the program, you would use this same screen.
With the highlight pointing
to COLLATE2 we simply press the
key to start the process of deleting
that program.
|
|
For the color TI–84 Plus C 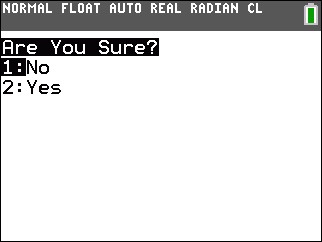 |
The TI–84 Plus C is cautious enough about deleting an entity that it
responds with the screen shown in Figure 48. If we are not serious
about removing the program then we can just take the No option.
If we really want to remove the program then we press
the key to move the highlight
to the Yes option, as in Figure 49.
|
|
For color TI–84 Plus C 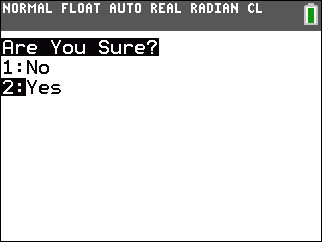
|
Here the Yes option is highlighted and we press
to have the calculator perform that option and move to Figure 50.
|
|
For the color TI–84 Plus C 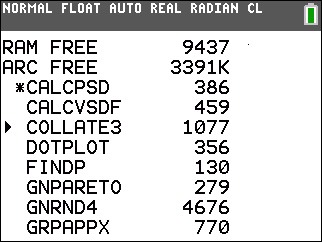 |
In Figure 50 we note that COLLATE2 is no longer on the calculator. Furthermore, the
free working memory has now increased to 9,437 bytes. Note that the
amount of free archive memory remains unchanged. After all, we
deleted the program from working memory and we did nothing to the archive memory.
We can get out of this screen, and return to just using the calculator via the
key sequence |
|
For the color TI–84 Plus C 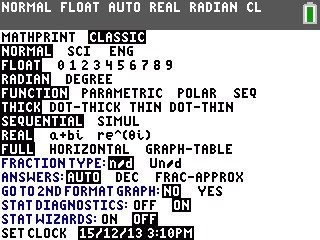 |
When we move to the MODE display, via the key,
we see that the options are the same as they are on the 2.55MP
version of the software on the
TI–84 Plus, except that with the better resolution of the
TI–84 Plus C screen all of the options are displayed on one screen.
The screen shown in Figure 51 has the options set the same way we set them back in Figures 36 through 38. |
©Roger M. Palay
Saline, MI 48176
December, 2013